Changelog

Follow new updates and improvements to Growably.

Schema management at Website/Funnel level

We’re launching a Schema markup dashboard at the website and funnel level, under the new SEO & AEO tab. User no longer need to open each page in the builder to check or fix its schema. From one screen, user can:

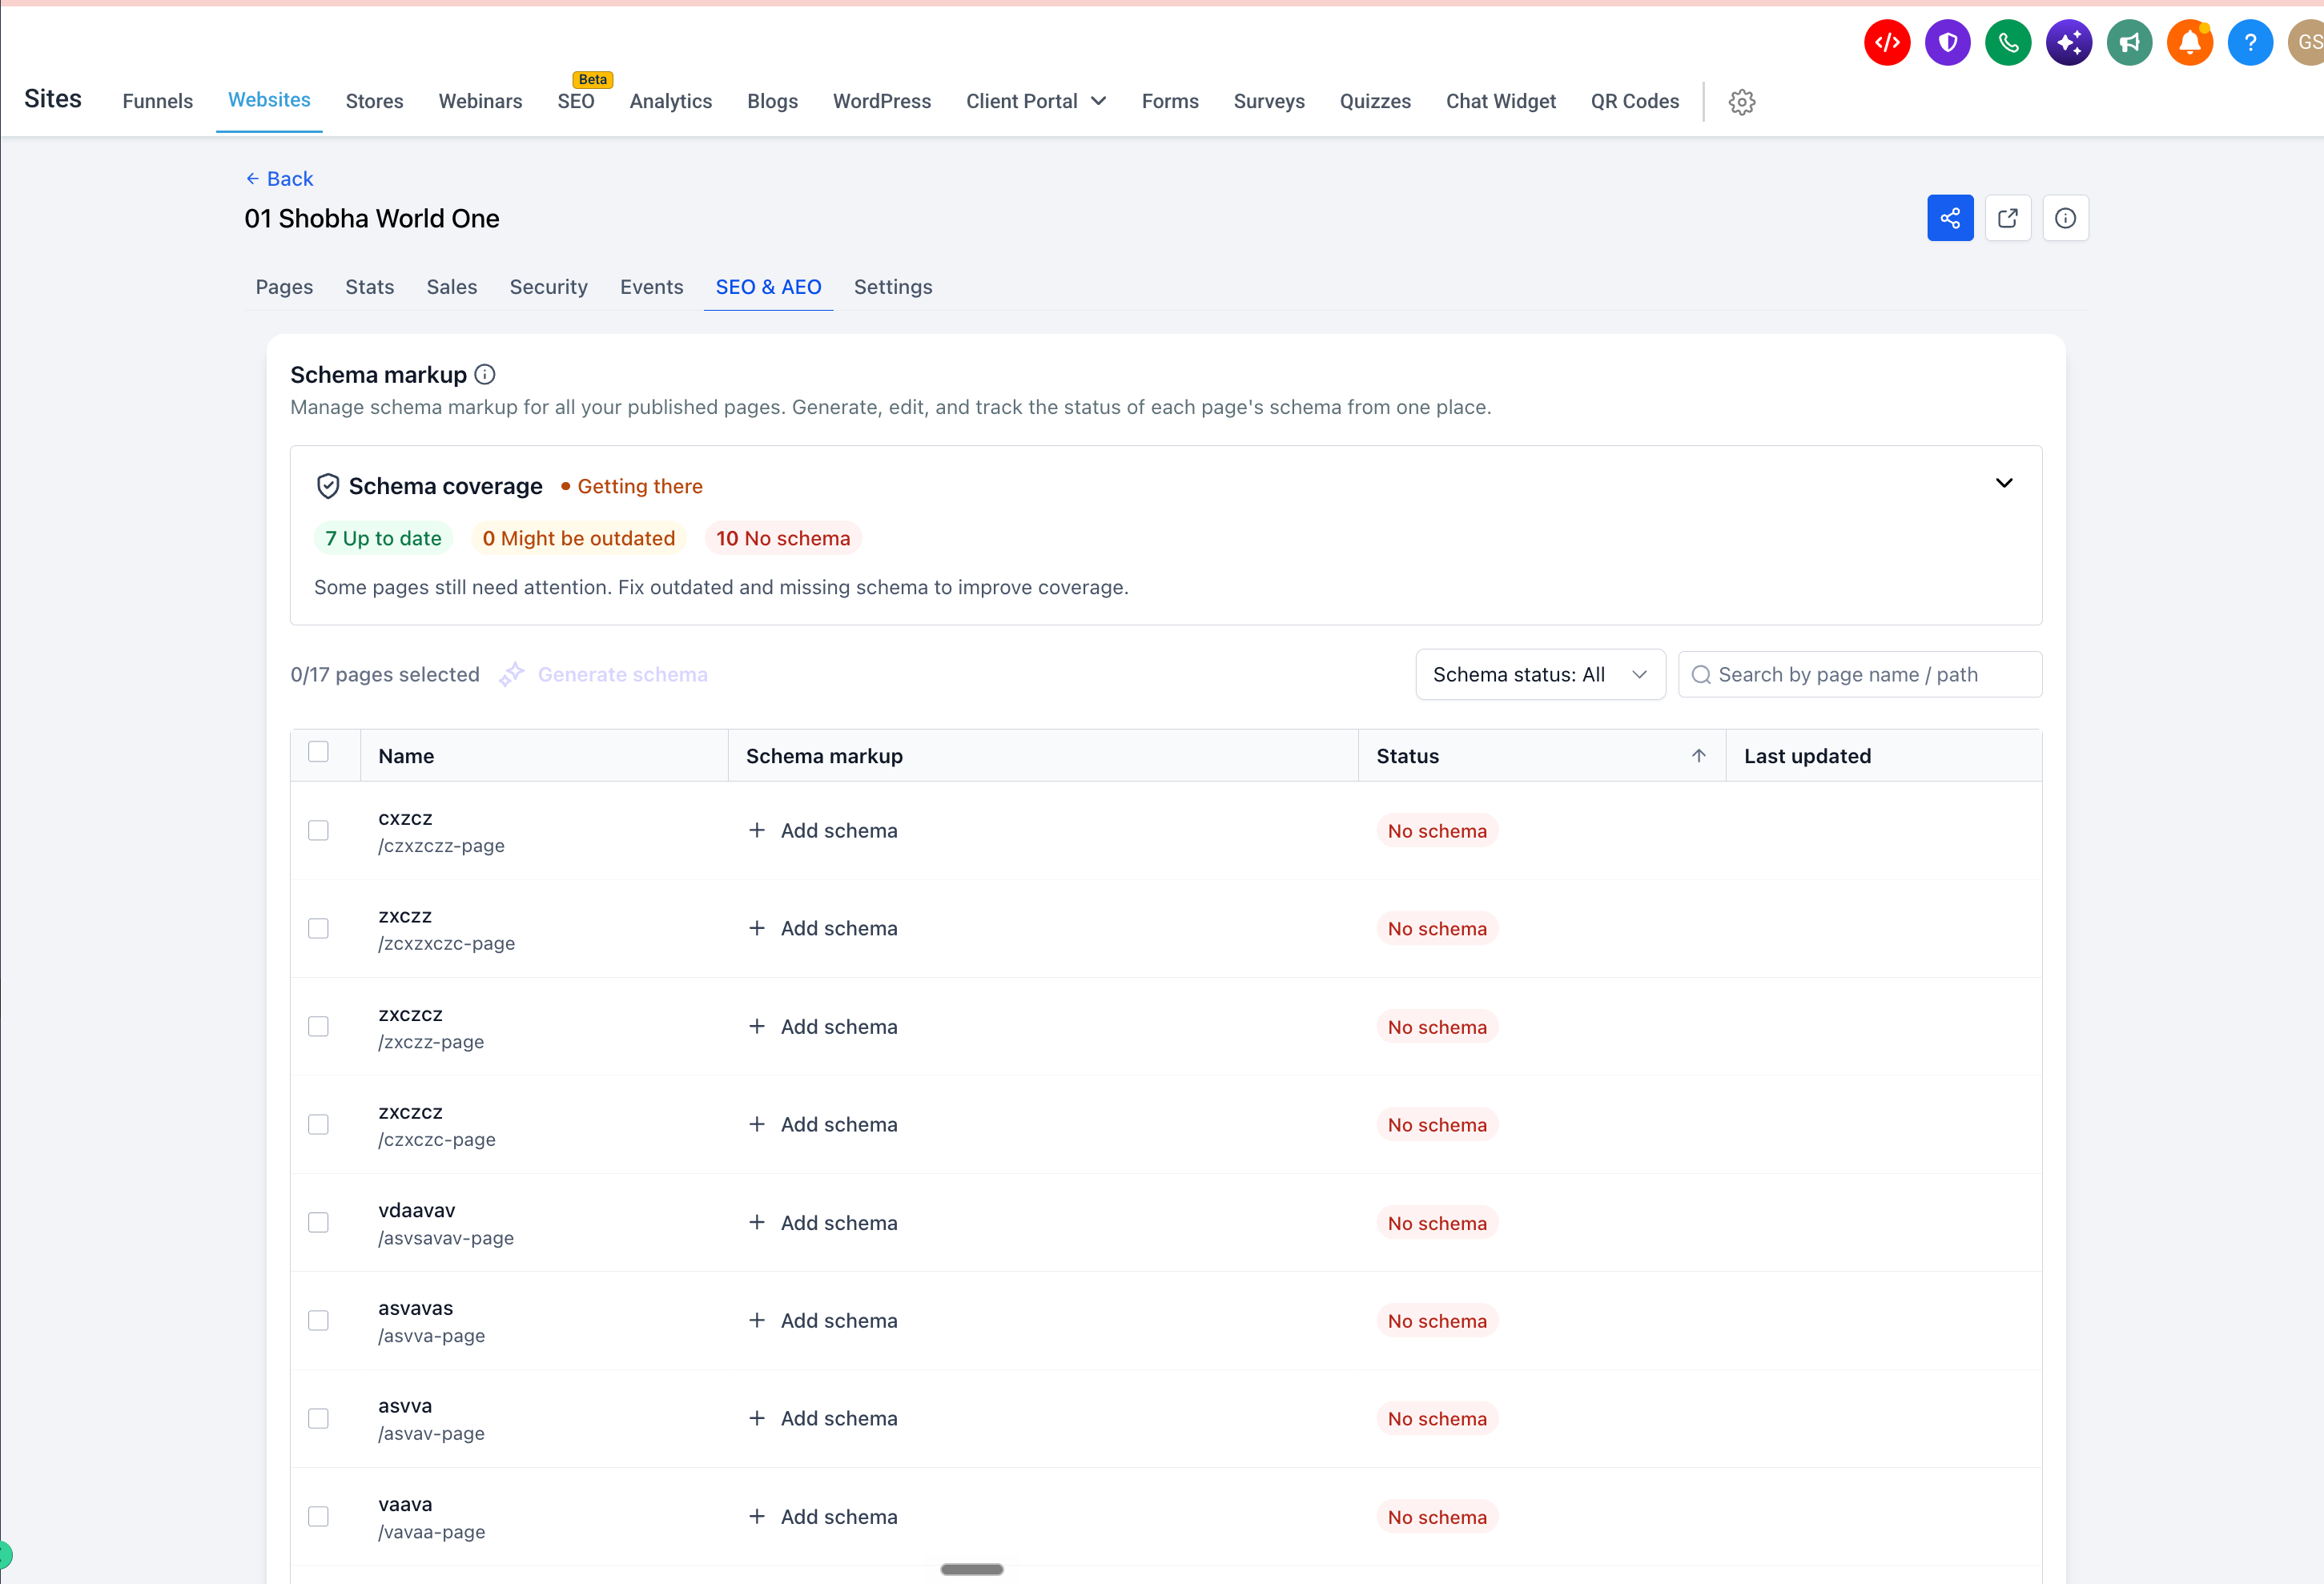
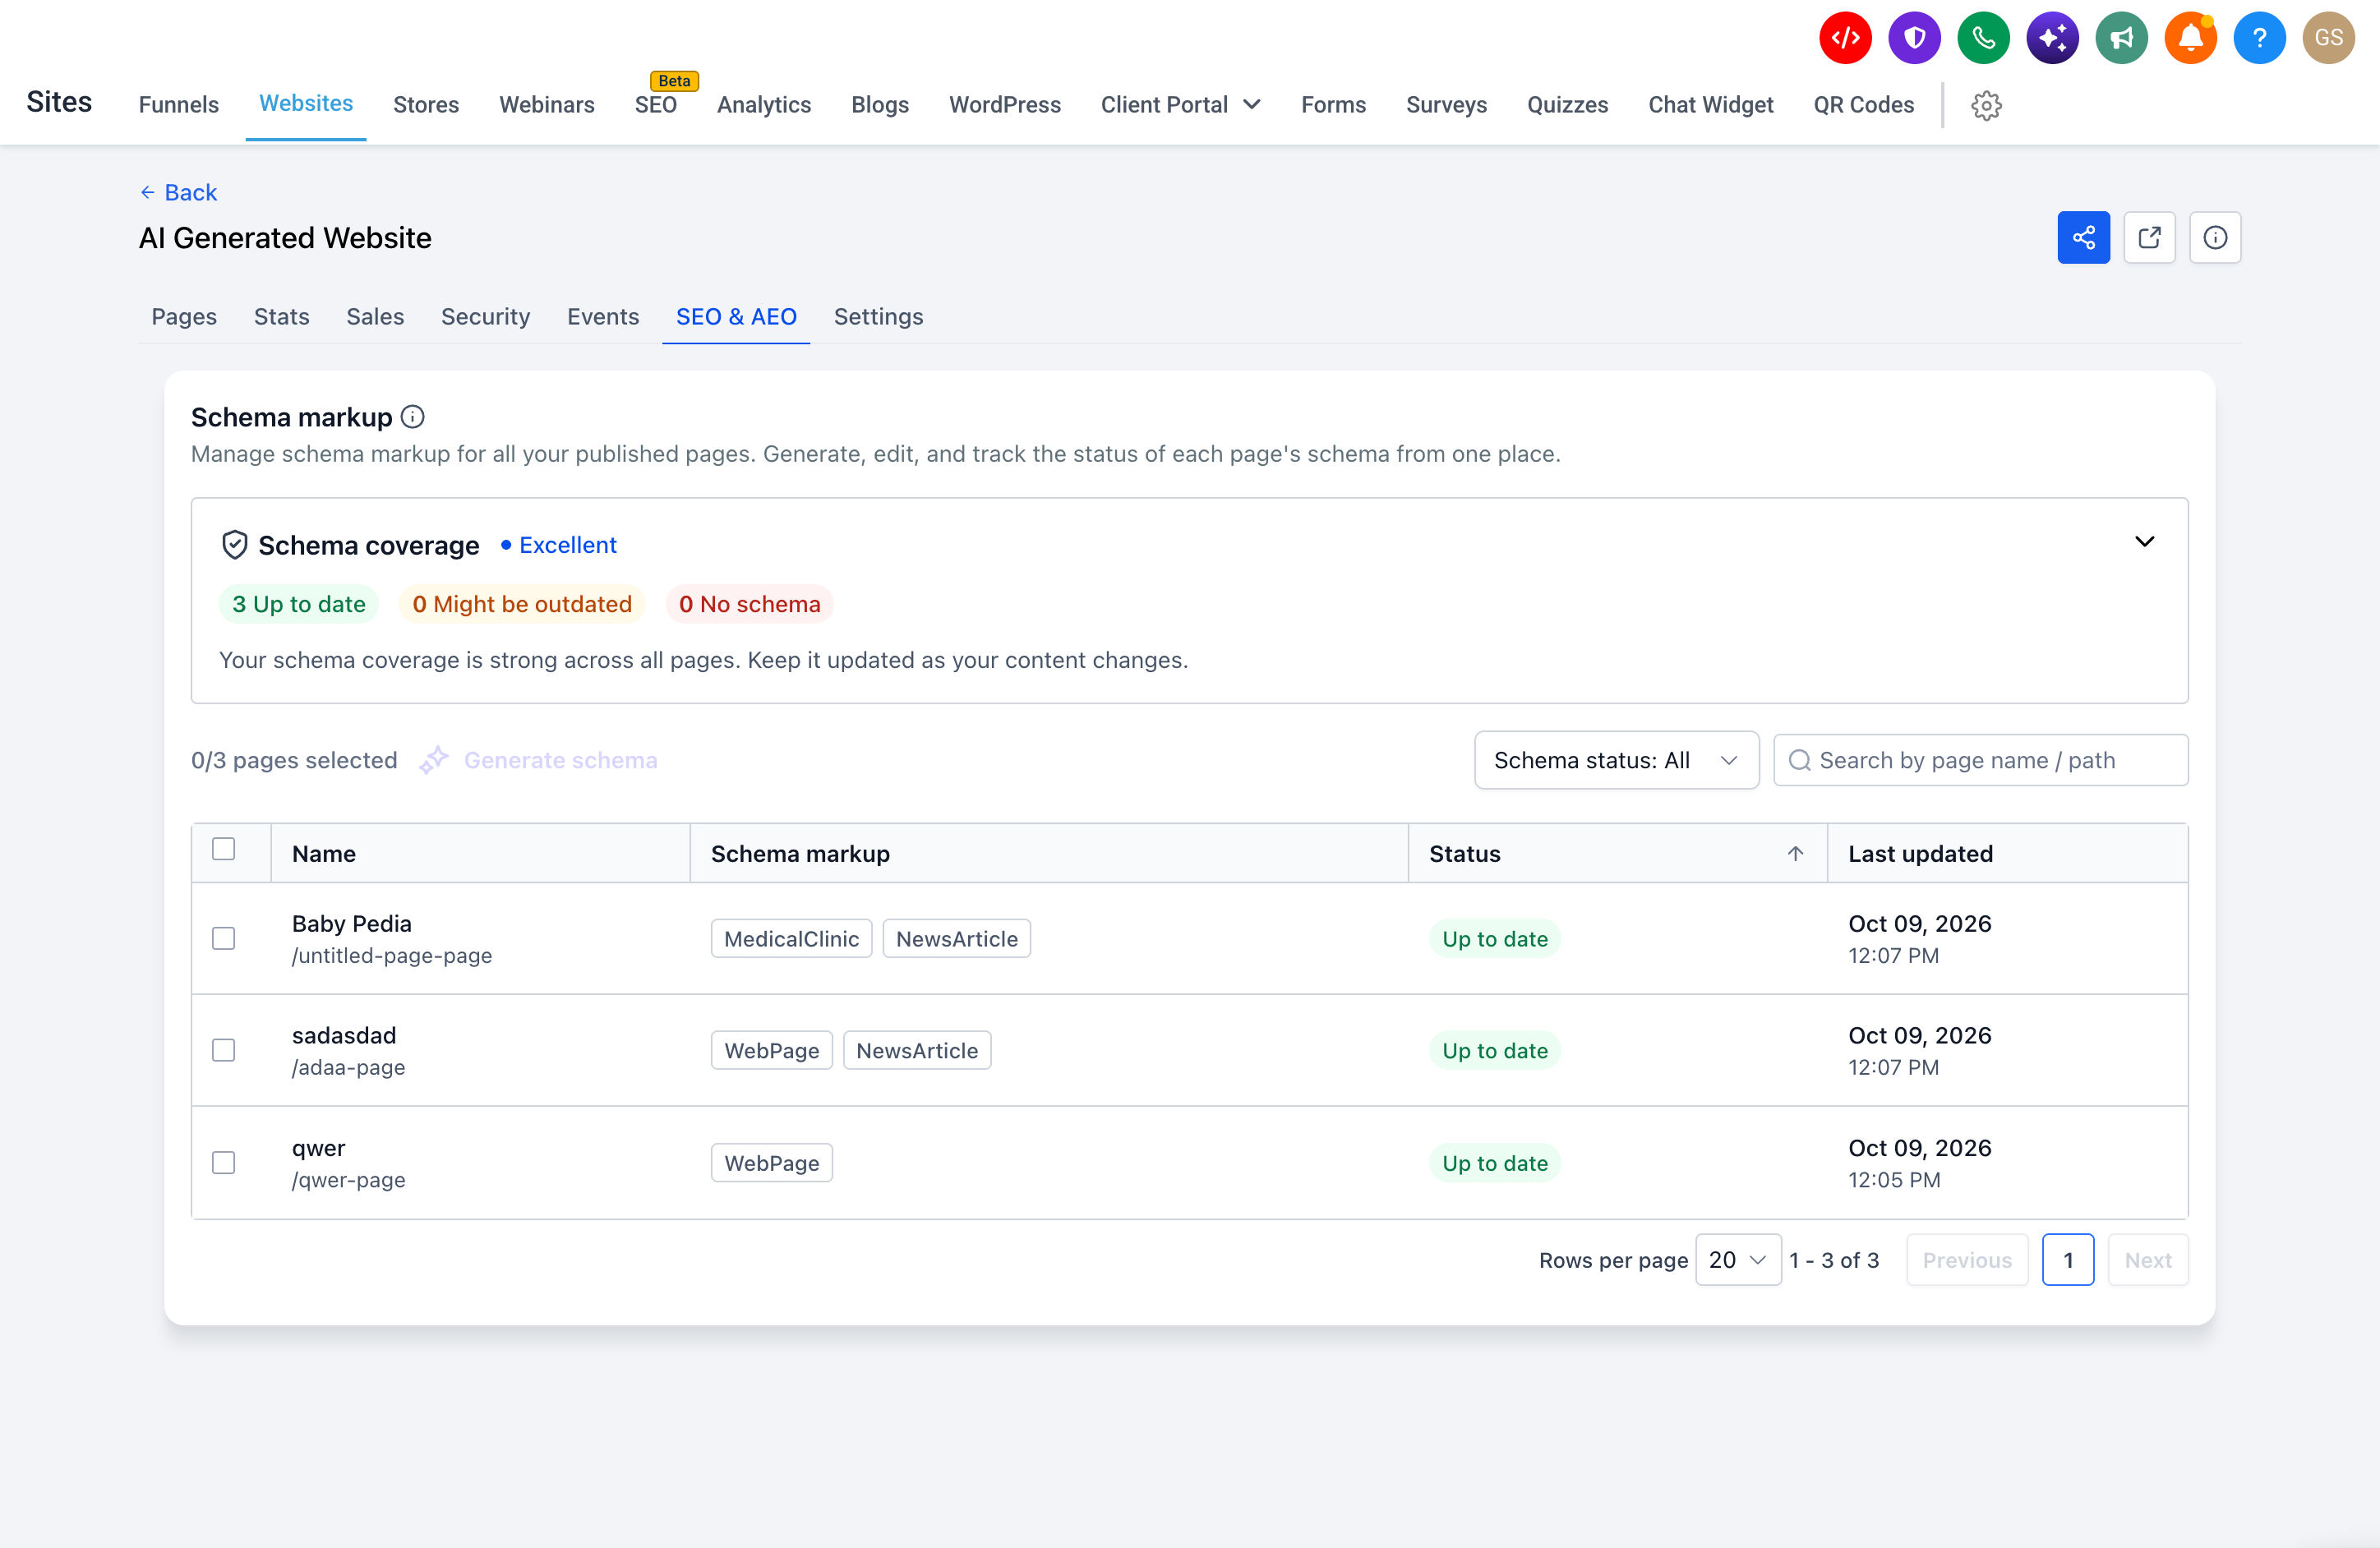
  • See overall schema health. The Schema coverage card rates your site as Needs work, Getting there, Good, or Excellent, with counts for Up to date, Might be outdated, and No schema.

  • Check every page at a glance. Each page shows its schema types, its status (Up to date / Might be outdated / No schema / Unpublished / Unsaved), and when it was last updated.

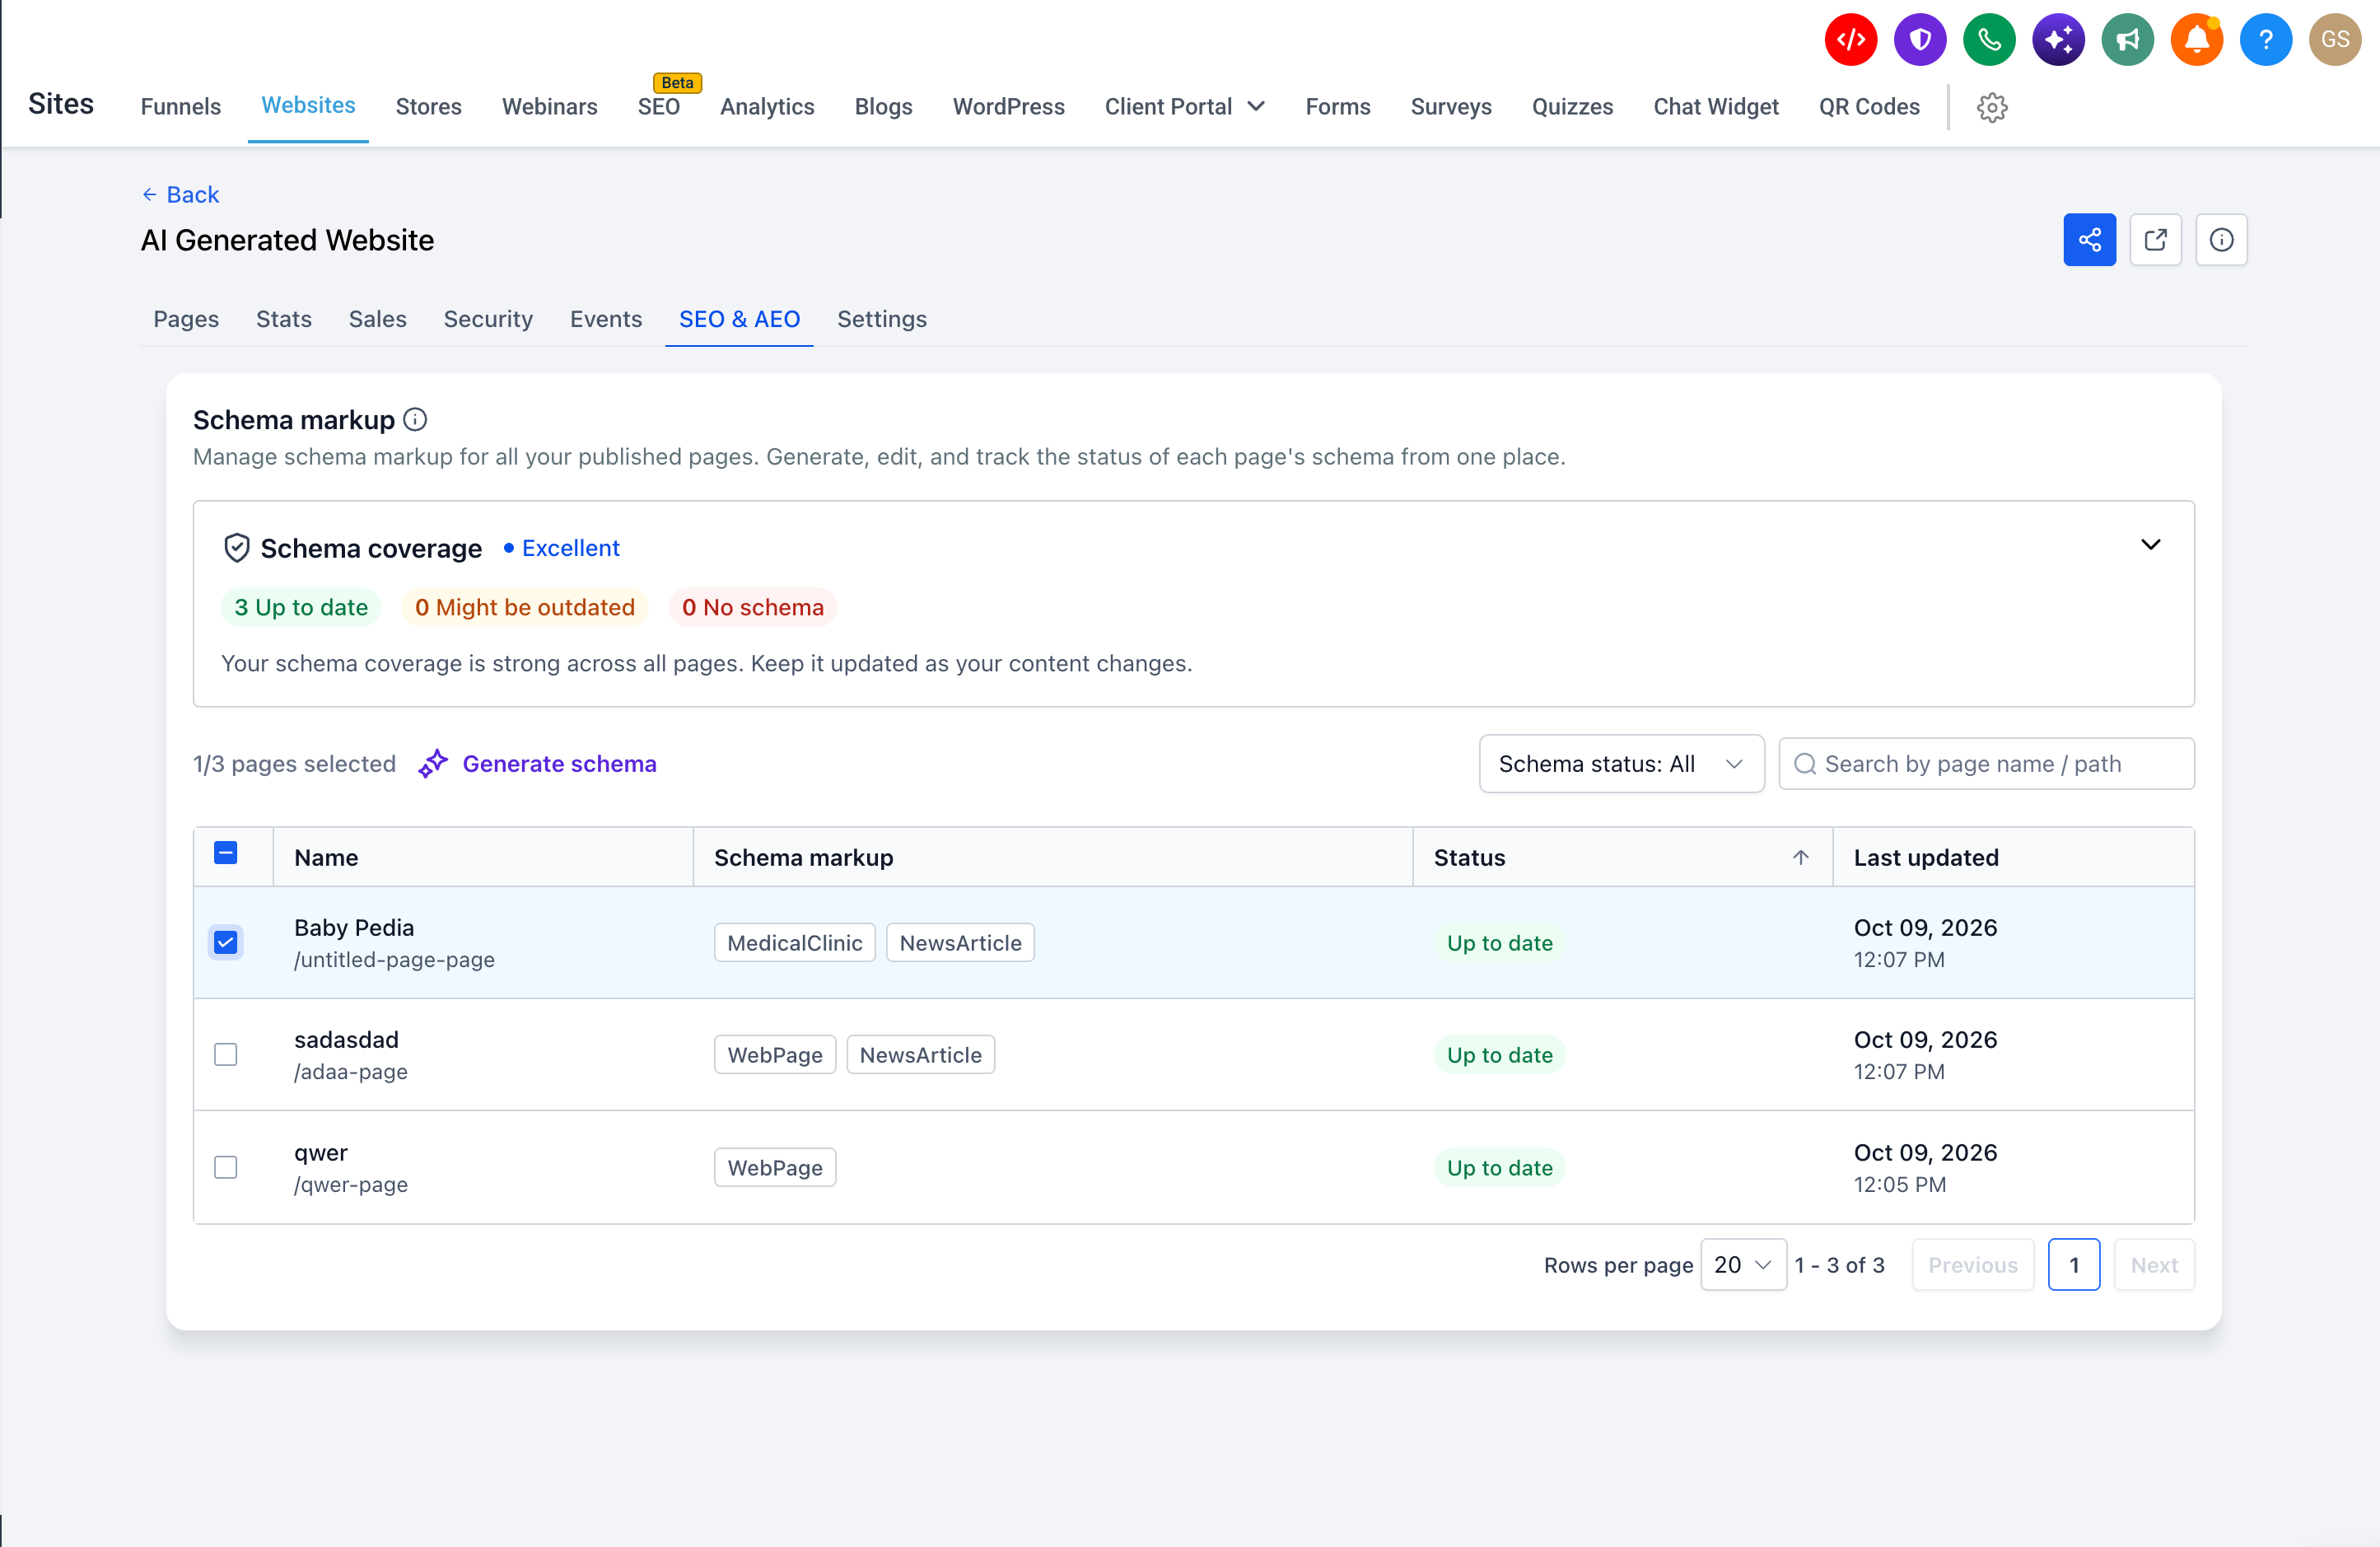
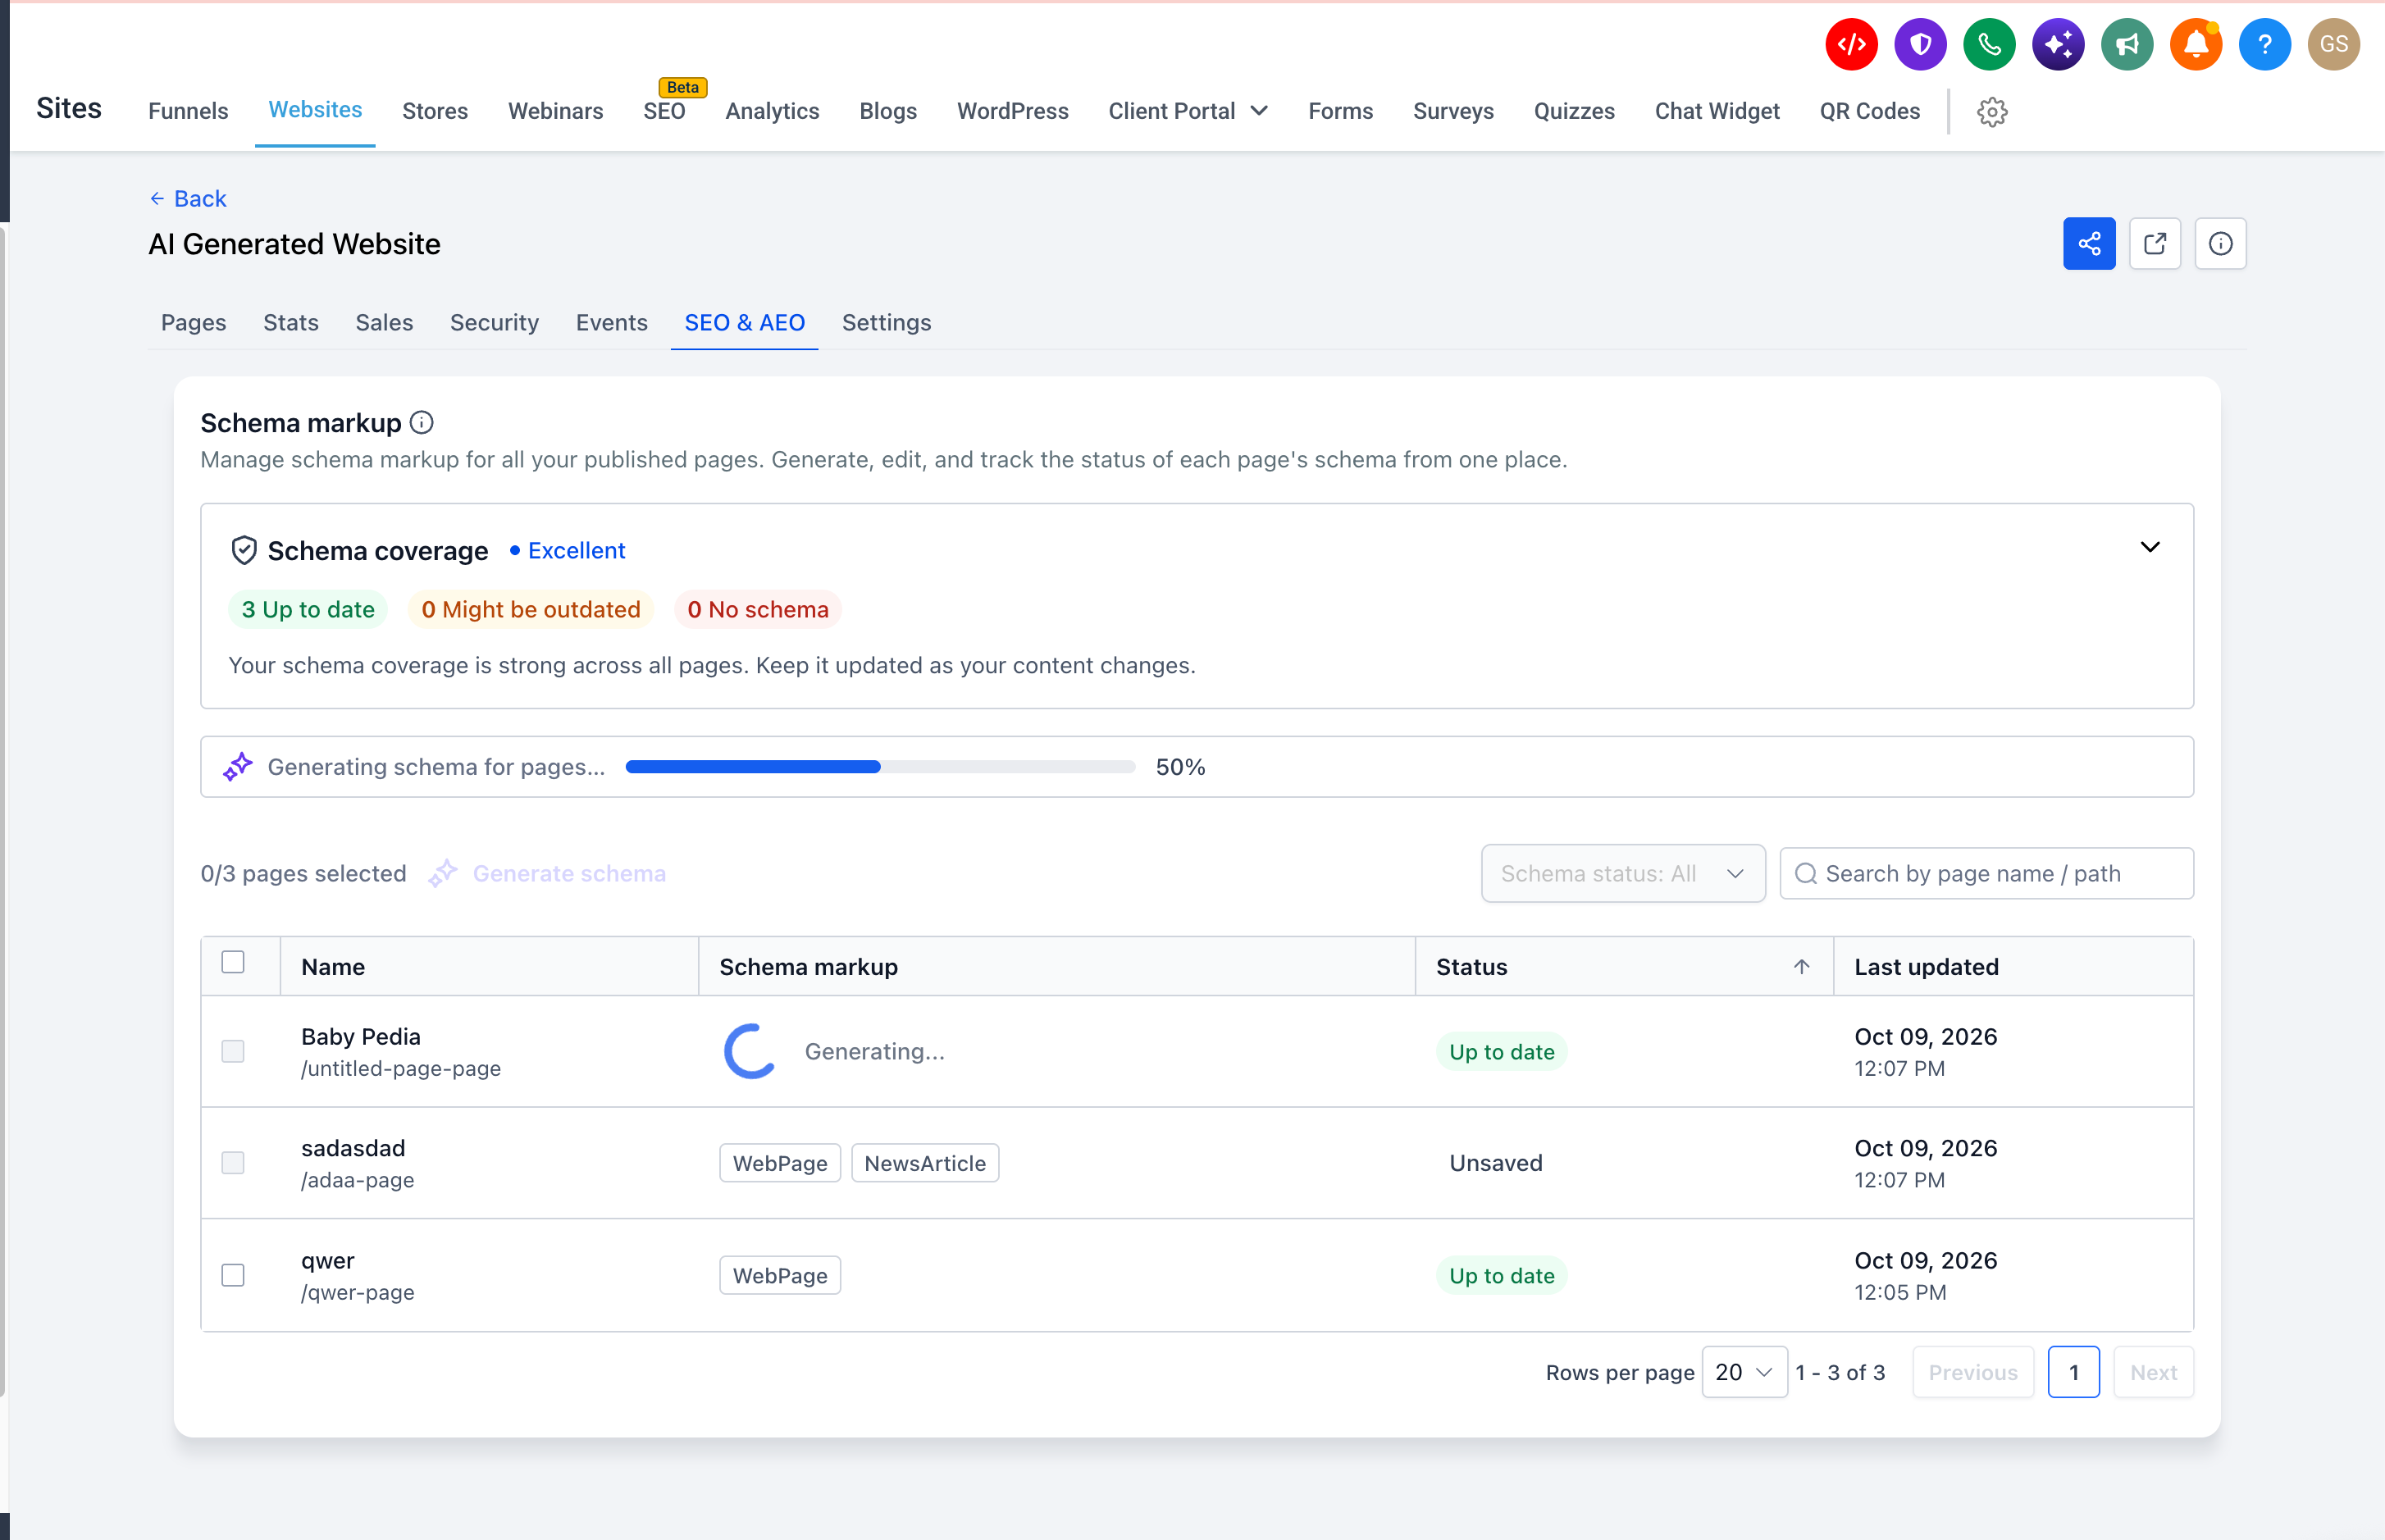
  • Generate schema with AI, one page or many. Select pages and click Generate schema. Progress shows live, and results appear for your review before anything goes live.

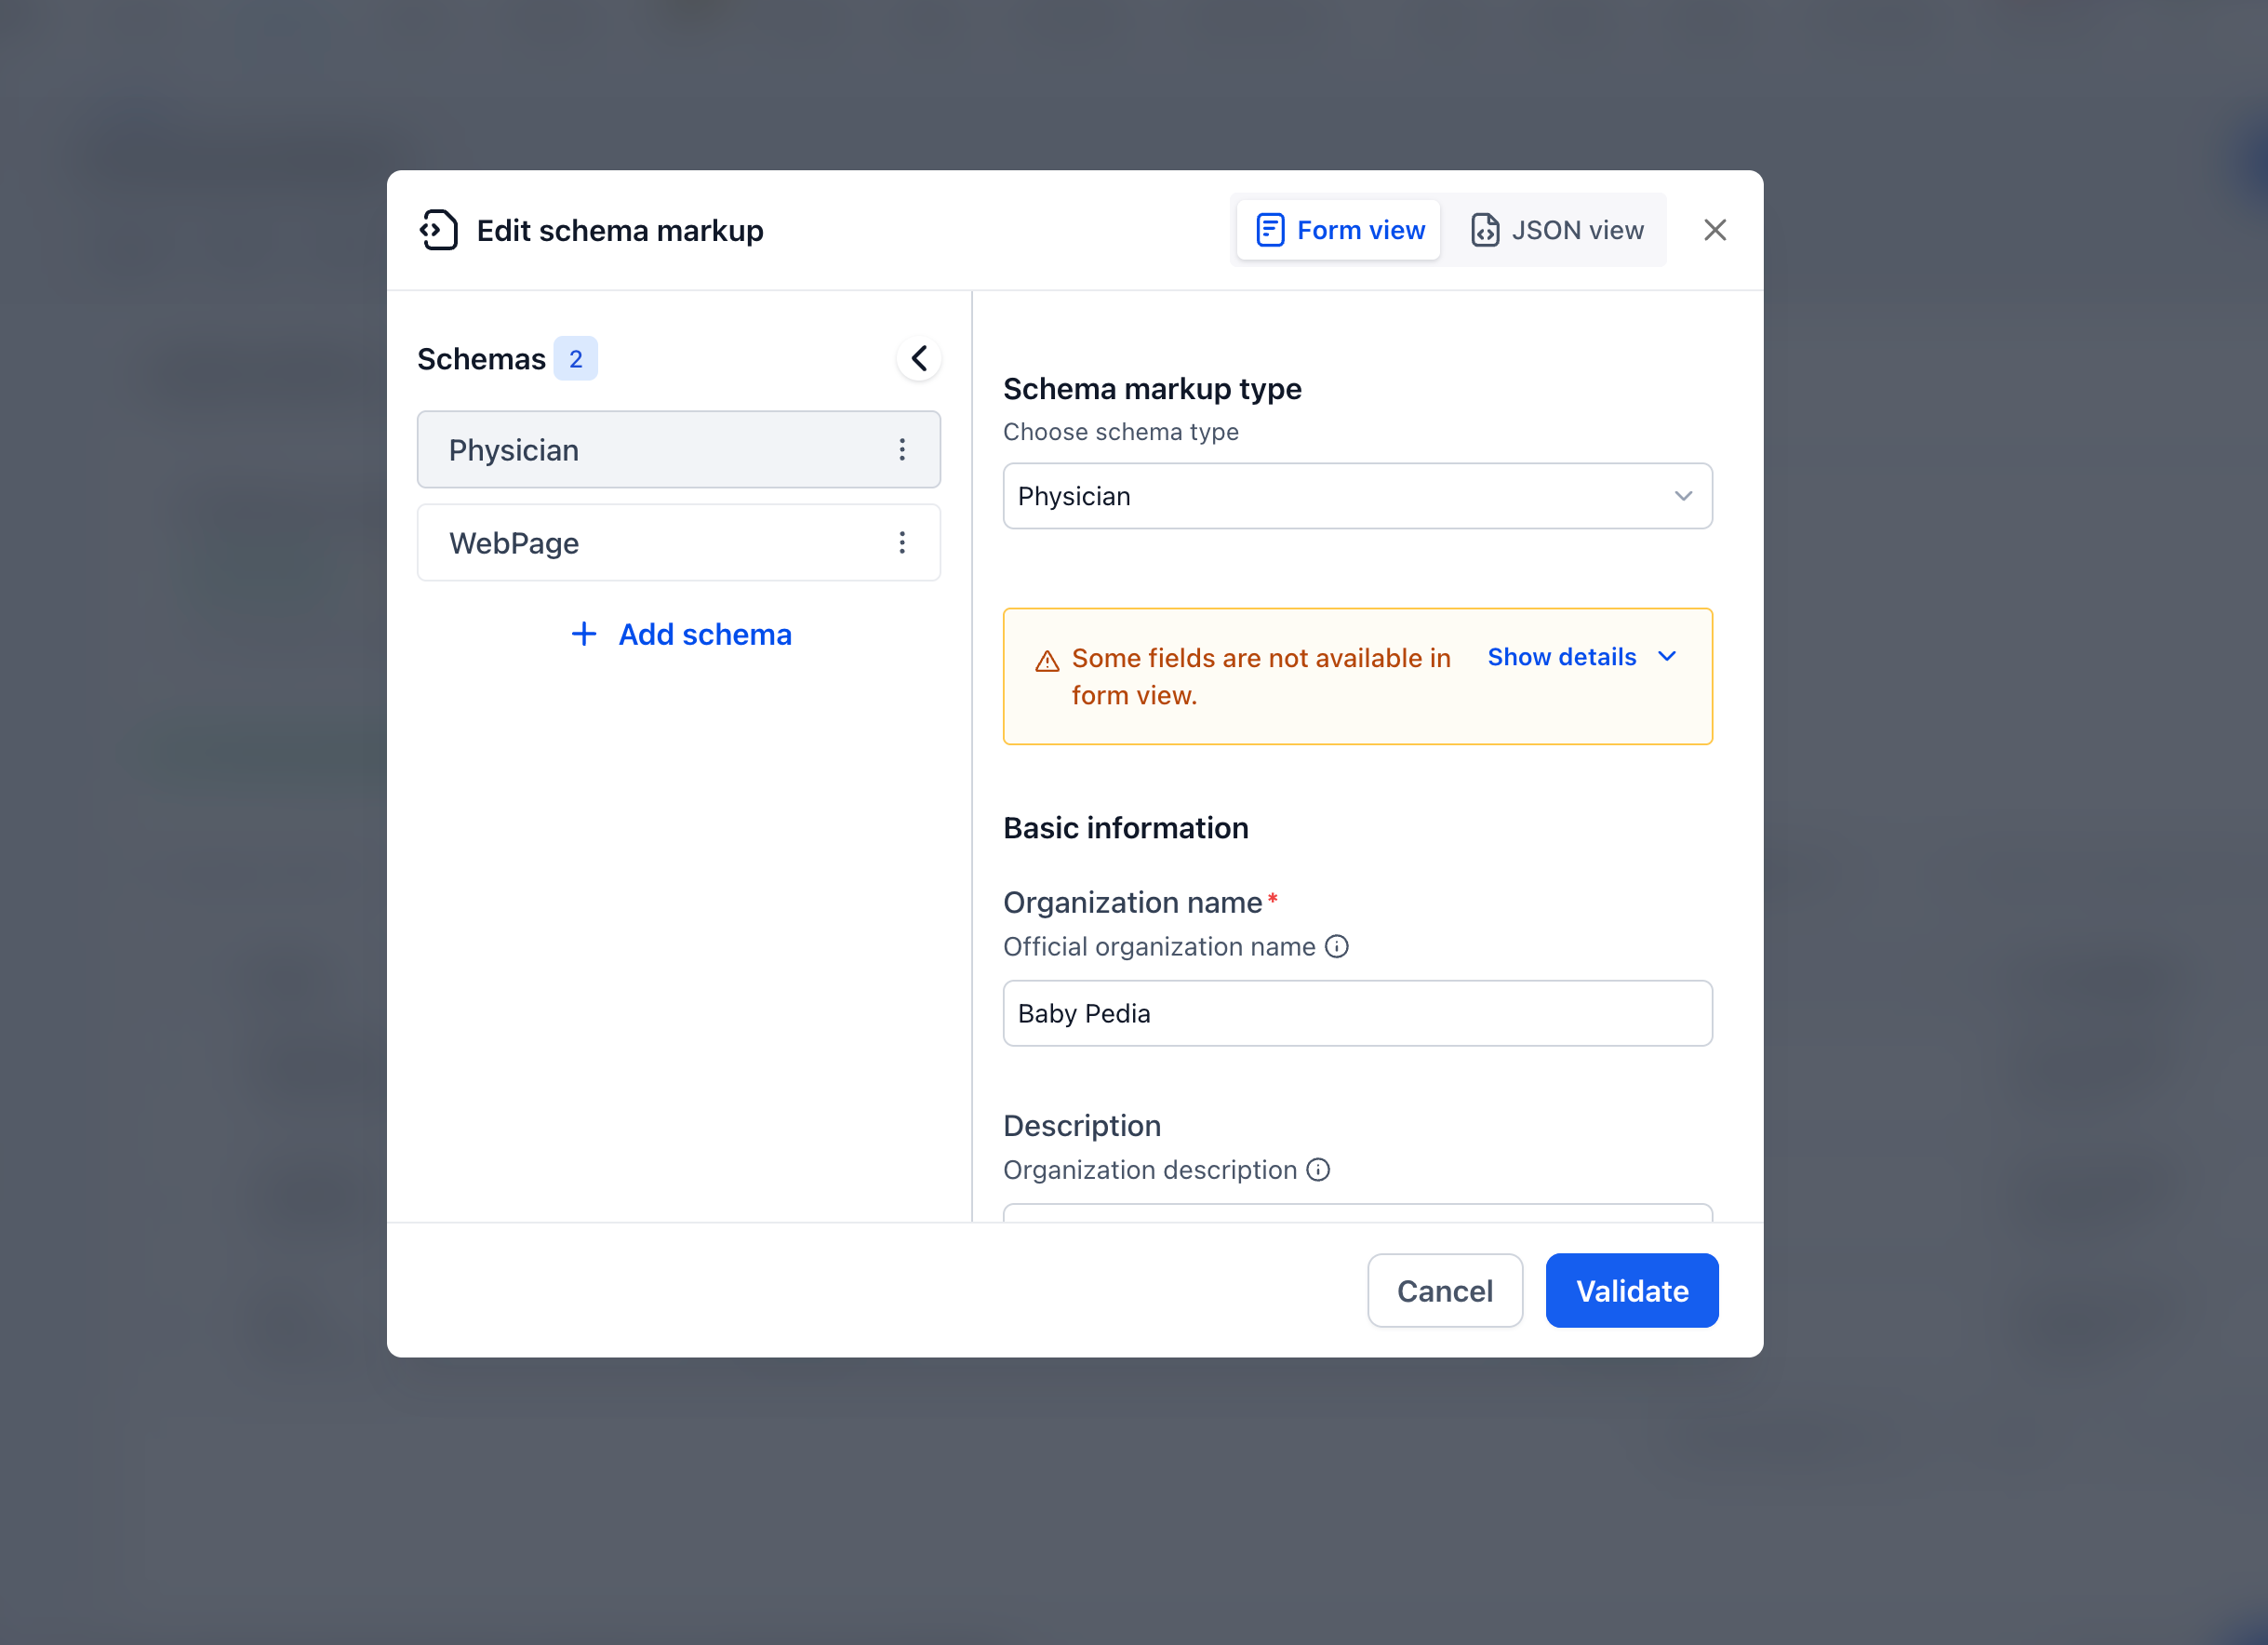
  • Add or edit schema manually. Click + Add schema for pages with none, or click any schema tag to open the editor.

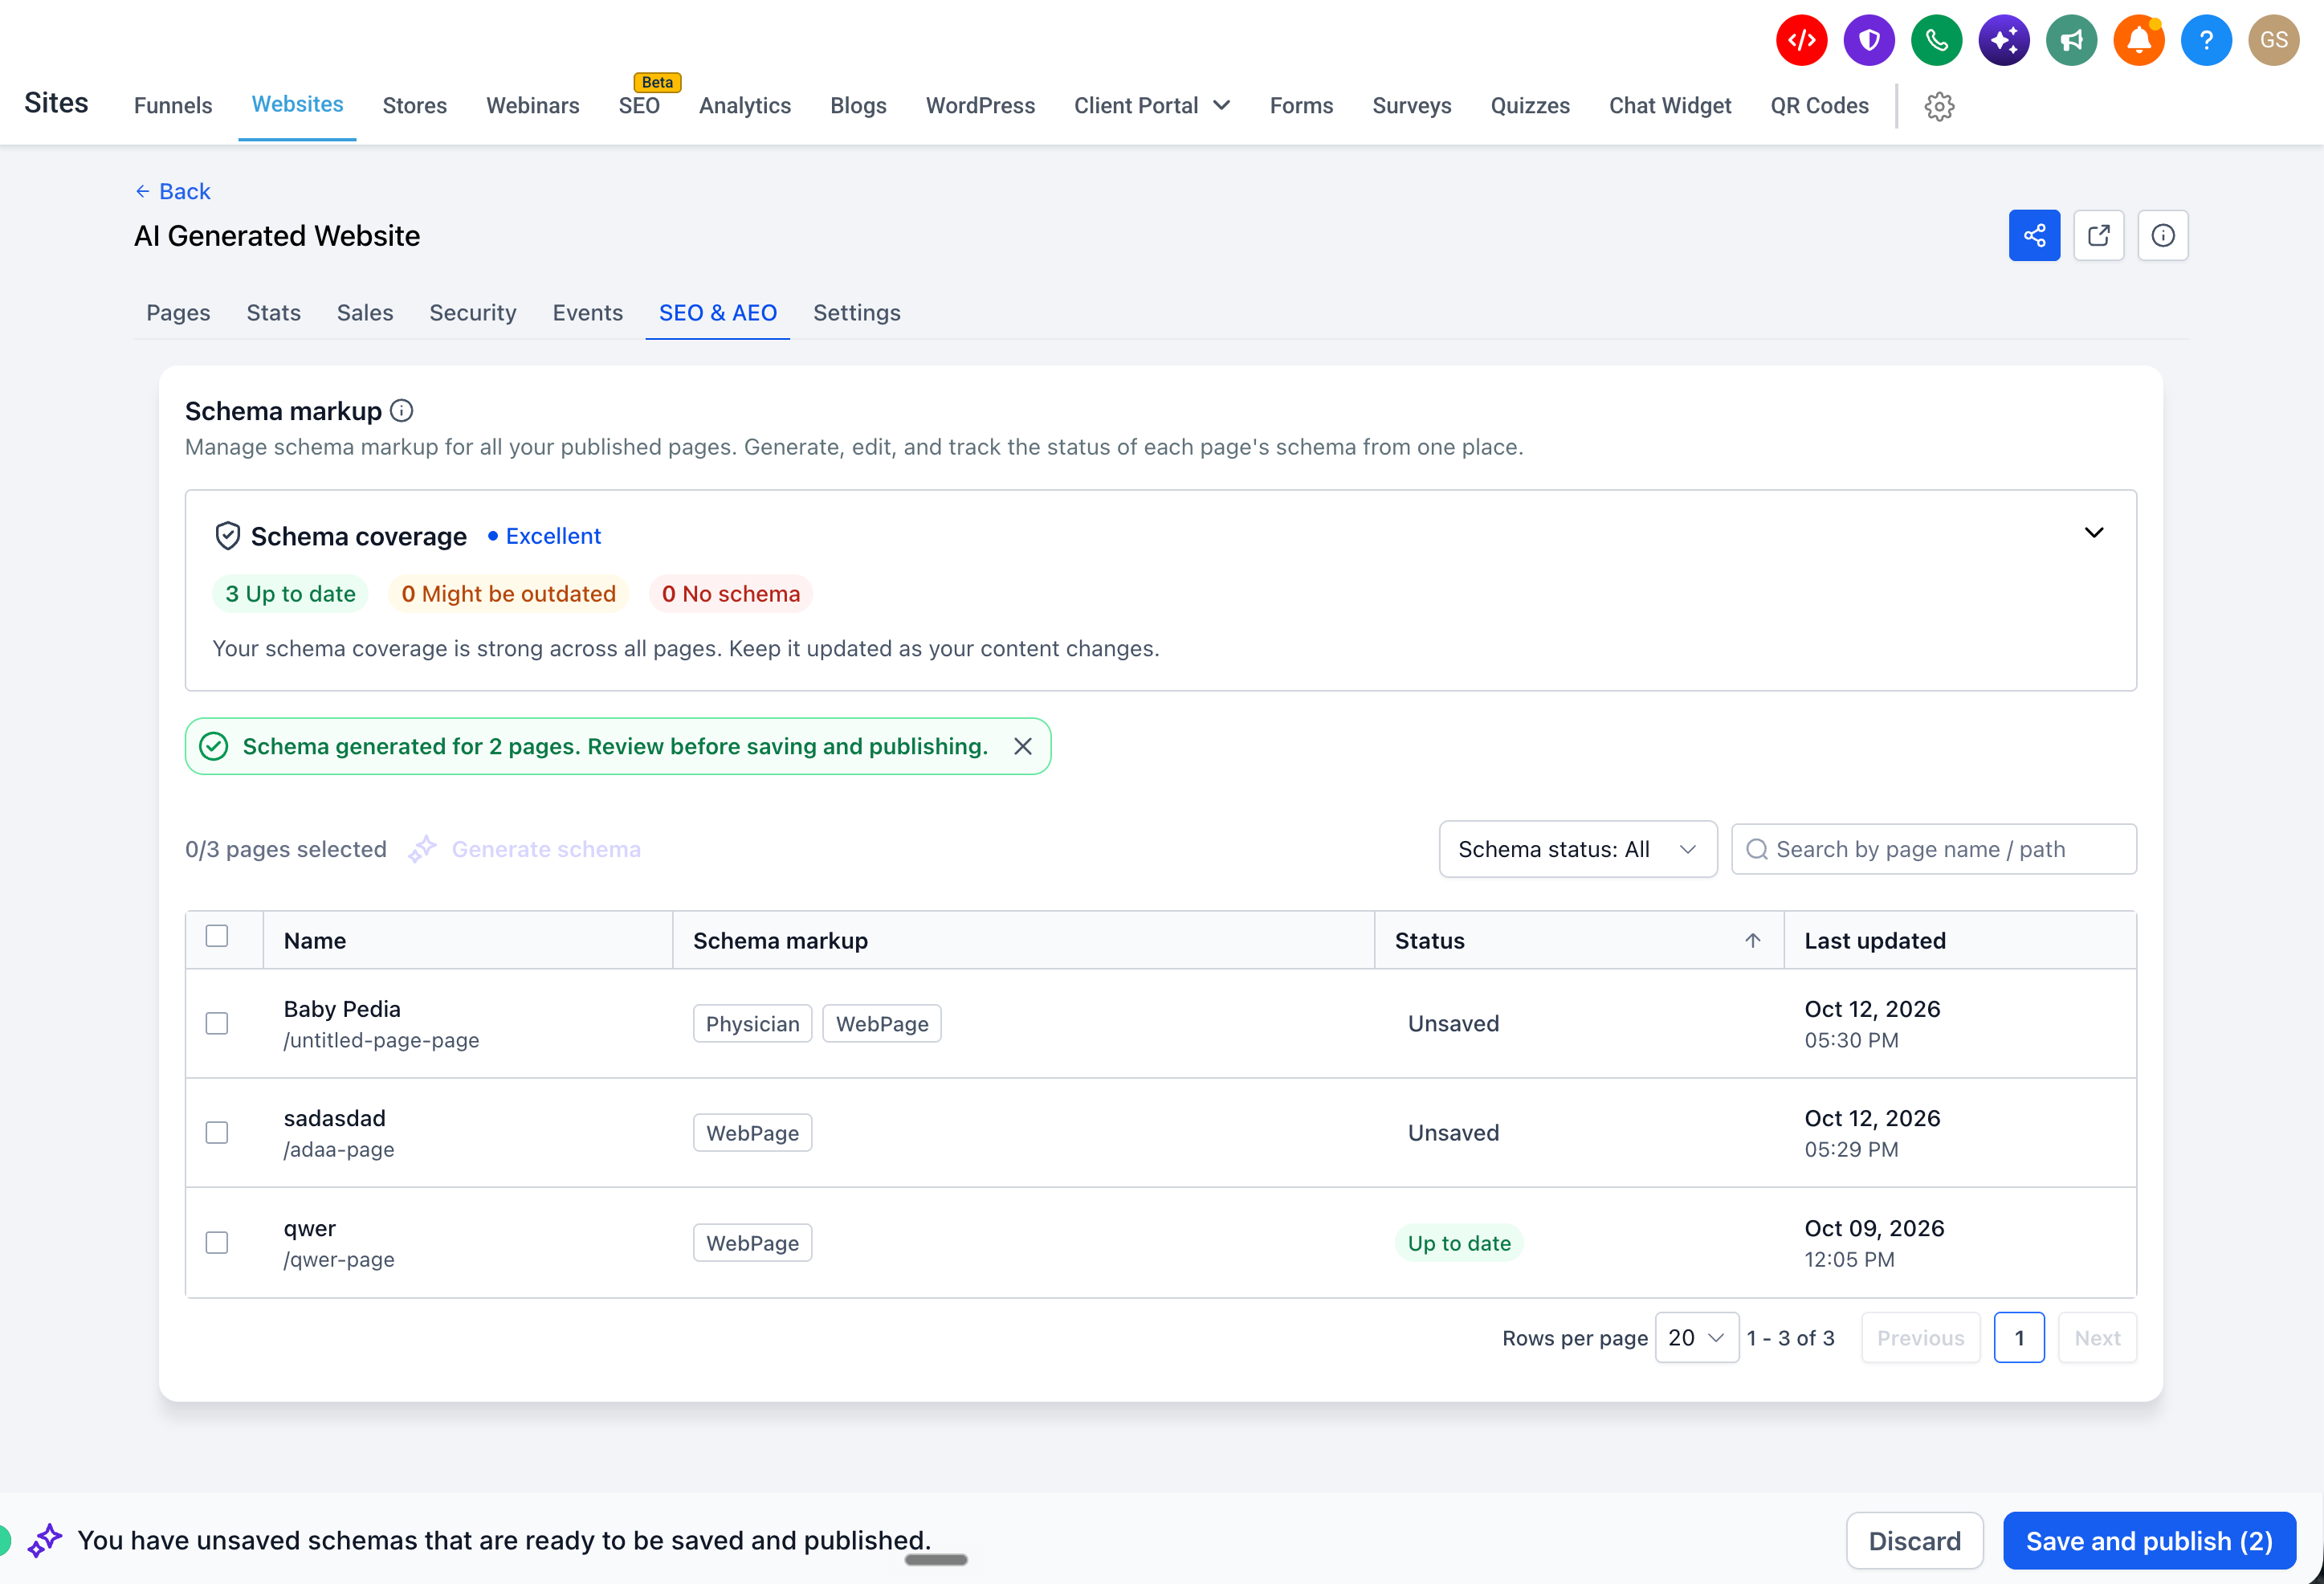
  • Review, then publish. Generated or edited schema stays Unsaved until you click Save and publish. You can also Discard it.

  • Find what needs fixing. Search by page name or path, and filter by schema status.

  • Spot stale schema. Pages edited and republished 2 or more times since their schema was created are flagged Might be outdated.

Why this matters?

Accurate, current schema makes your pages eligible for Google rich results and helps AI answer engines understand and cite your business. Until now, keeping schema current meant going through the builder one page at a time, so most sites fell out of date. This dashboard turns that into a quick check you can act on in bulk.

Impact on existing users

  • No data loss and no action required.

  • Every website and funnel now has an SEO & AEO tab. Any existing schema appears there automatically.

  • Pages without schema are flagged No schema, so user can fix them in bulk.

  • Schema editing in the page builder still works exactly as before. Both places stay in sync.

  • Running Generate schema on a page that already has schema replaces it entirely. Review before Save and publish click.

How to use

  1. Go to Sites → Websites/Funnels → select one → SEO & AEO.

  2. Check the Schema coverage card, and filter by No schema or Might be outdated.

  3. Select pages and click Generate schema, or use + Add schema / click a tag to edit manually.

  4. Review the results, then click Save and publish.

Sample screens
Screenshot 2026-10-12 at 5

Screen 1: SEO & AEO - Schema home screen 1
Screenshot 2026-10-12 at 5

Screen 2: SEO & AEO - Schema home screen 2
Screenshot 2026-10-12 at 5

Screen 3: SEO & AEO - Select page For Schema generation
Screenshot 2026-10-12 at 5

Screen 4: SEO & AEO - Schema generation progress
Screenshot 2026-10-12 at 5

Screen 5: SEO & AEO - Schema generated using AI
Screenshot 2026-10-12 at 5

Screen 6: SEO & AEO - Schema edit
Client Portal: "User Login" Workflow Trigger Now Supports the New Client Portal Experience

📌 Overview

The User login workflow trigger now fires for logins from the new Client Portal experience — not just legacy membership logins. We've also added a dedicated Client Portal category in the workflow trigger picker, so all Client Portal triggers live in one place.

✨ What's New

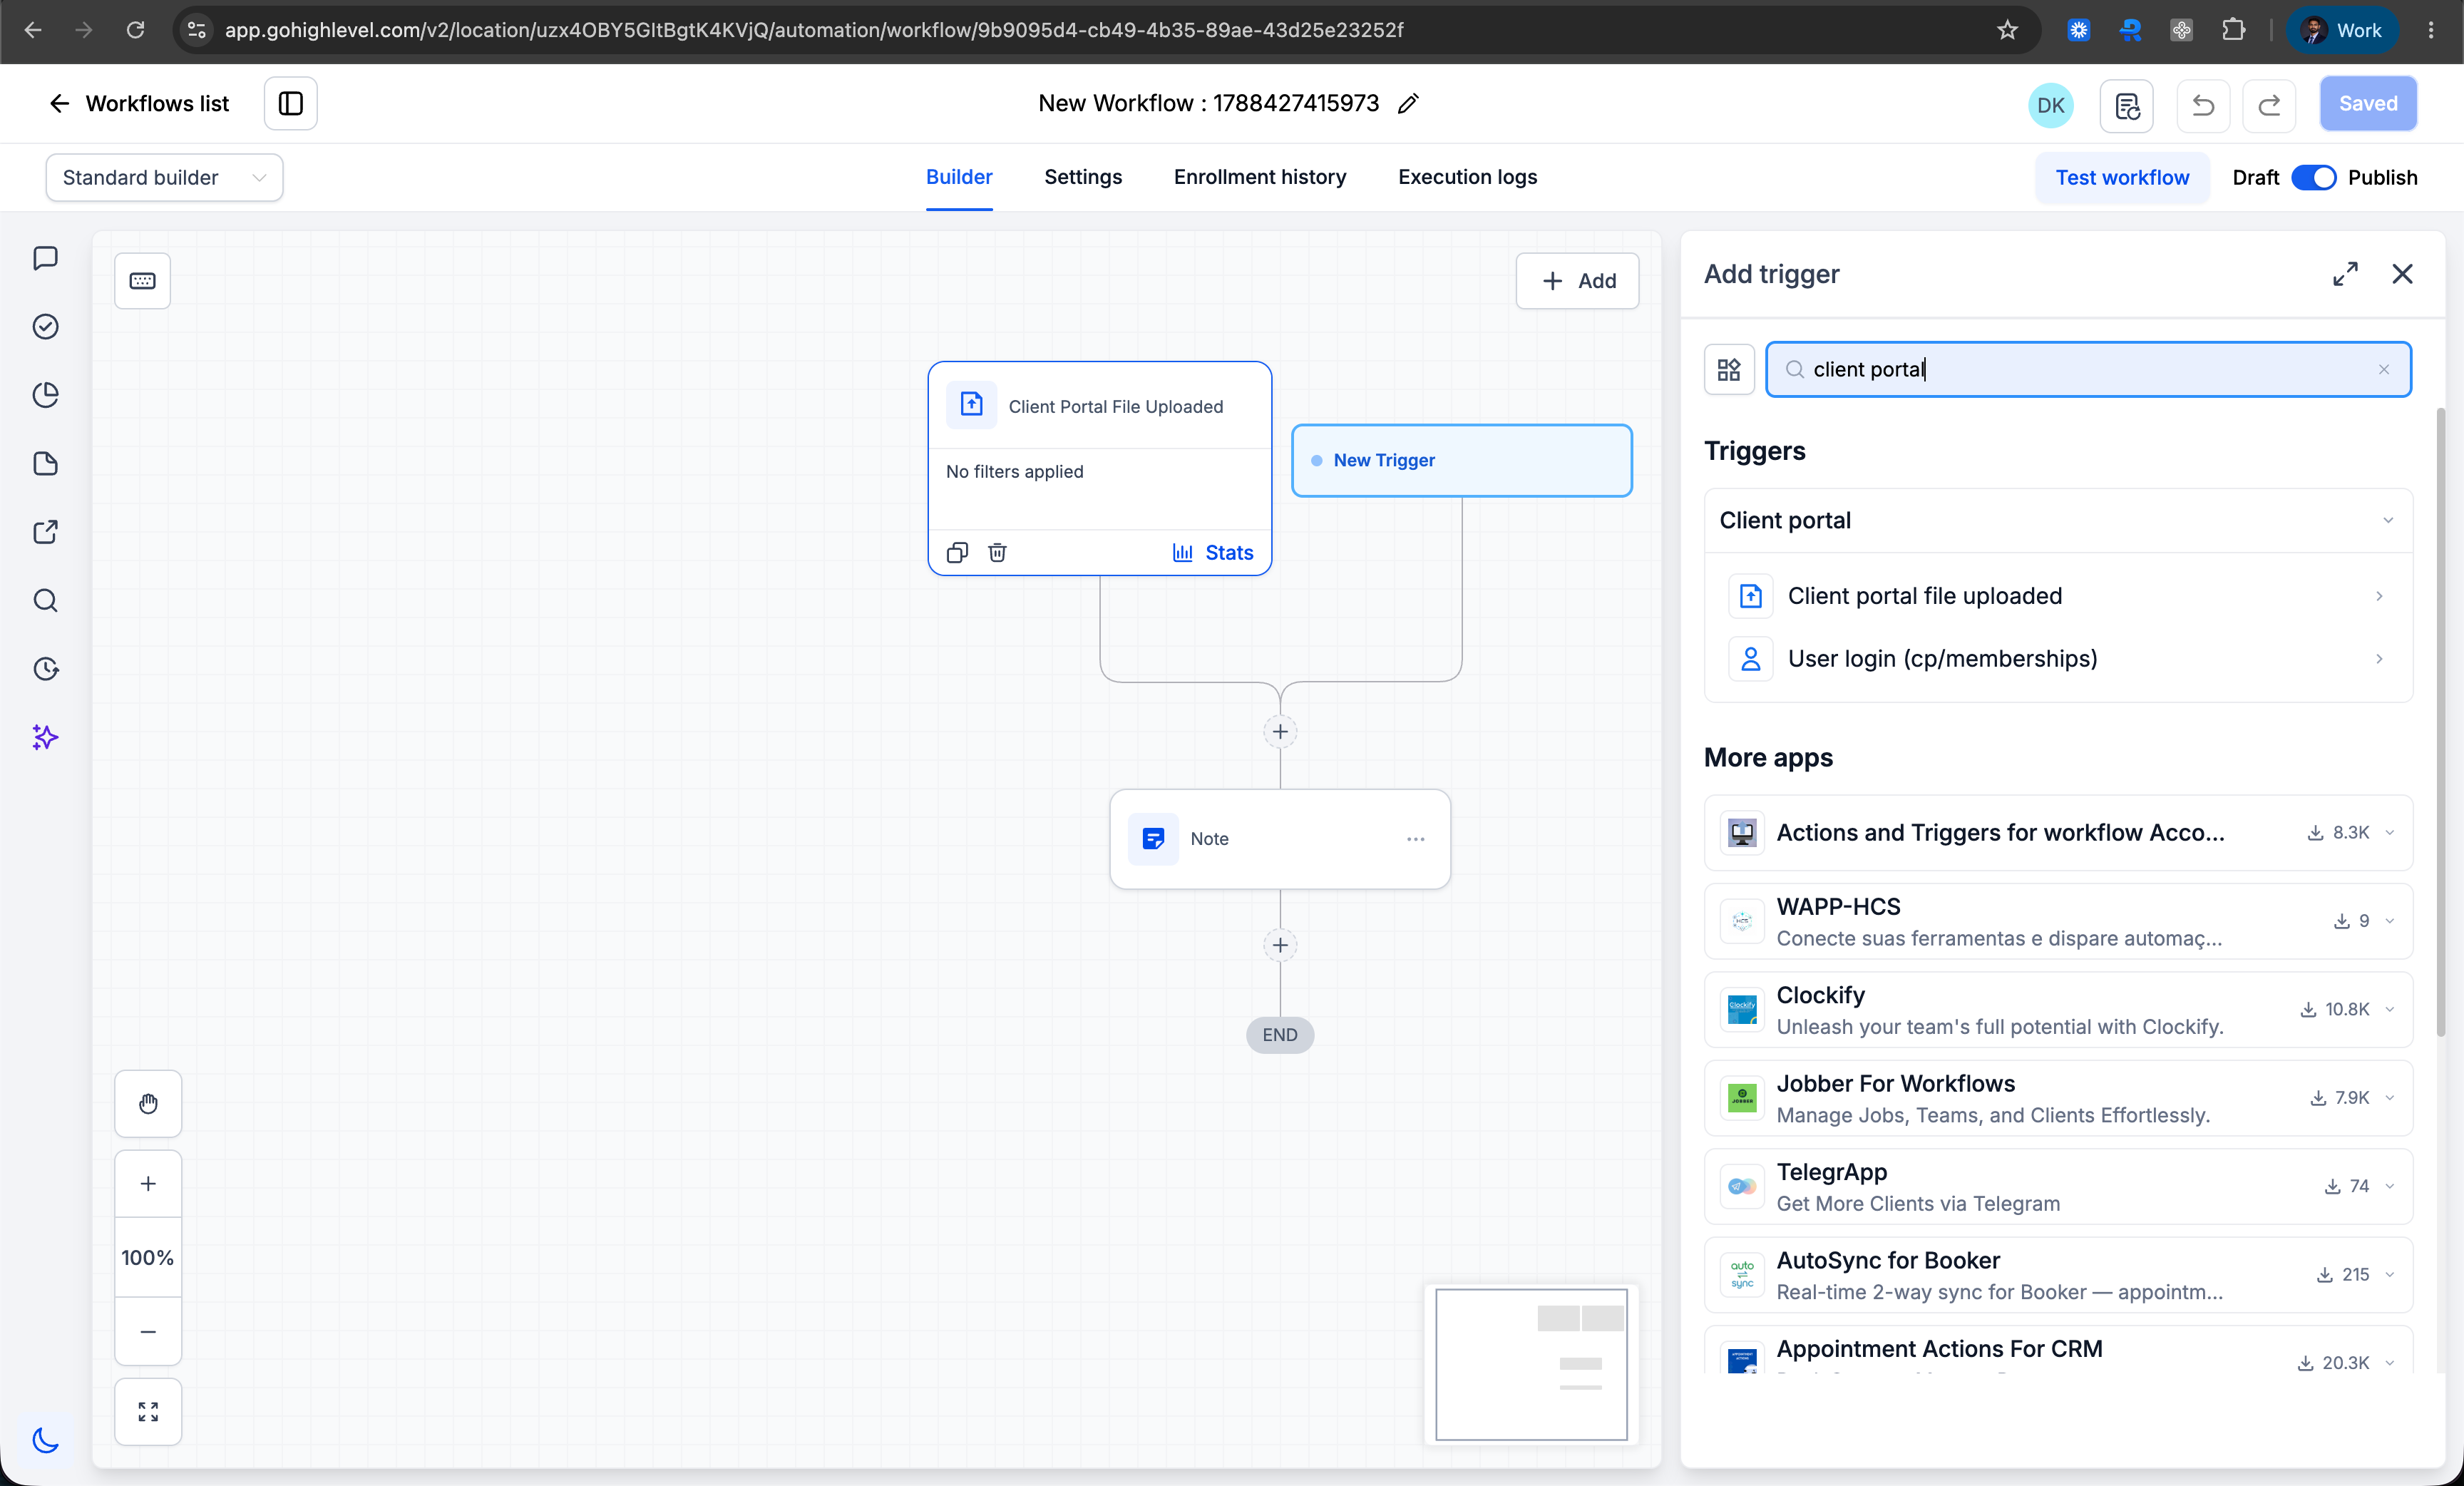
🔑 New Client Portal logins now fire the "User login" trigger Successful logins from the new Client Portal experience now emit the same workflow trigger event as legacy membership logins. Any workflow already using the User login trigger will start running on these logins automatically — no reconfiguration required.

🗂️ New "Client Portal" category in the trigger picker

A dedicated Client Portal category now groups all Client Portal triggers together:

User login — moved from Courses

Client portal file uploaded — moved from Membership

💬 Clearer helper text

The User login trigger now spells out that it covers both legacy membership logins and logins from the new Client Portal experience — removing the confusion caused by its old placement under Courses.

image

🛠️ How to Use

Automate on Client Portal member login

  • Open the Workflow Builder.

  • Click Add trigger and search for User login.

  • Select it under the new Client Portal category (previously found under Courses).

  • Save your workflow — it will now fire on both legacy membership logins and logins from the new Client Portal experience.

Already using this trigger?

No action needed. Existing workflows continue to run as-is and will automatically pick up login events from the new Client Portal experience.

💡 Why This Matters

Agencies on the new Client Portal experience previously had no way to automate off a member login, because the trigger only covered legacy memberships. Trigger placement was inconsistent too — login sat under Courses while file upload sat under Membership — making it unclear what each trigger actually covered. This update closes the gap and puts both triggers where you'd expect to find them.

Single Page Unpublish for Funnels and Websites

We are excited to introduce Single Page Unpublish! You can now take individual pages within a funnel or website offline without disconnecting your domain. Easily hide outdated content, pause seasonal promos, or manage campaigns granularly - while the rest of your site stays live.

✨What's New

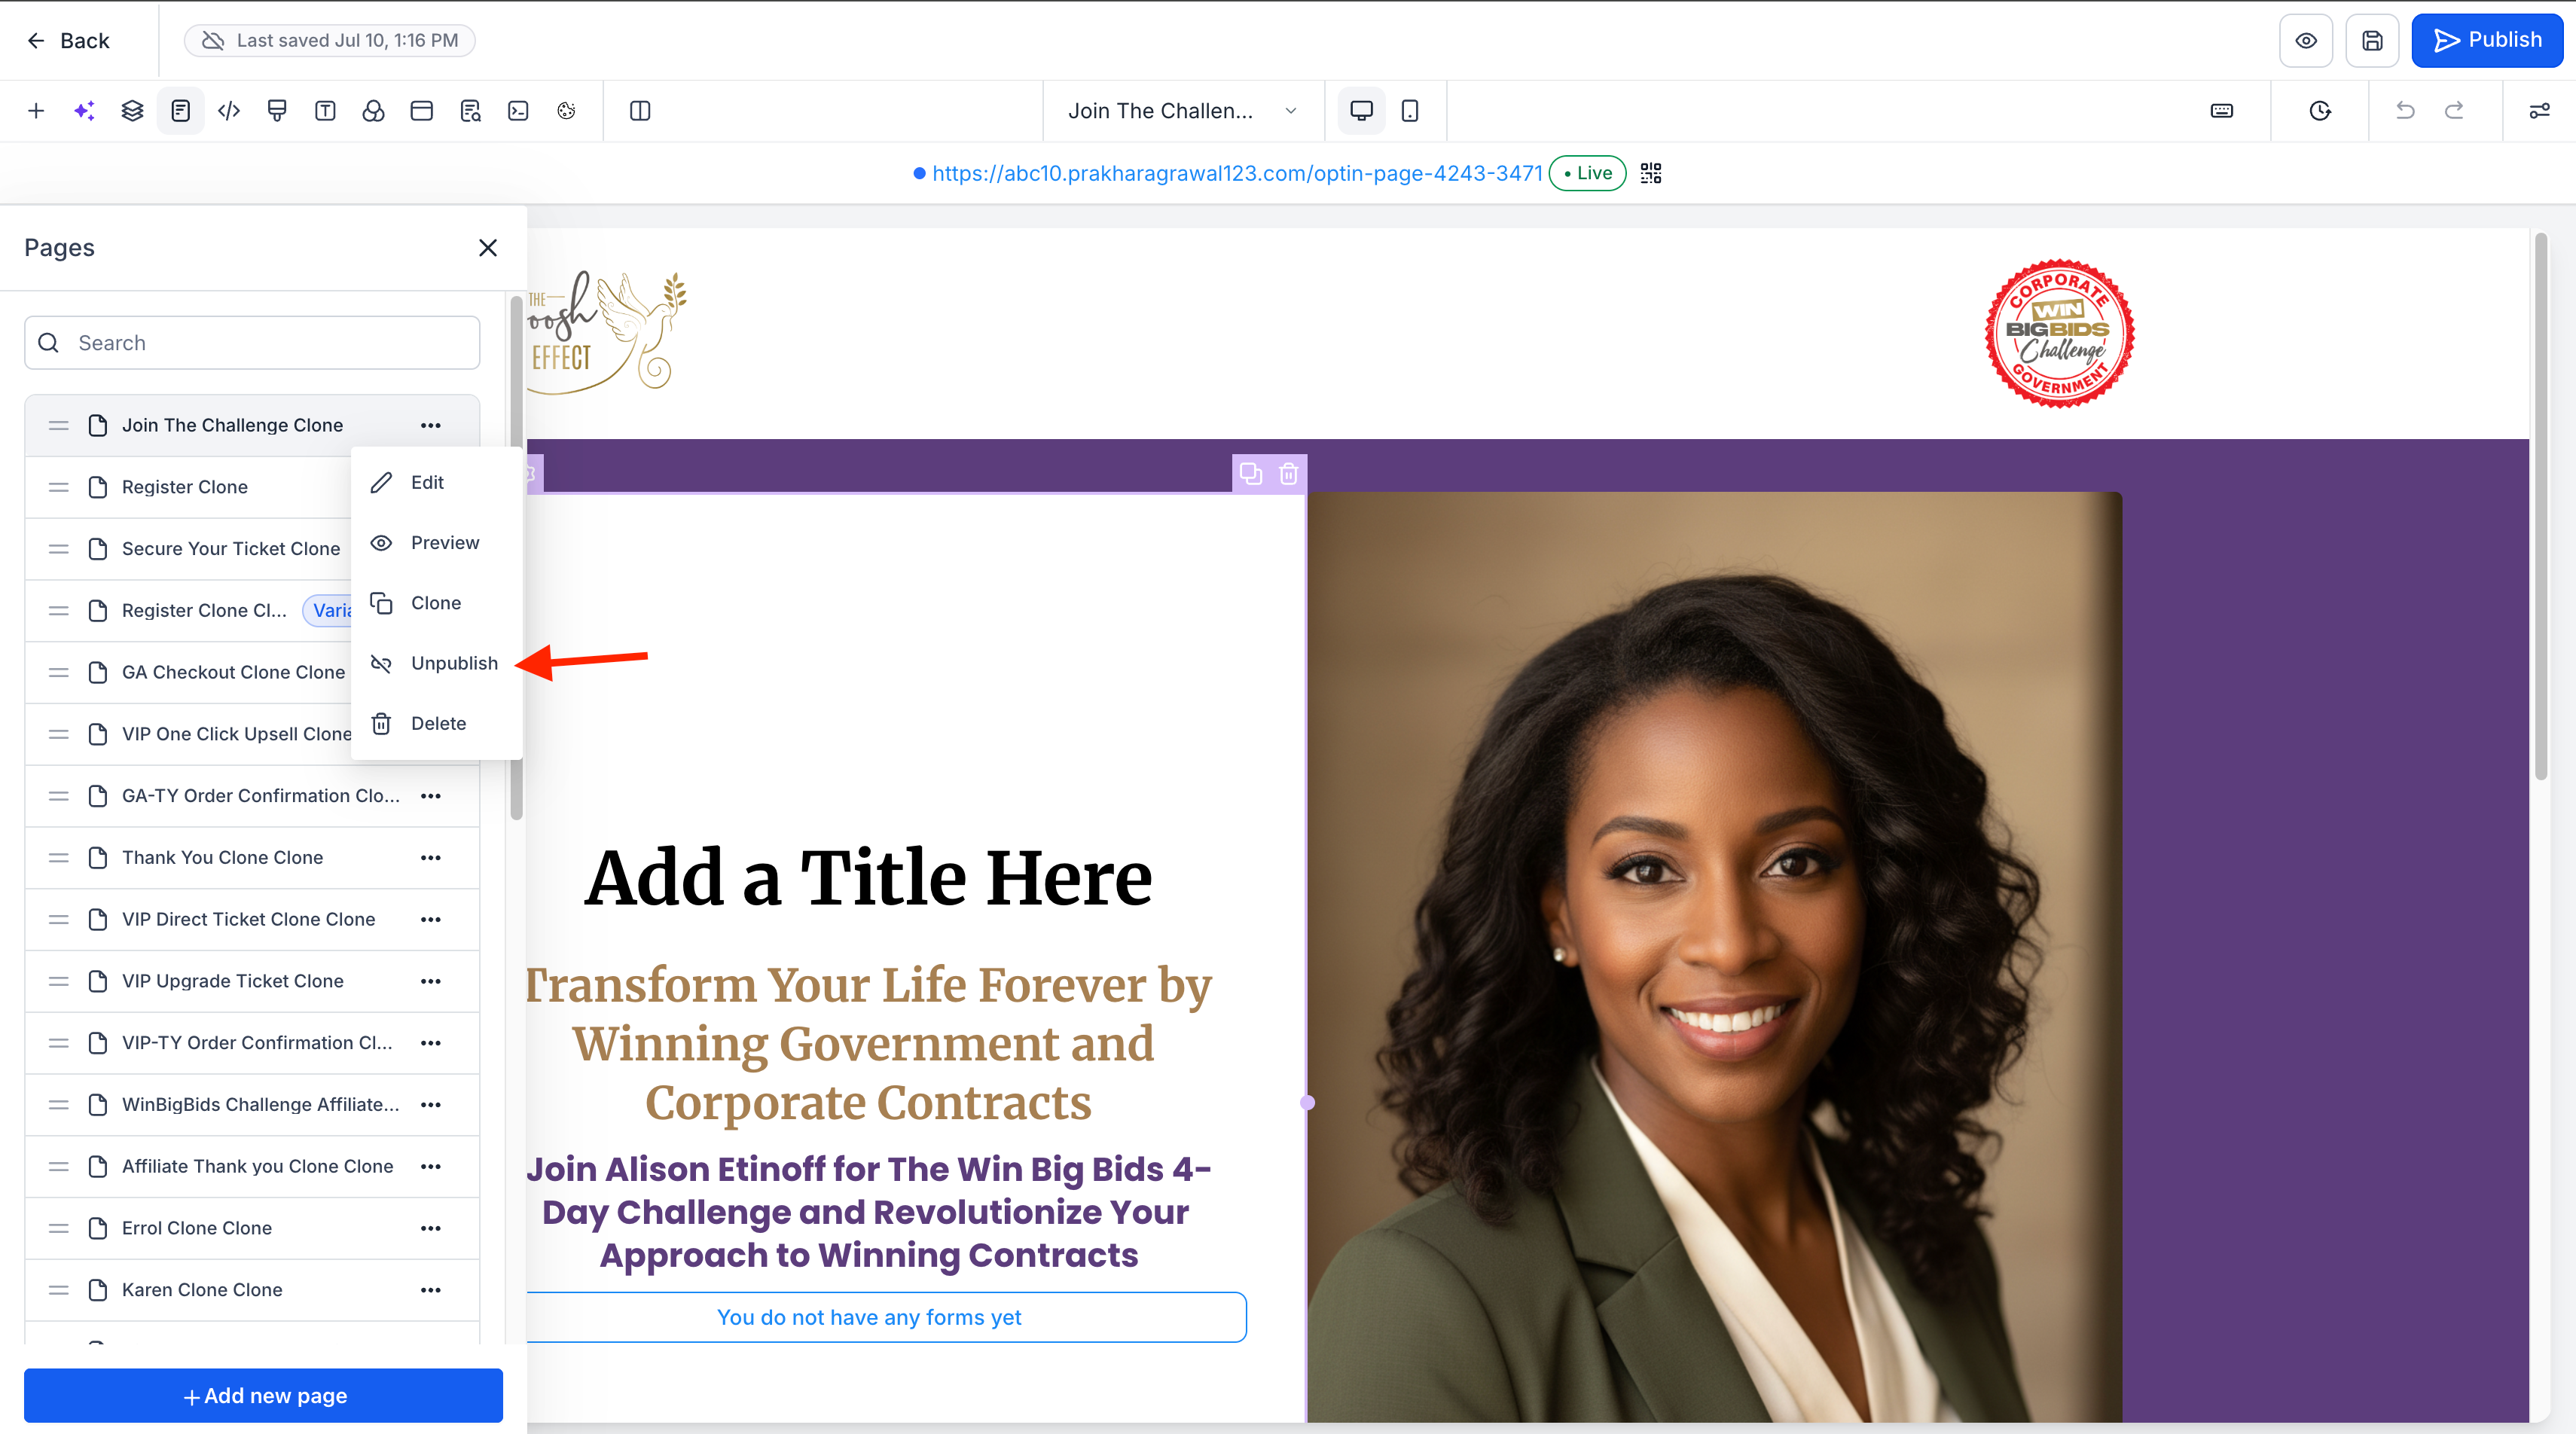
  • 🎛️Granular Page Control: Publish or unpublish a single funnel or website page while every other page on your site remains fully active. The action is available right in the page's Options menu - both in the funnel/website page list and inside the page builder's side panel.

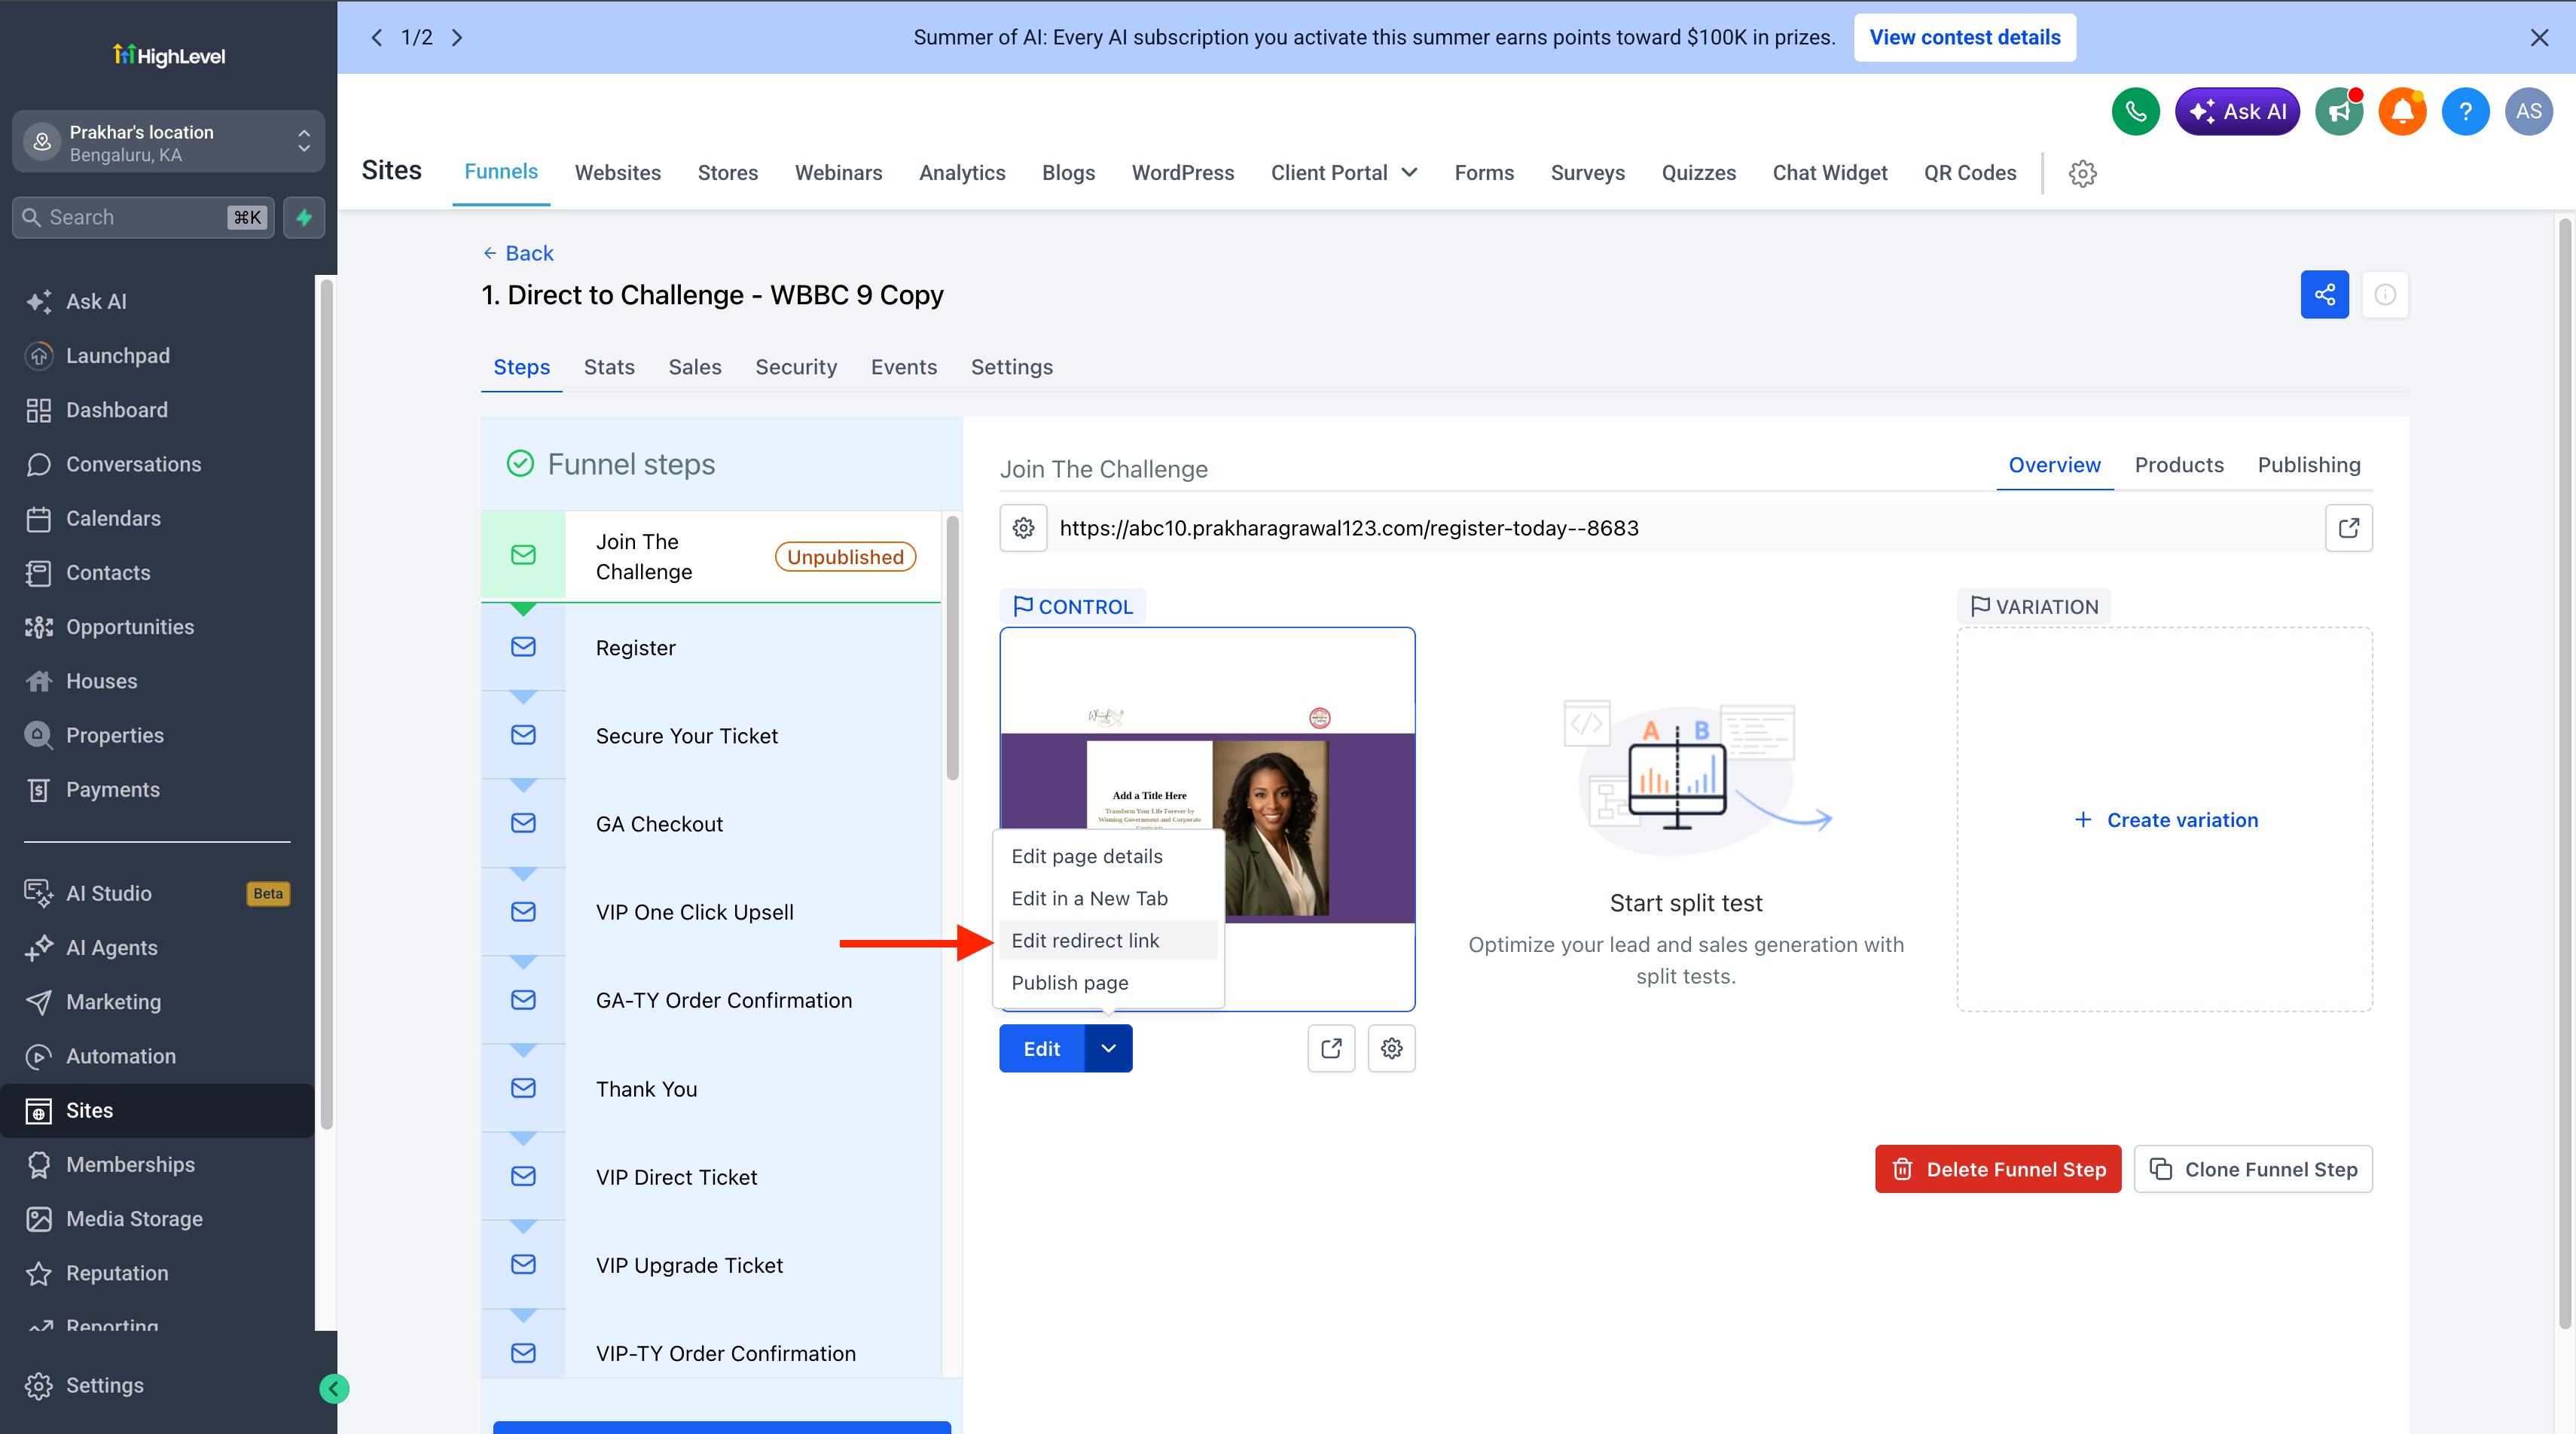
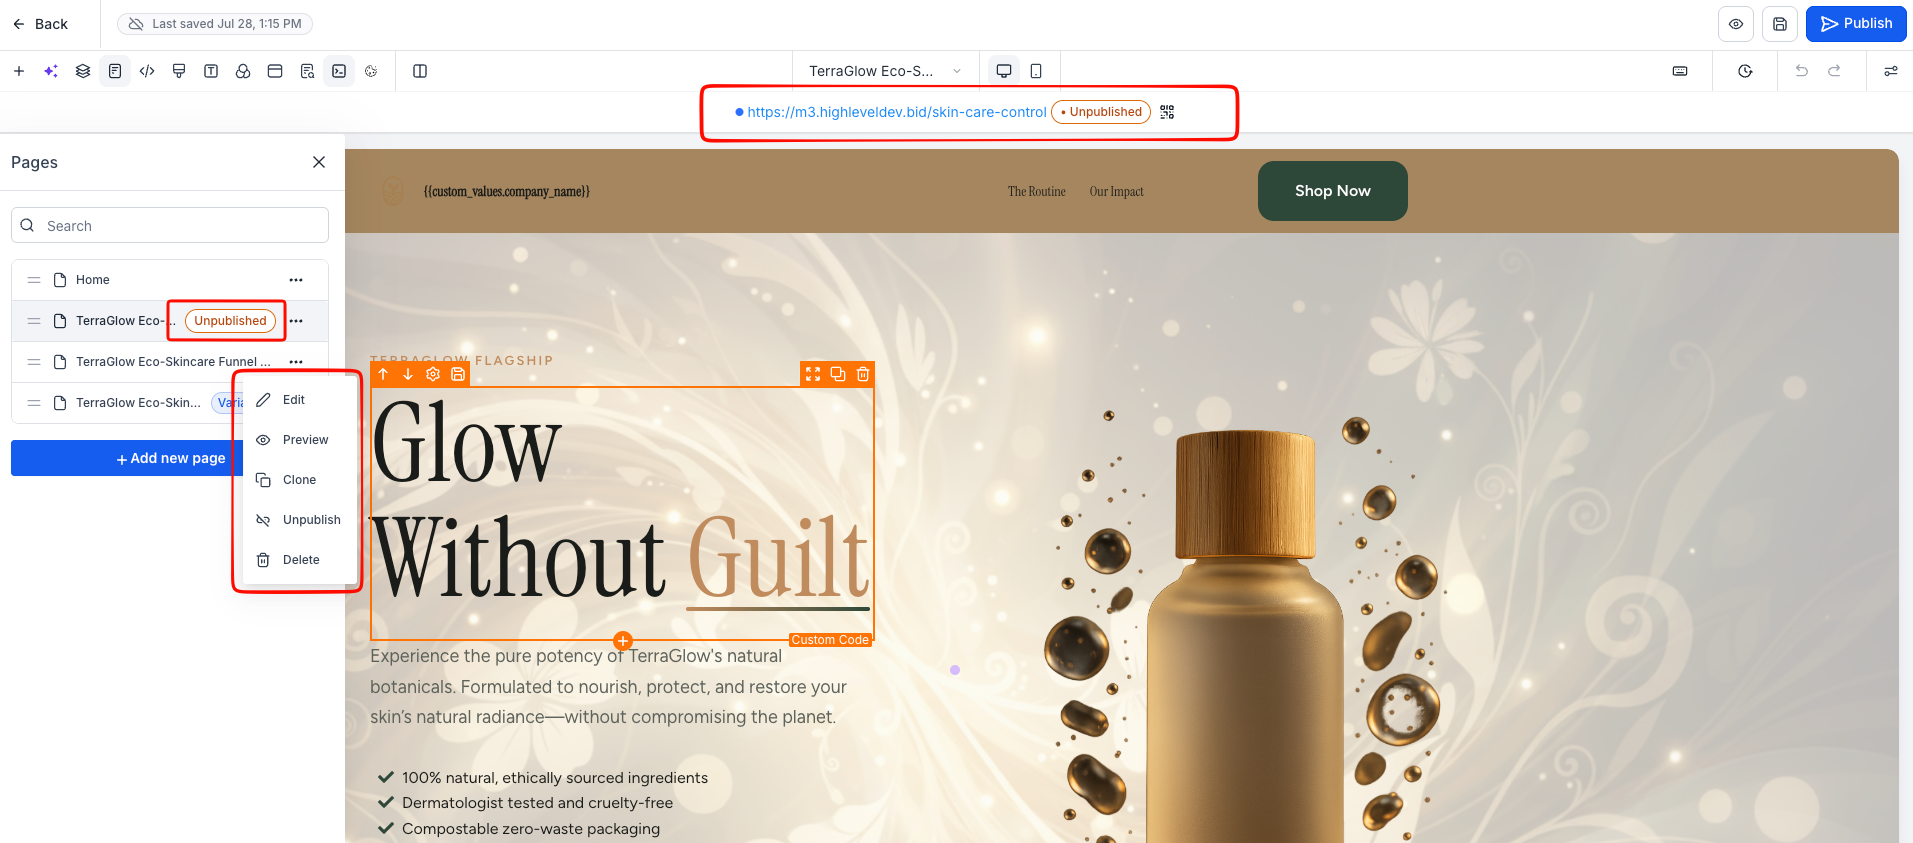
  • 🗂️Full Page Management Inside the Builder: Every page in the builder's side panel now has a complete actions menu -Edit (rename / change URL slug), Preview, Clone (within the same funnel or to another funnel/location), Unpublish, Edit Redirect Link, Publish, and Delete (with typed confirmation). The menu adapts to the page's state: live pages show Unpublish, unpublished pages show Publish and Edit Redirect Link. No more leaving the builder to manage your pages.

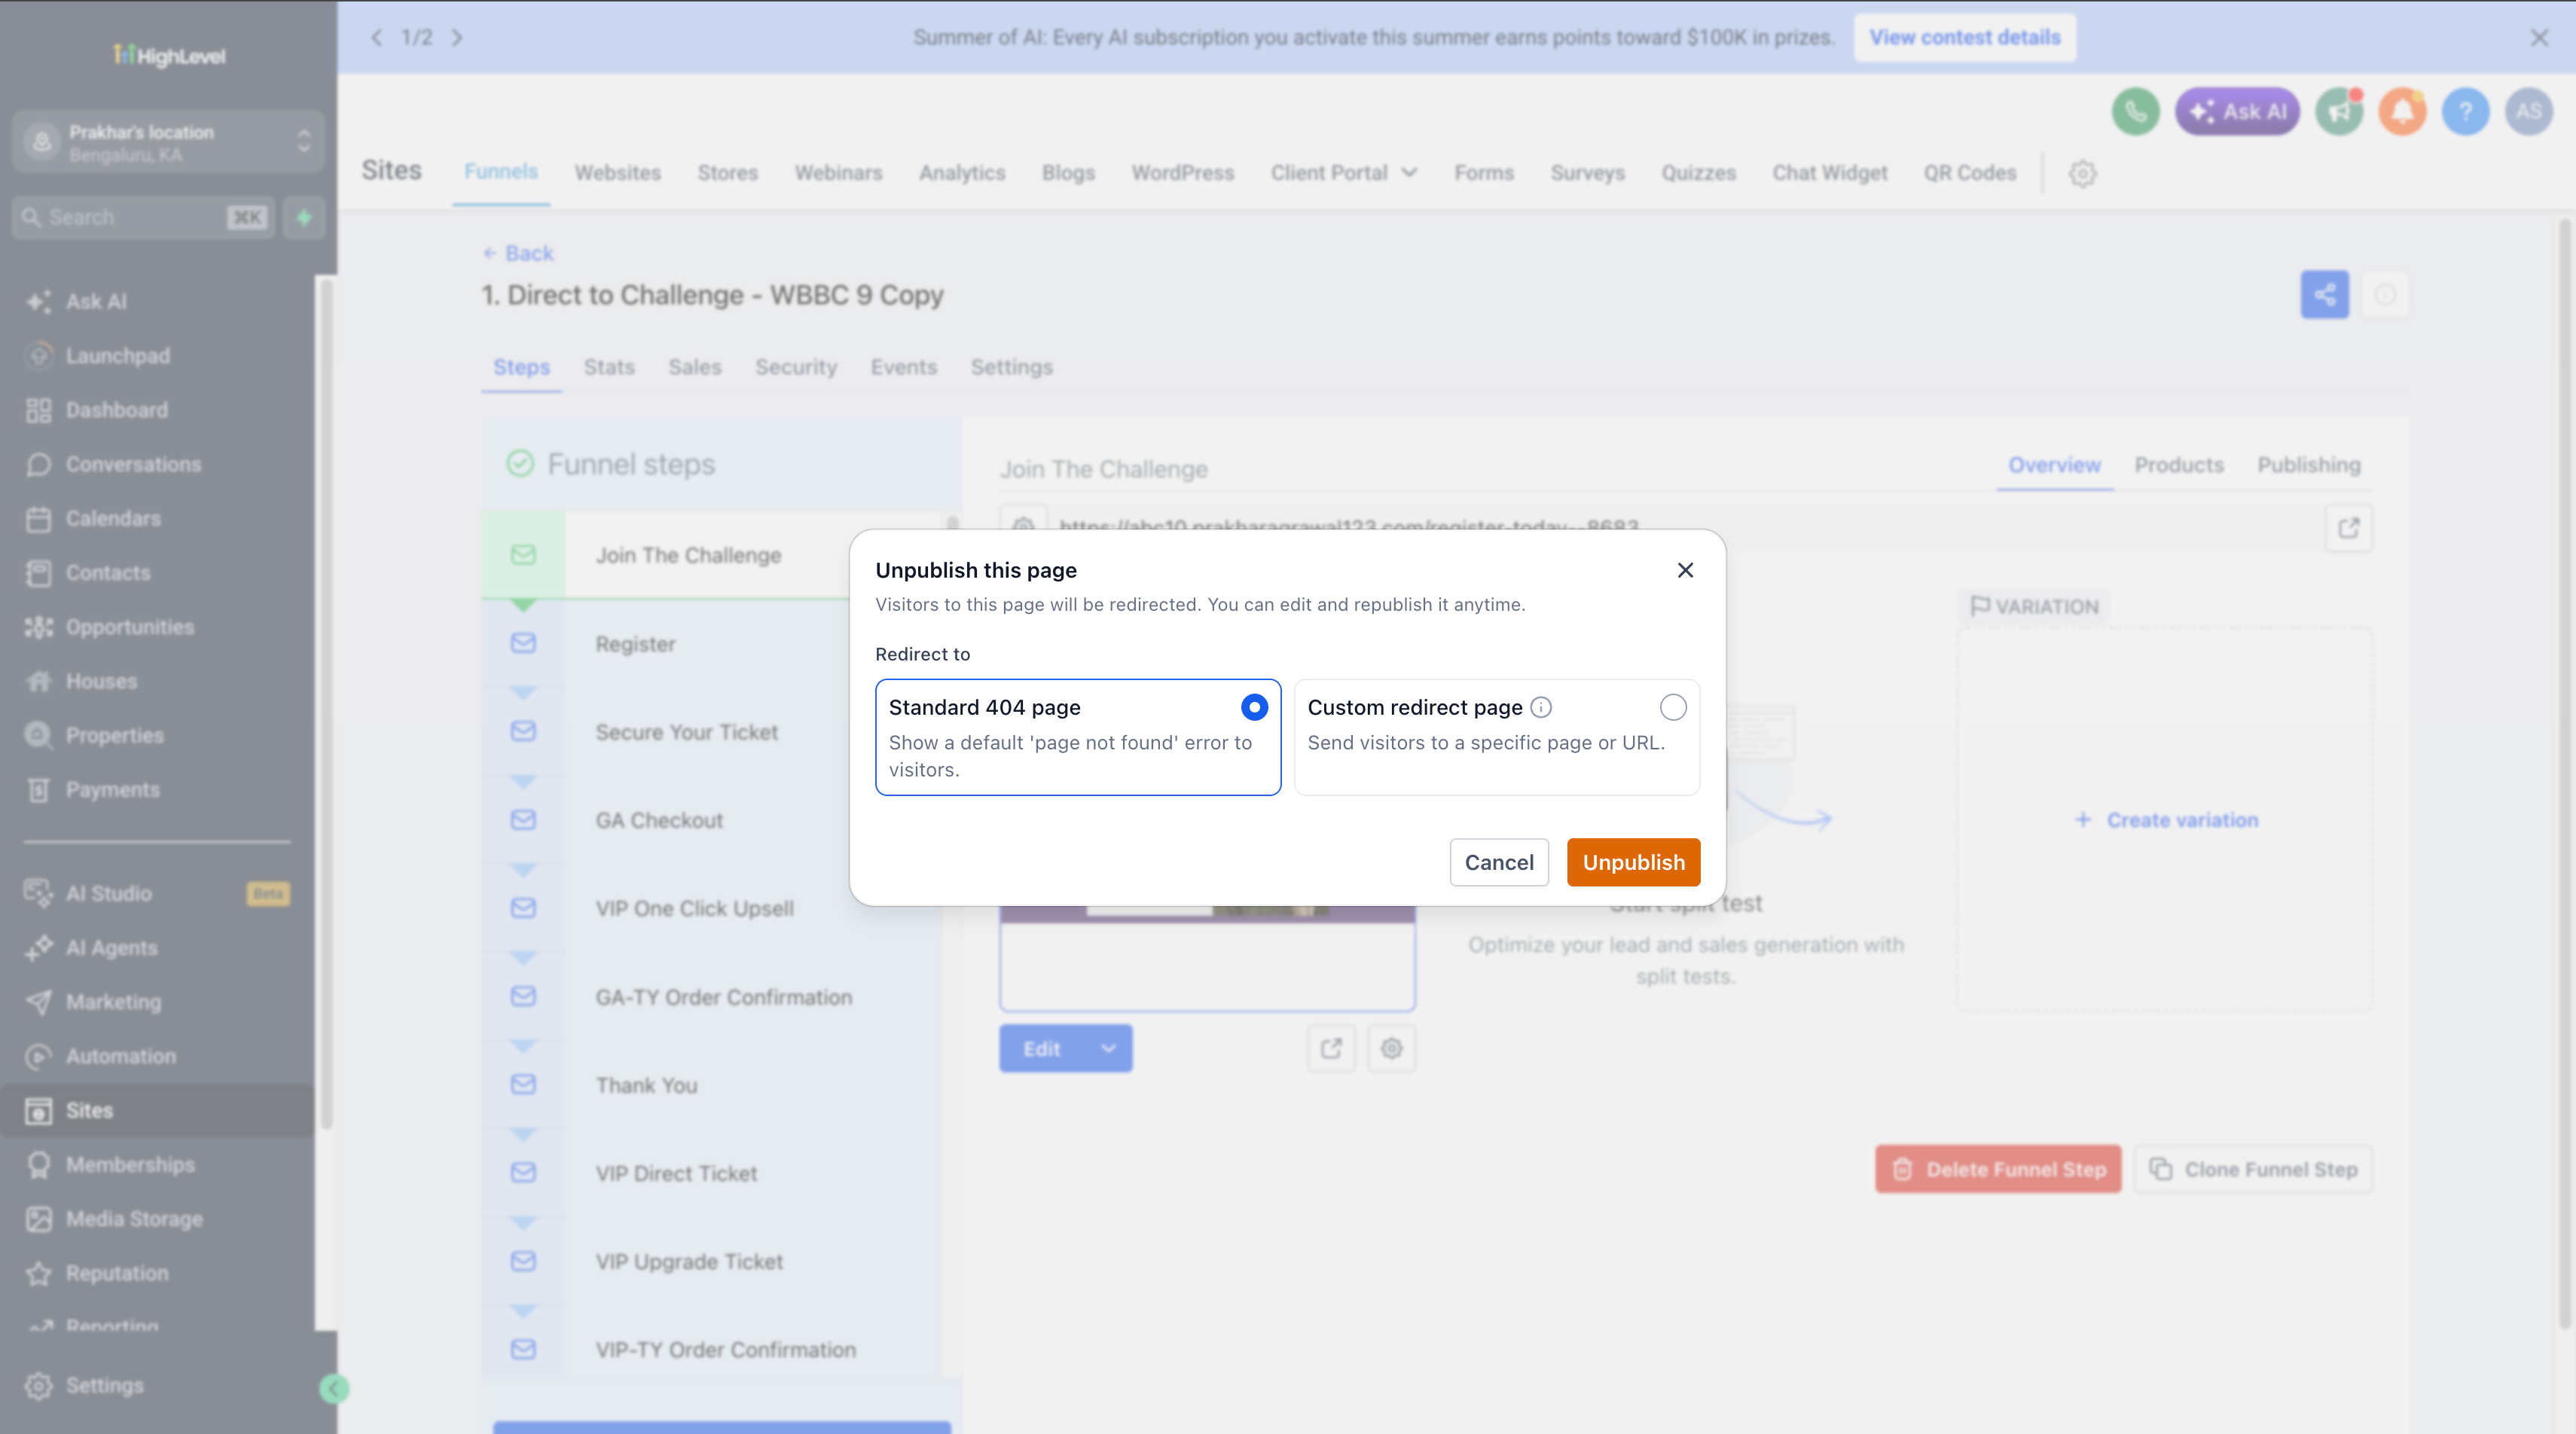
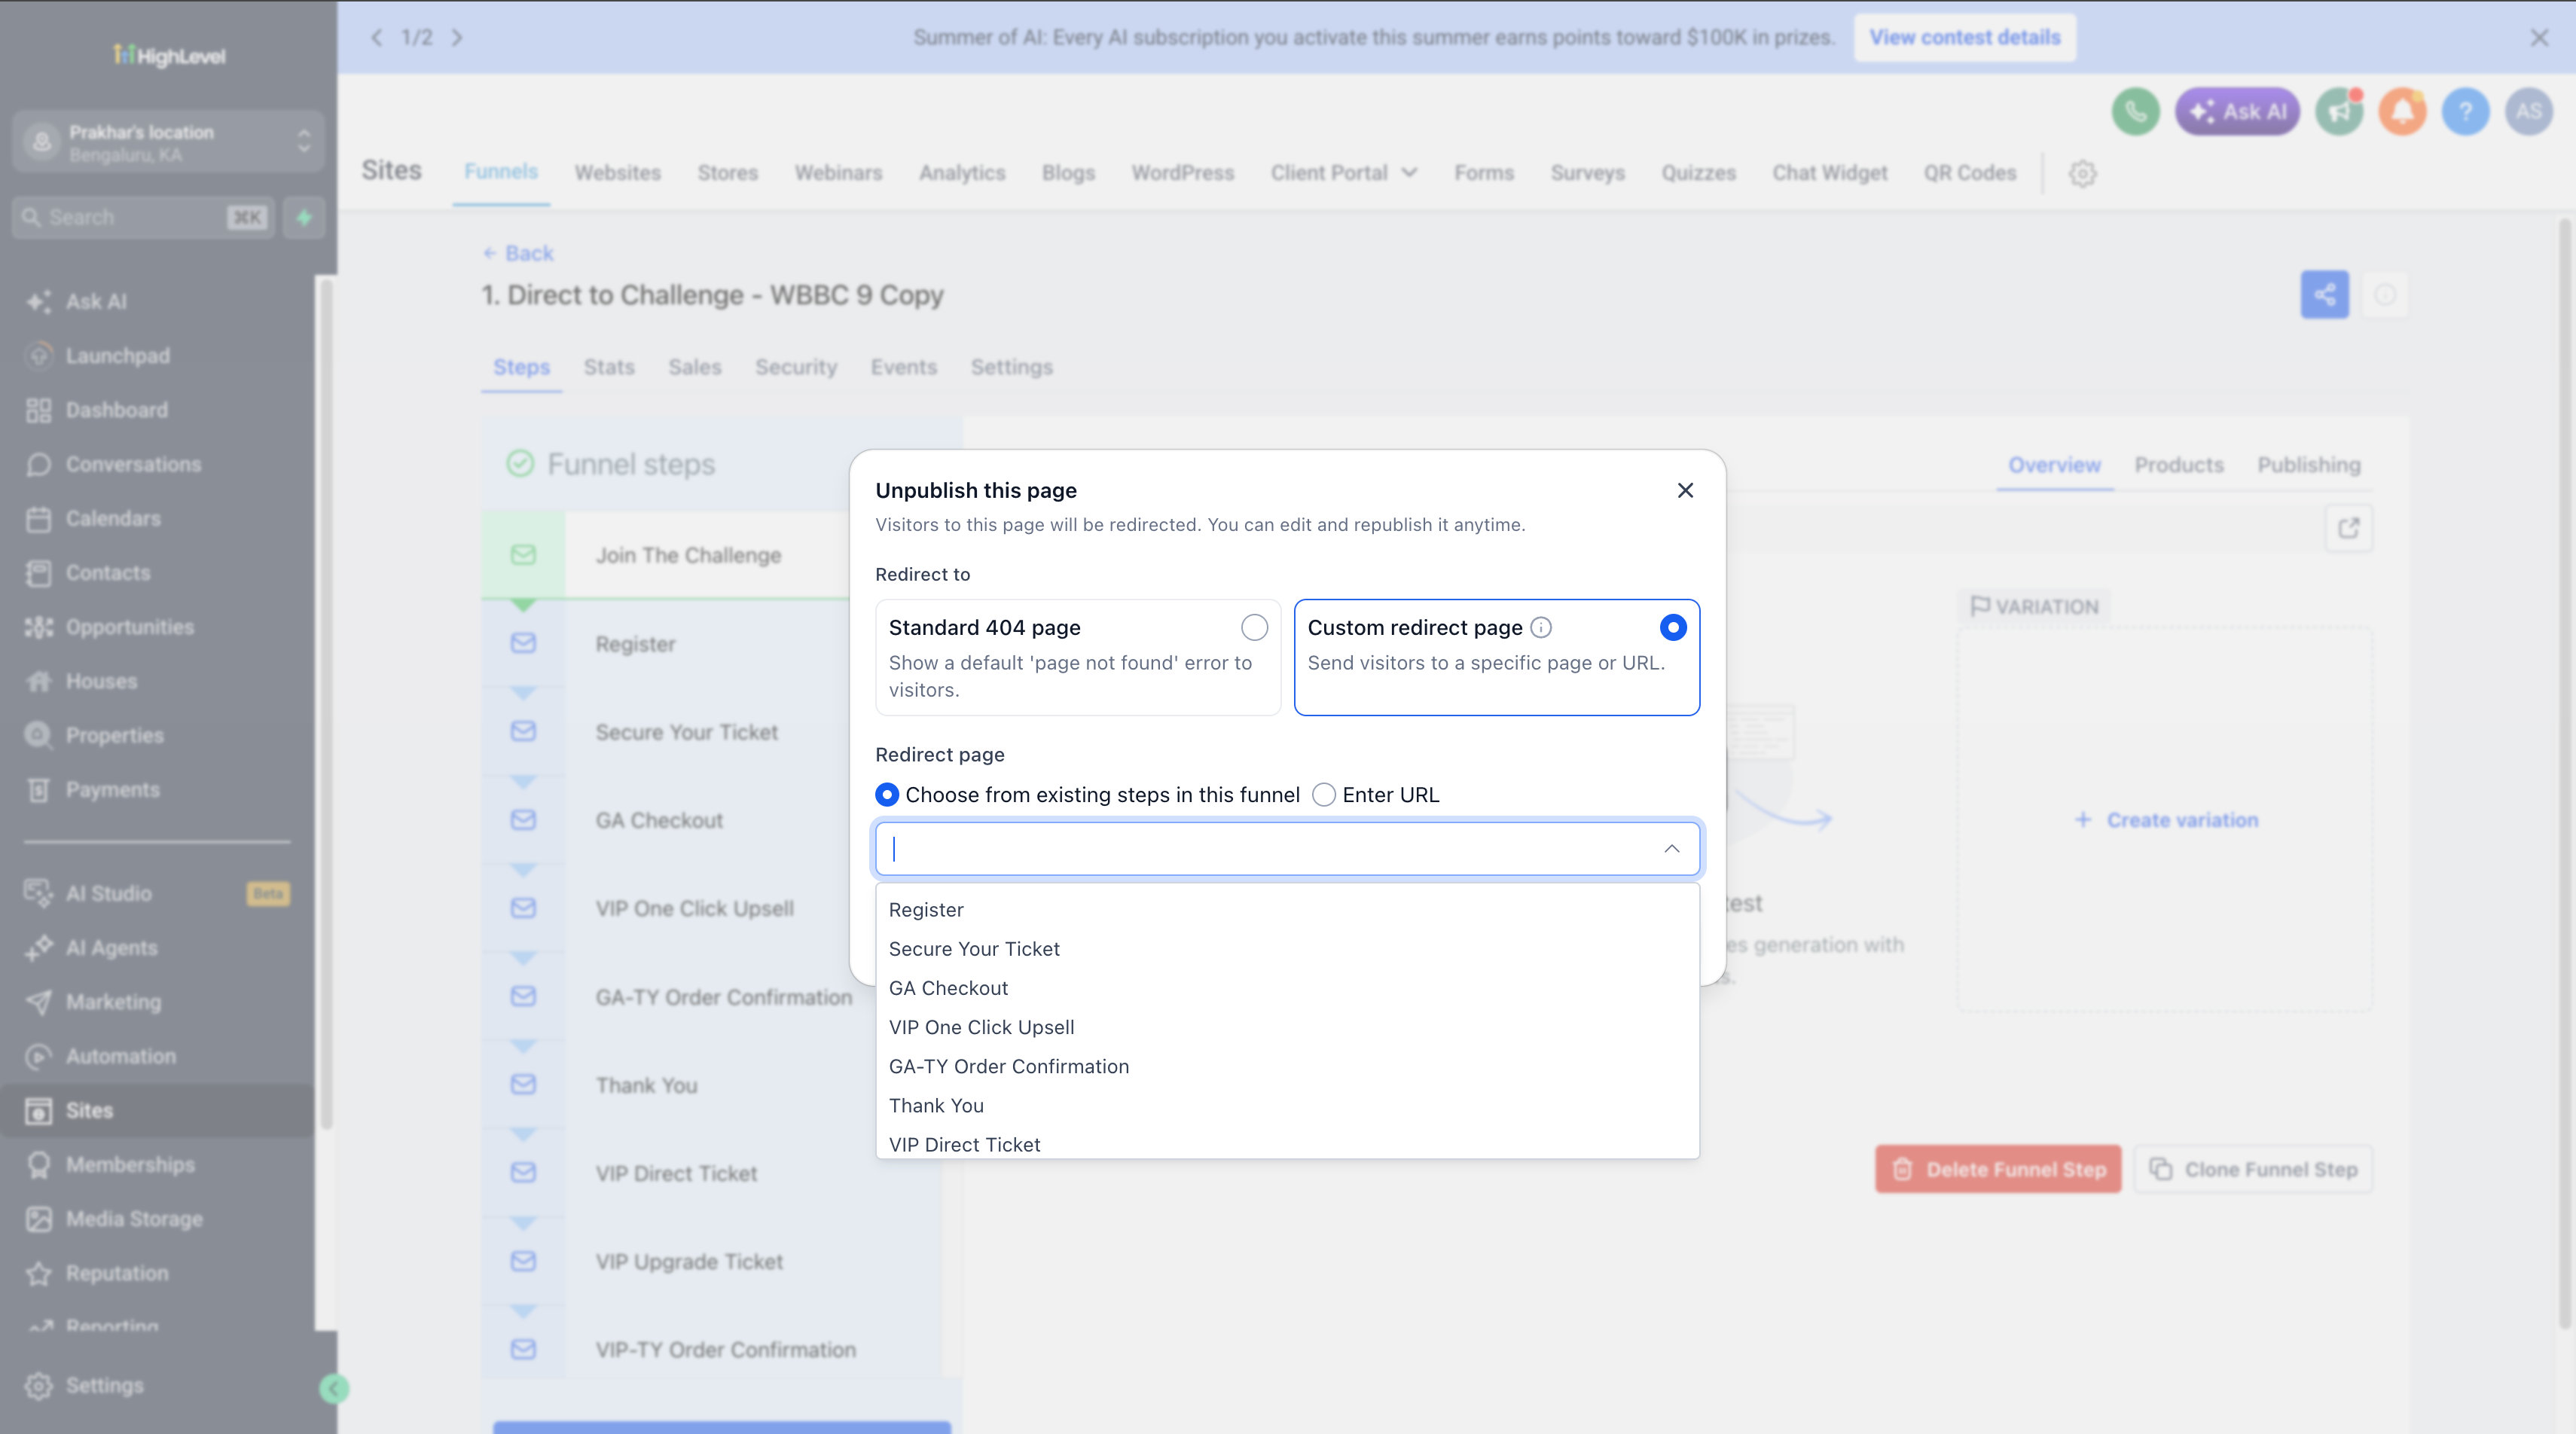
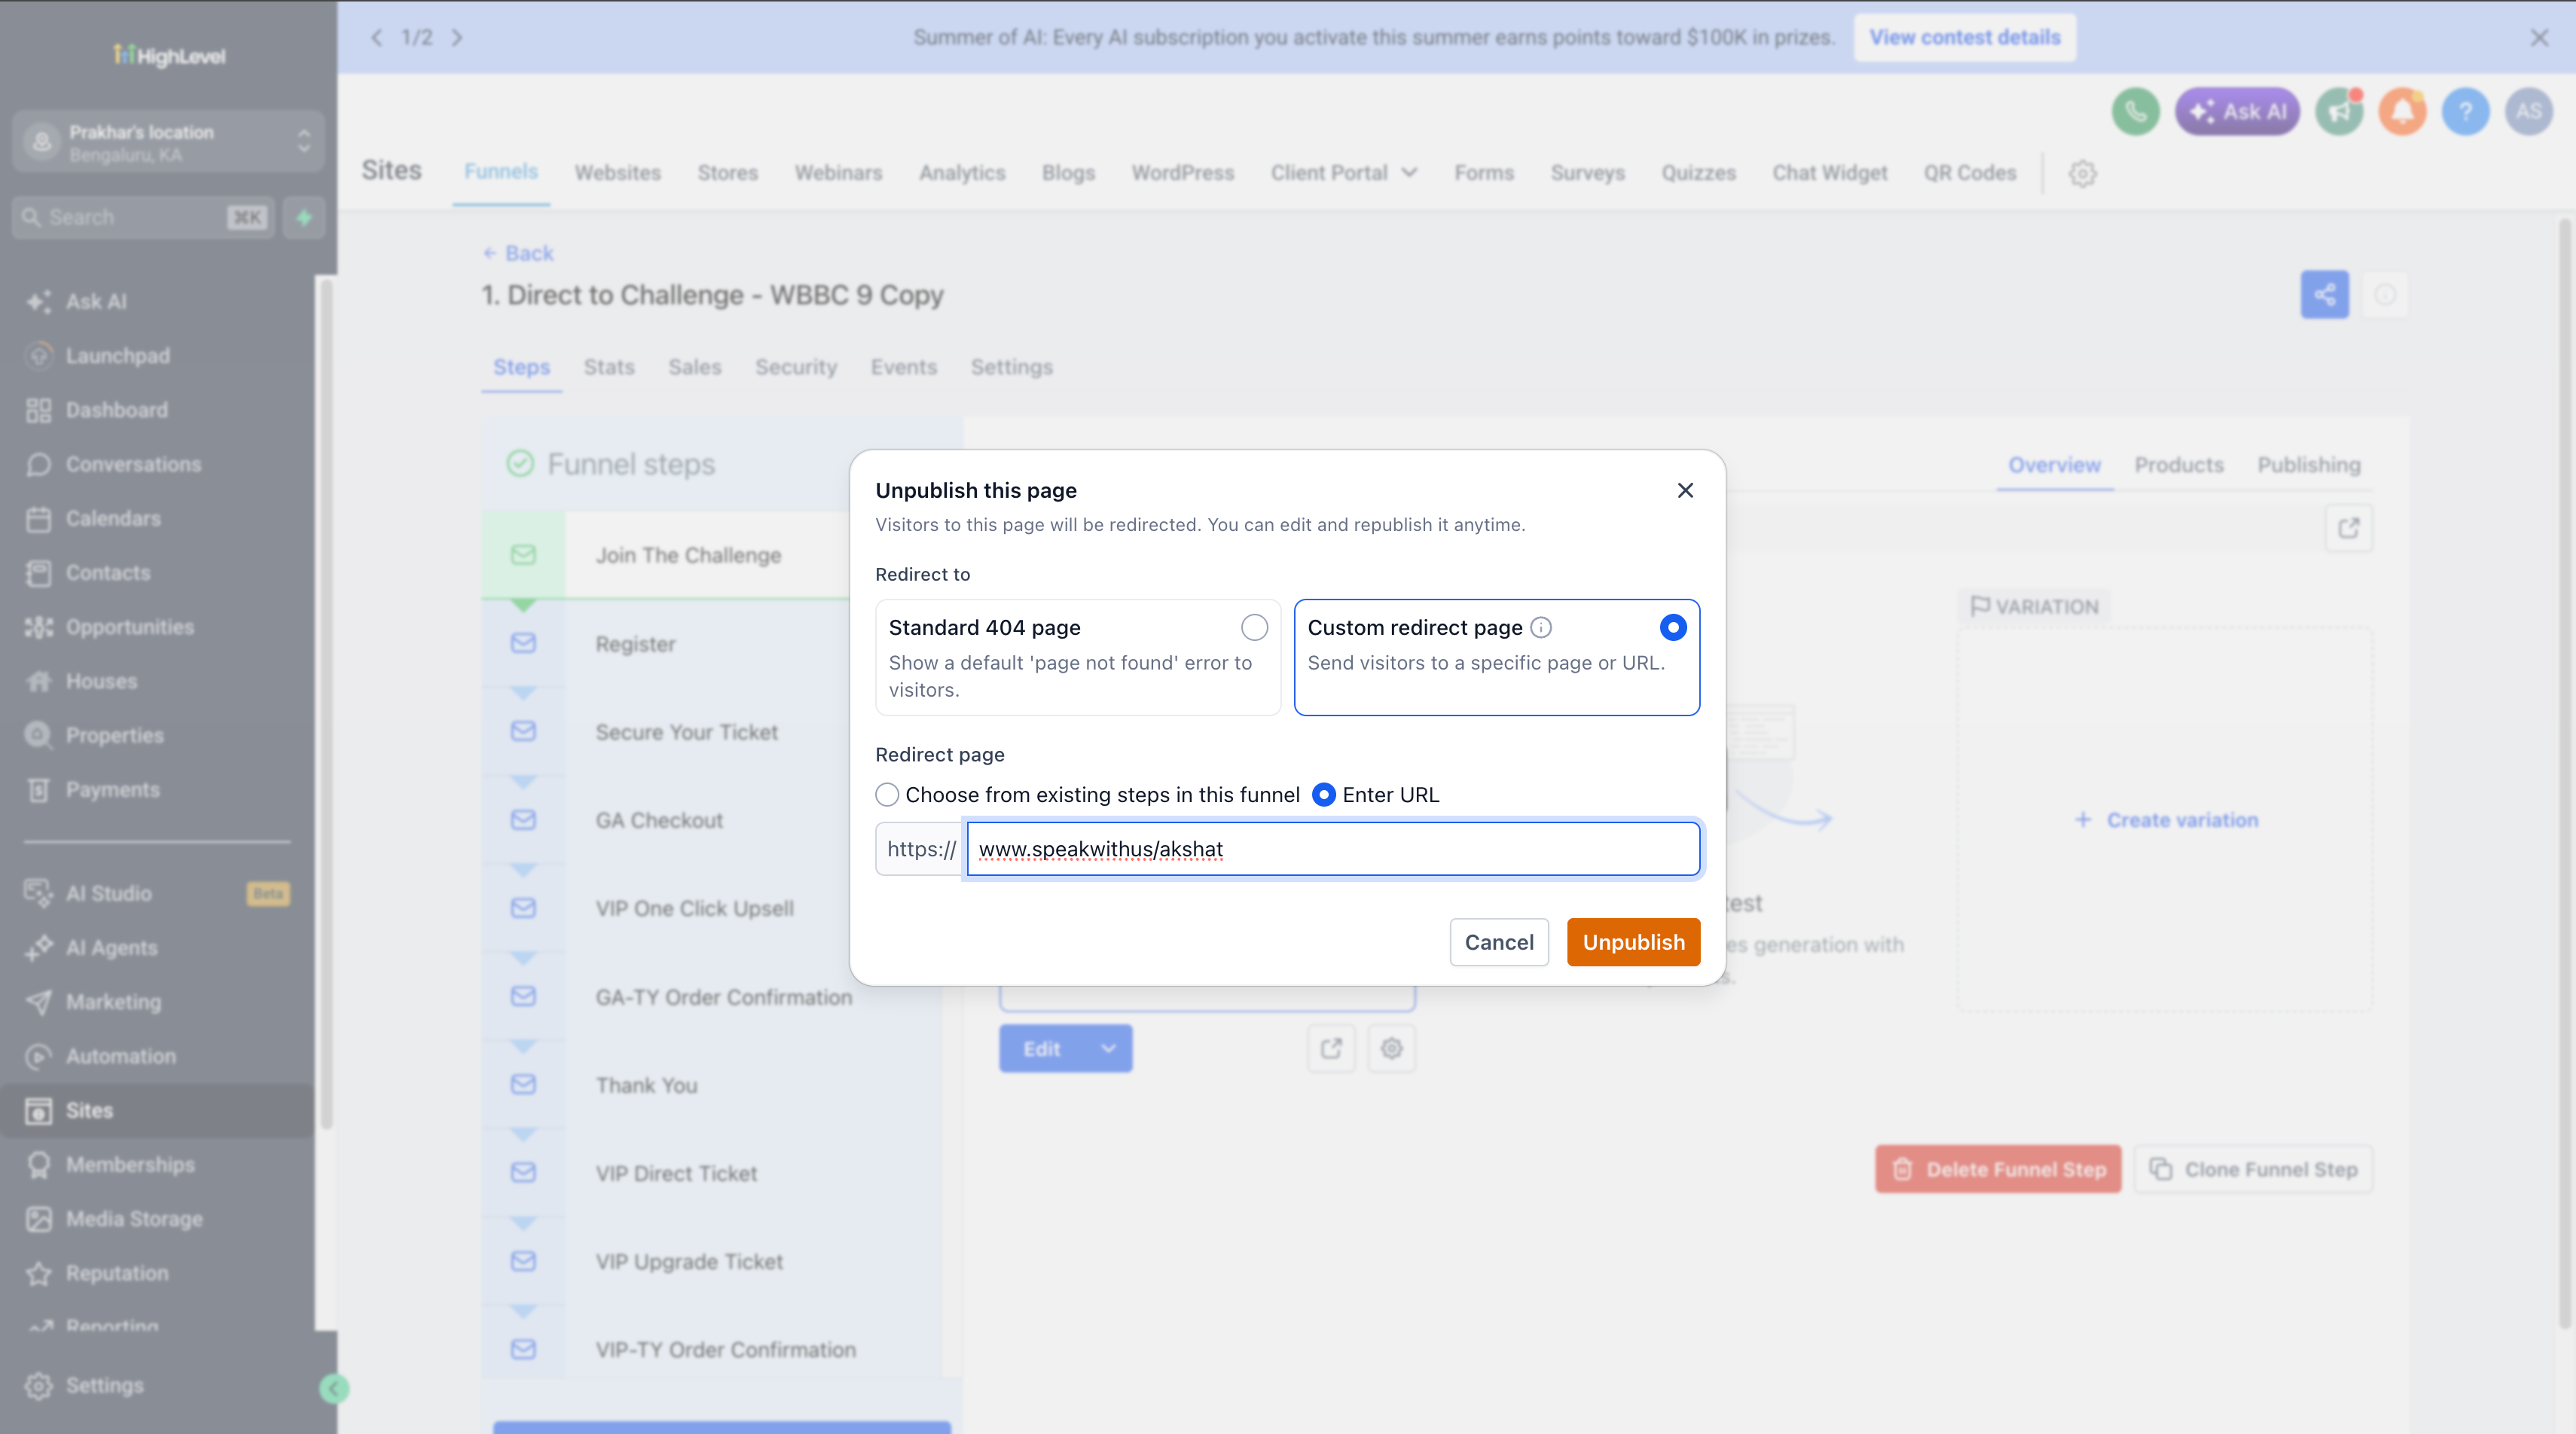
  • 🔄Built-in Redirects: When unpublishing, choose exactly what visitors hitting the old URL should see - a standard 404 page, a redirect to another page in the same funnel/website, or a redirect to any external URL.

  • ✏️Edit Redirect Anytime: Already unpublished a page? Use Edit Redirect Link to change where its traffic goes at any time - without touching the page's publish state.

  • 🔗 Publish with Domain Setup in One Flow: Publishing a page on a funnel or website with no domain attached prompts you to select, purchase, or connect a domain and takes the page live - all in a single flow.

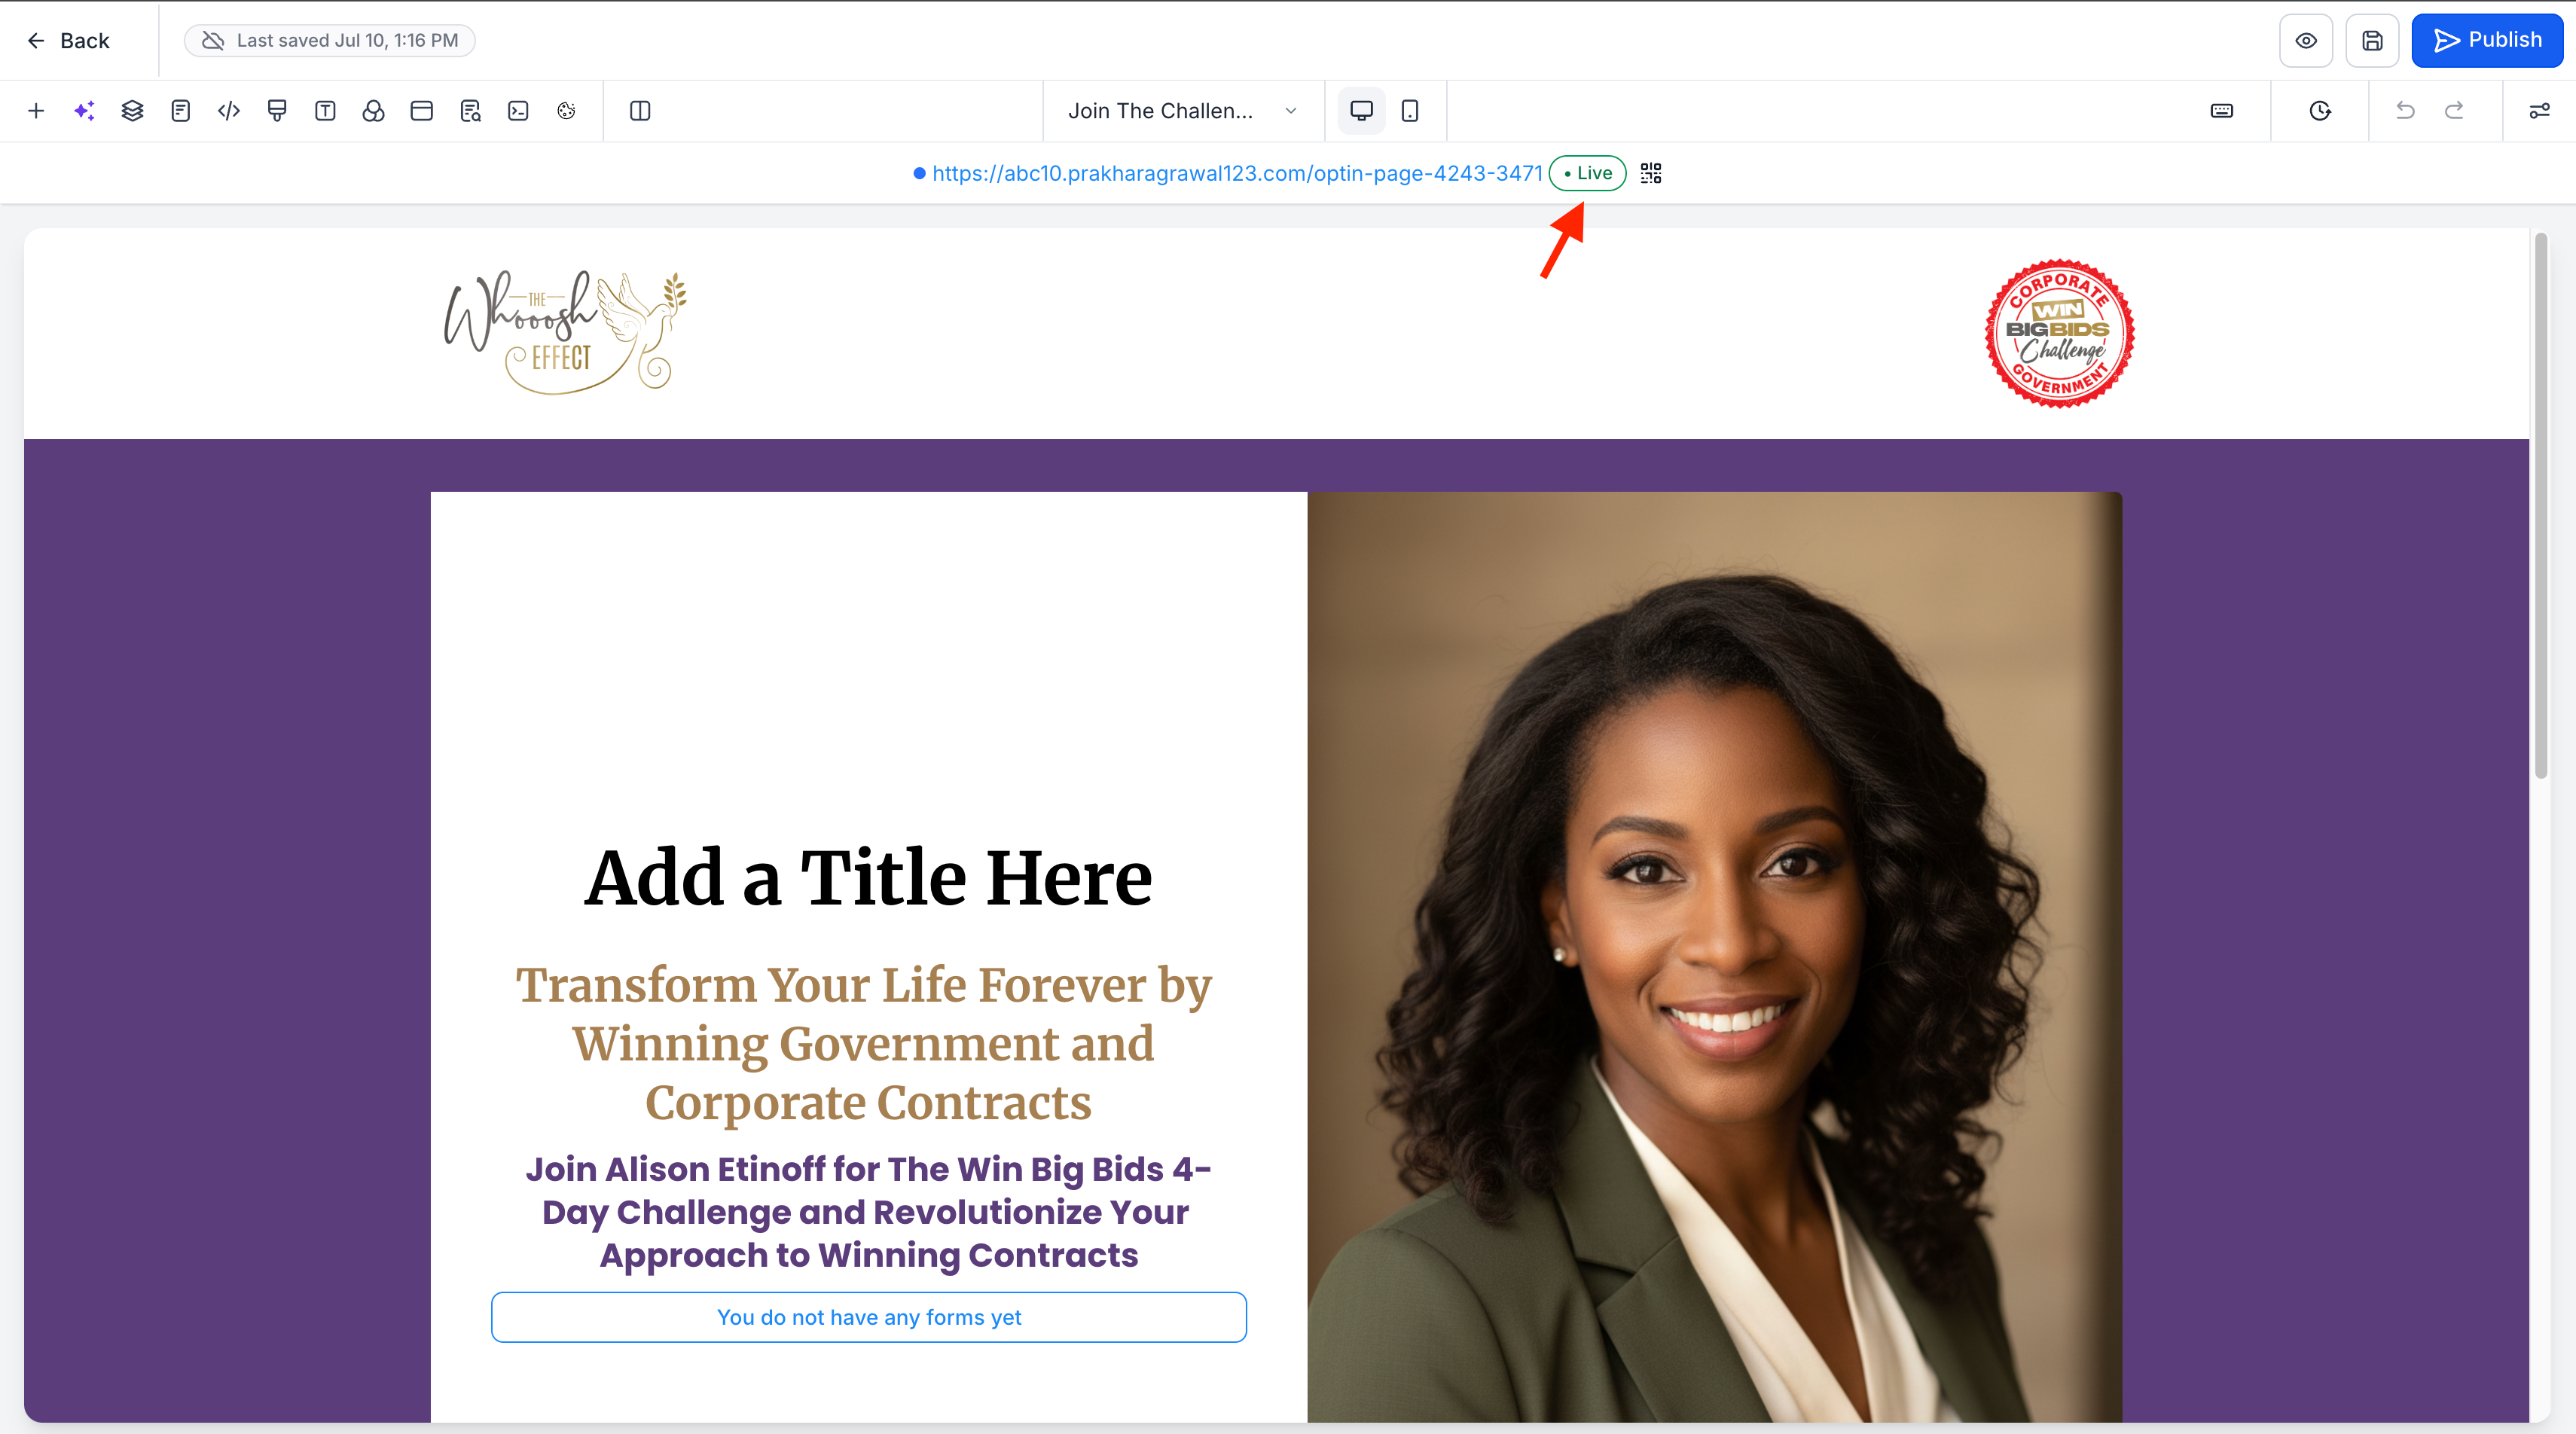
  • 👀 Status Visibility Everywhere: Unpublished pages show a clear Unpublished tag in the page list and step sidebar, and the builder header displays a live status chip (• Live / • Unpublished) along with the page's live URL and who last changed its status.

💡Why it Matters

  • 📈SEO Preservation: No more broken links or lost link equity. The redirect step is part of the unpublish flow itself, so traffic gets routed properly the moment content comes down.

  • 🎯Improved User Control: No more permanently deleting pages (and losing historic data) or assigning obscure URLs just to hide an offer. Unpublishing is fully reversible - the page stays editable and can be re-published anytime.

  • 🧠Reduced Confusion: Solves the common mistake where users disconnected their entire domain when they only meant to hide a single landing page.

  • 👥Team Accountability: Every publish/unpublish records who made the change and when, so multi-collaborator teams always know a page's history.

⭐ Key Highlights

  • 🛡️ Zero Domain Disruption: Un-publishing a page will not disrupt your connected domain's SSL certificate or DNS settings.

  • 🚧 Smart Fallbacks: If no redirect URL is provided during un-publishing, the system automatically routes visitors to a default 404 error page.

  • ⚖️ A/B Testing Handled: If an A/B test is running on a page you unpublish, the test is automatically stopped, but all historic metrics and stats are preserved.

  • 🧭 Clean Navigation: Unpublished pages are automatically excluded from the options list when linking navigation paths (like buttons or image navs).

  • ⚡️ Instant Effect: Status changes take effect immediately - no full-funnel republish required.

🛠️ How it Works

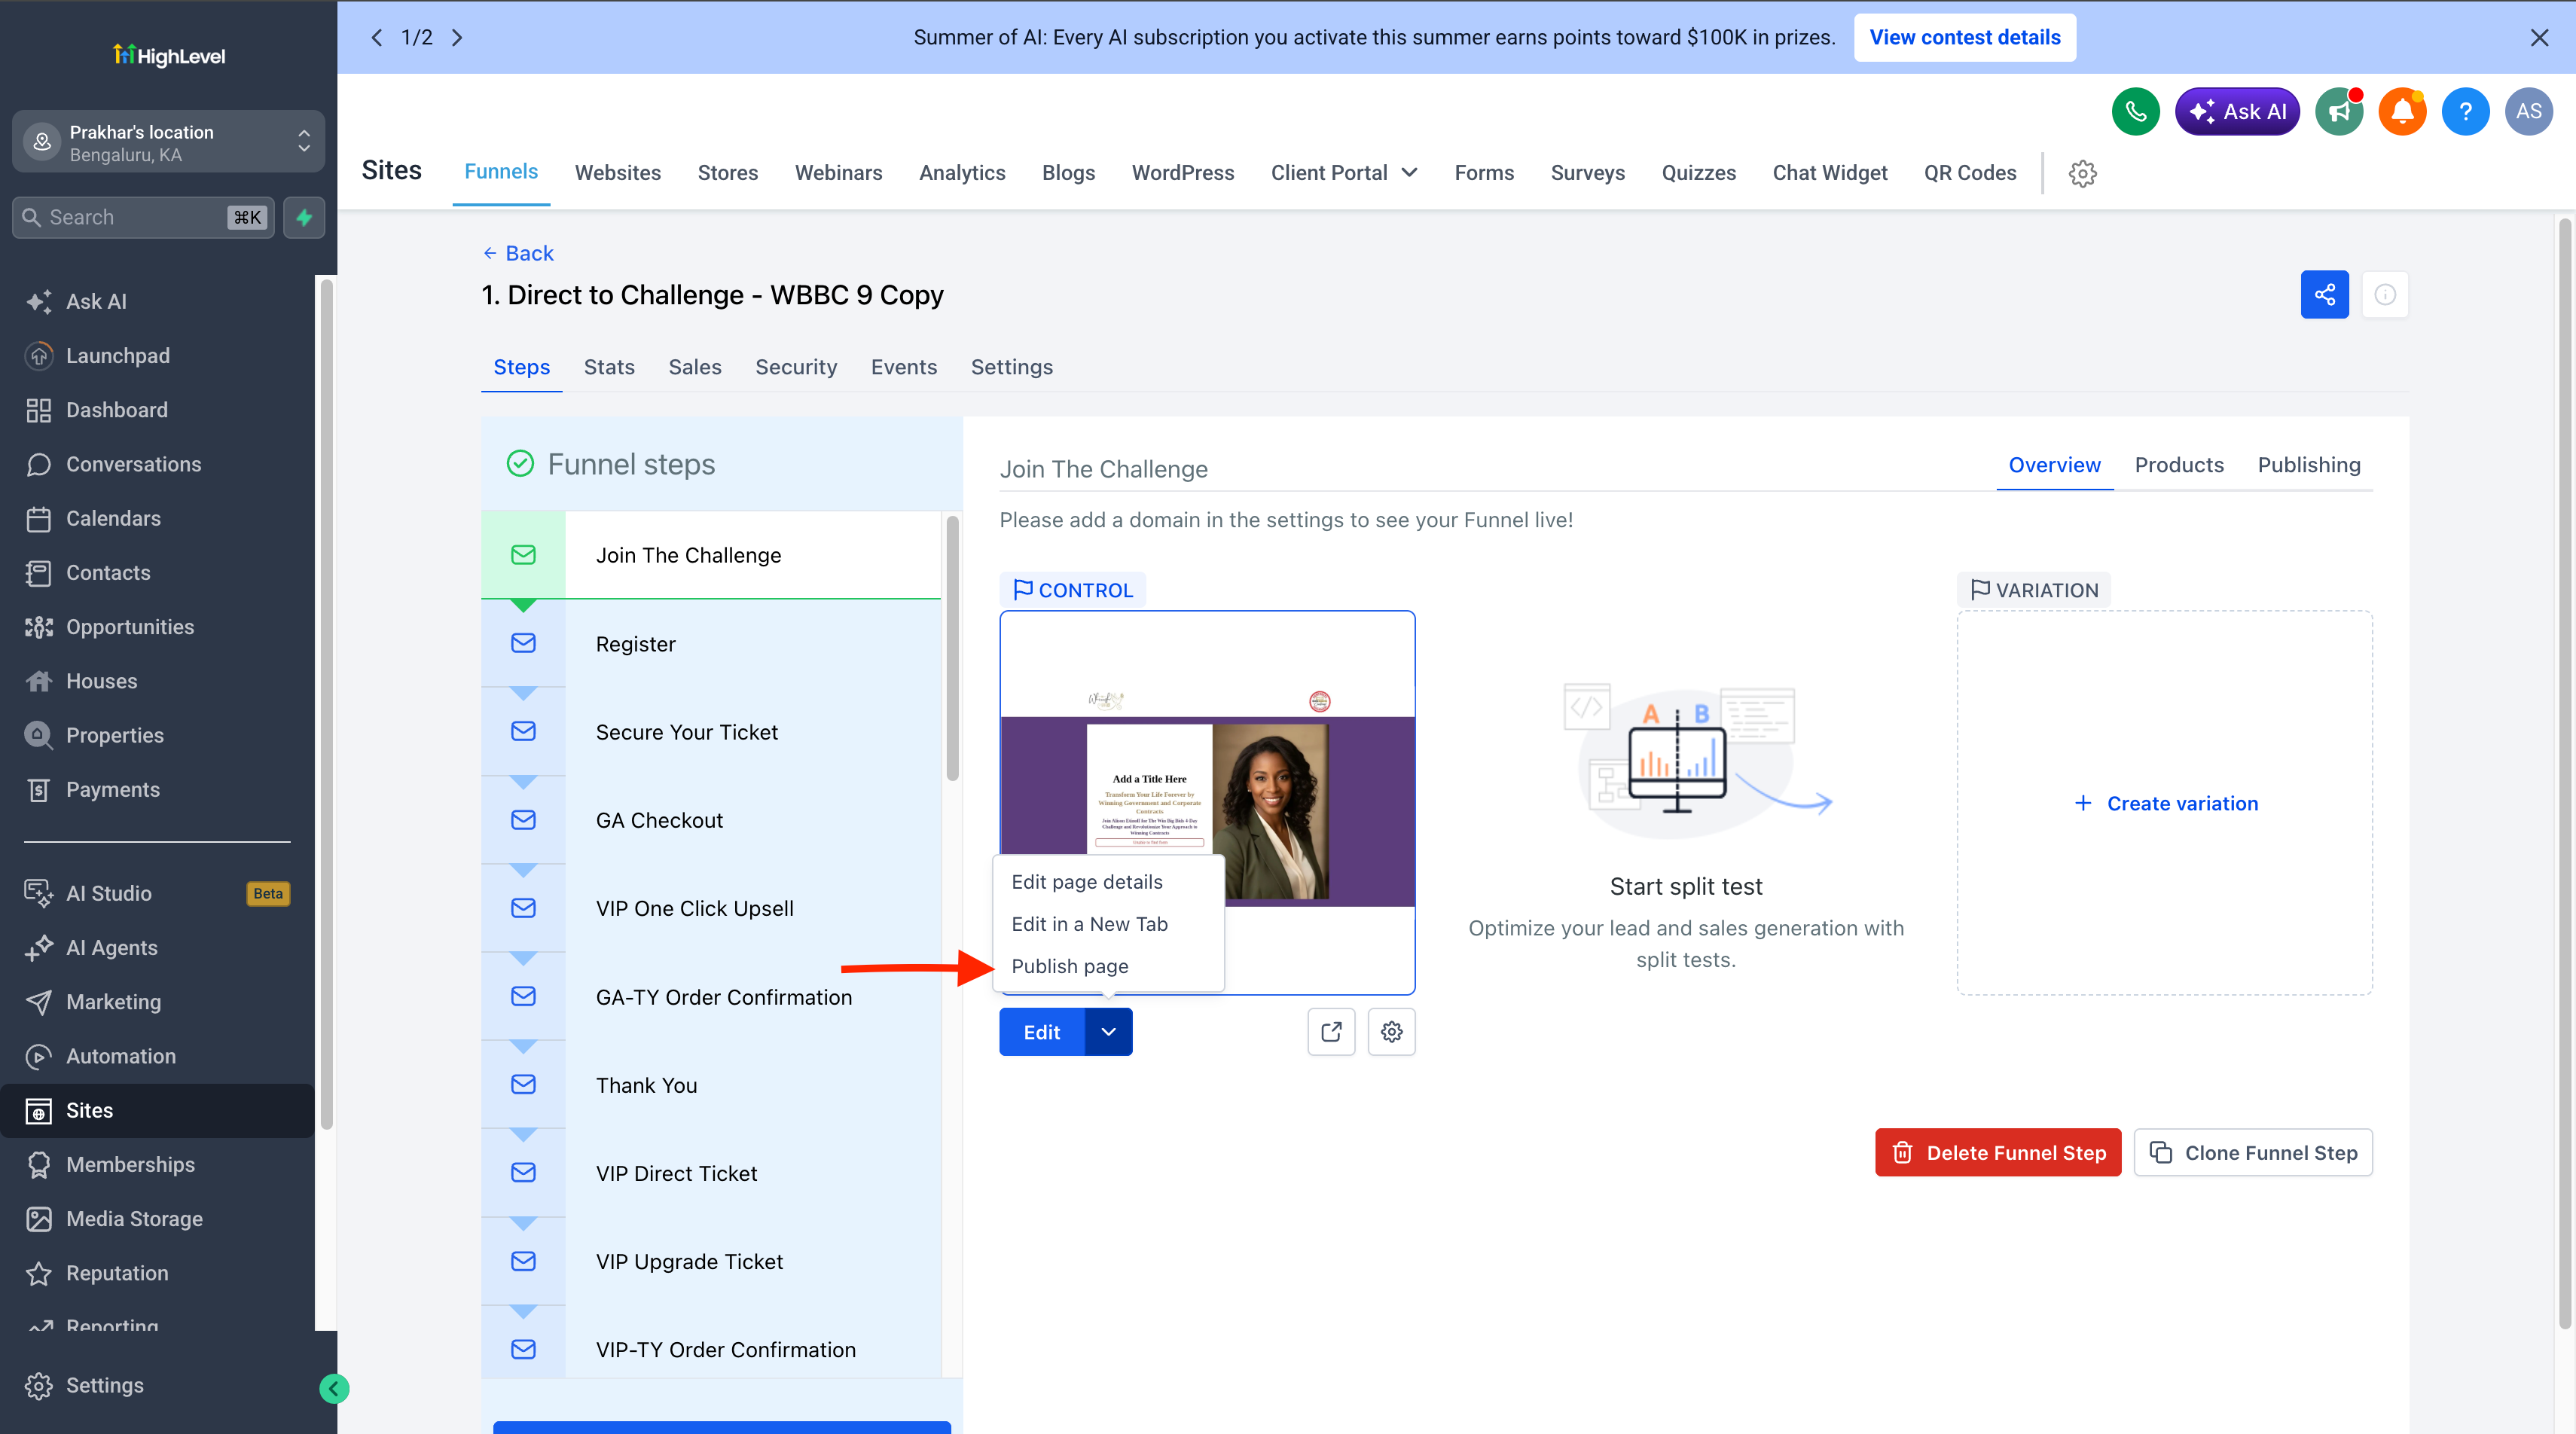
  1. Open the funnel or website you want to manage and go to its page list (Funnel details / Website details).

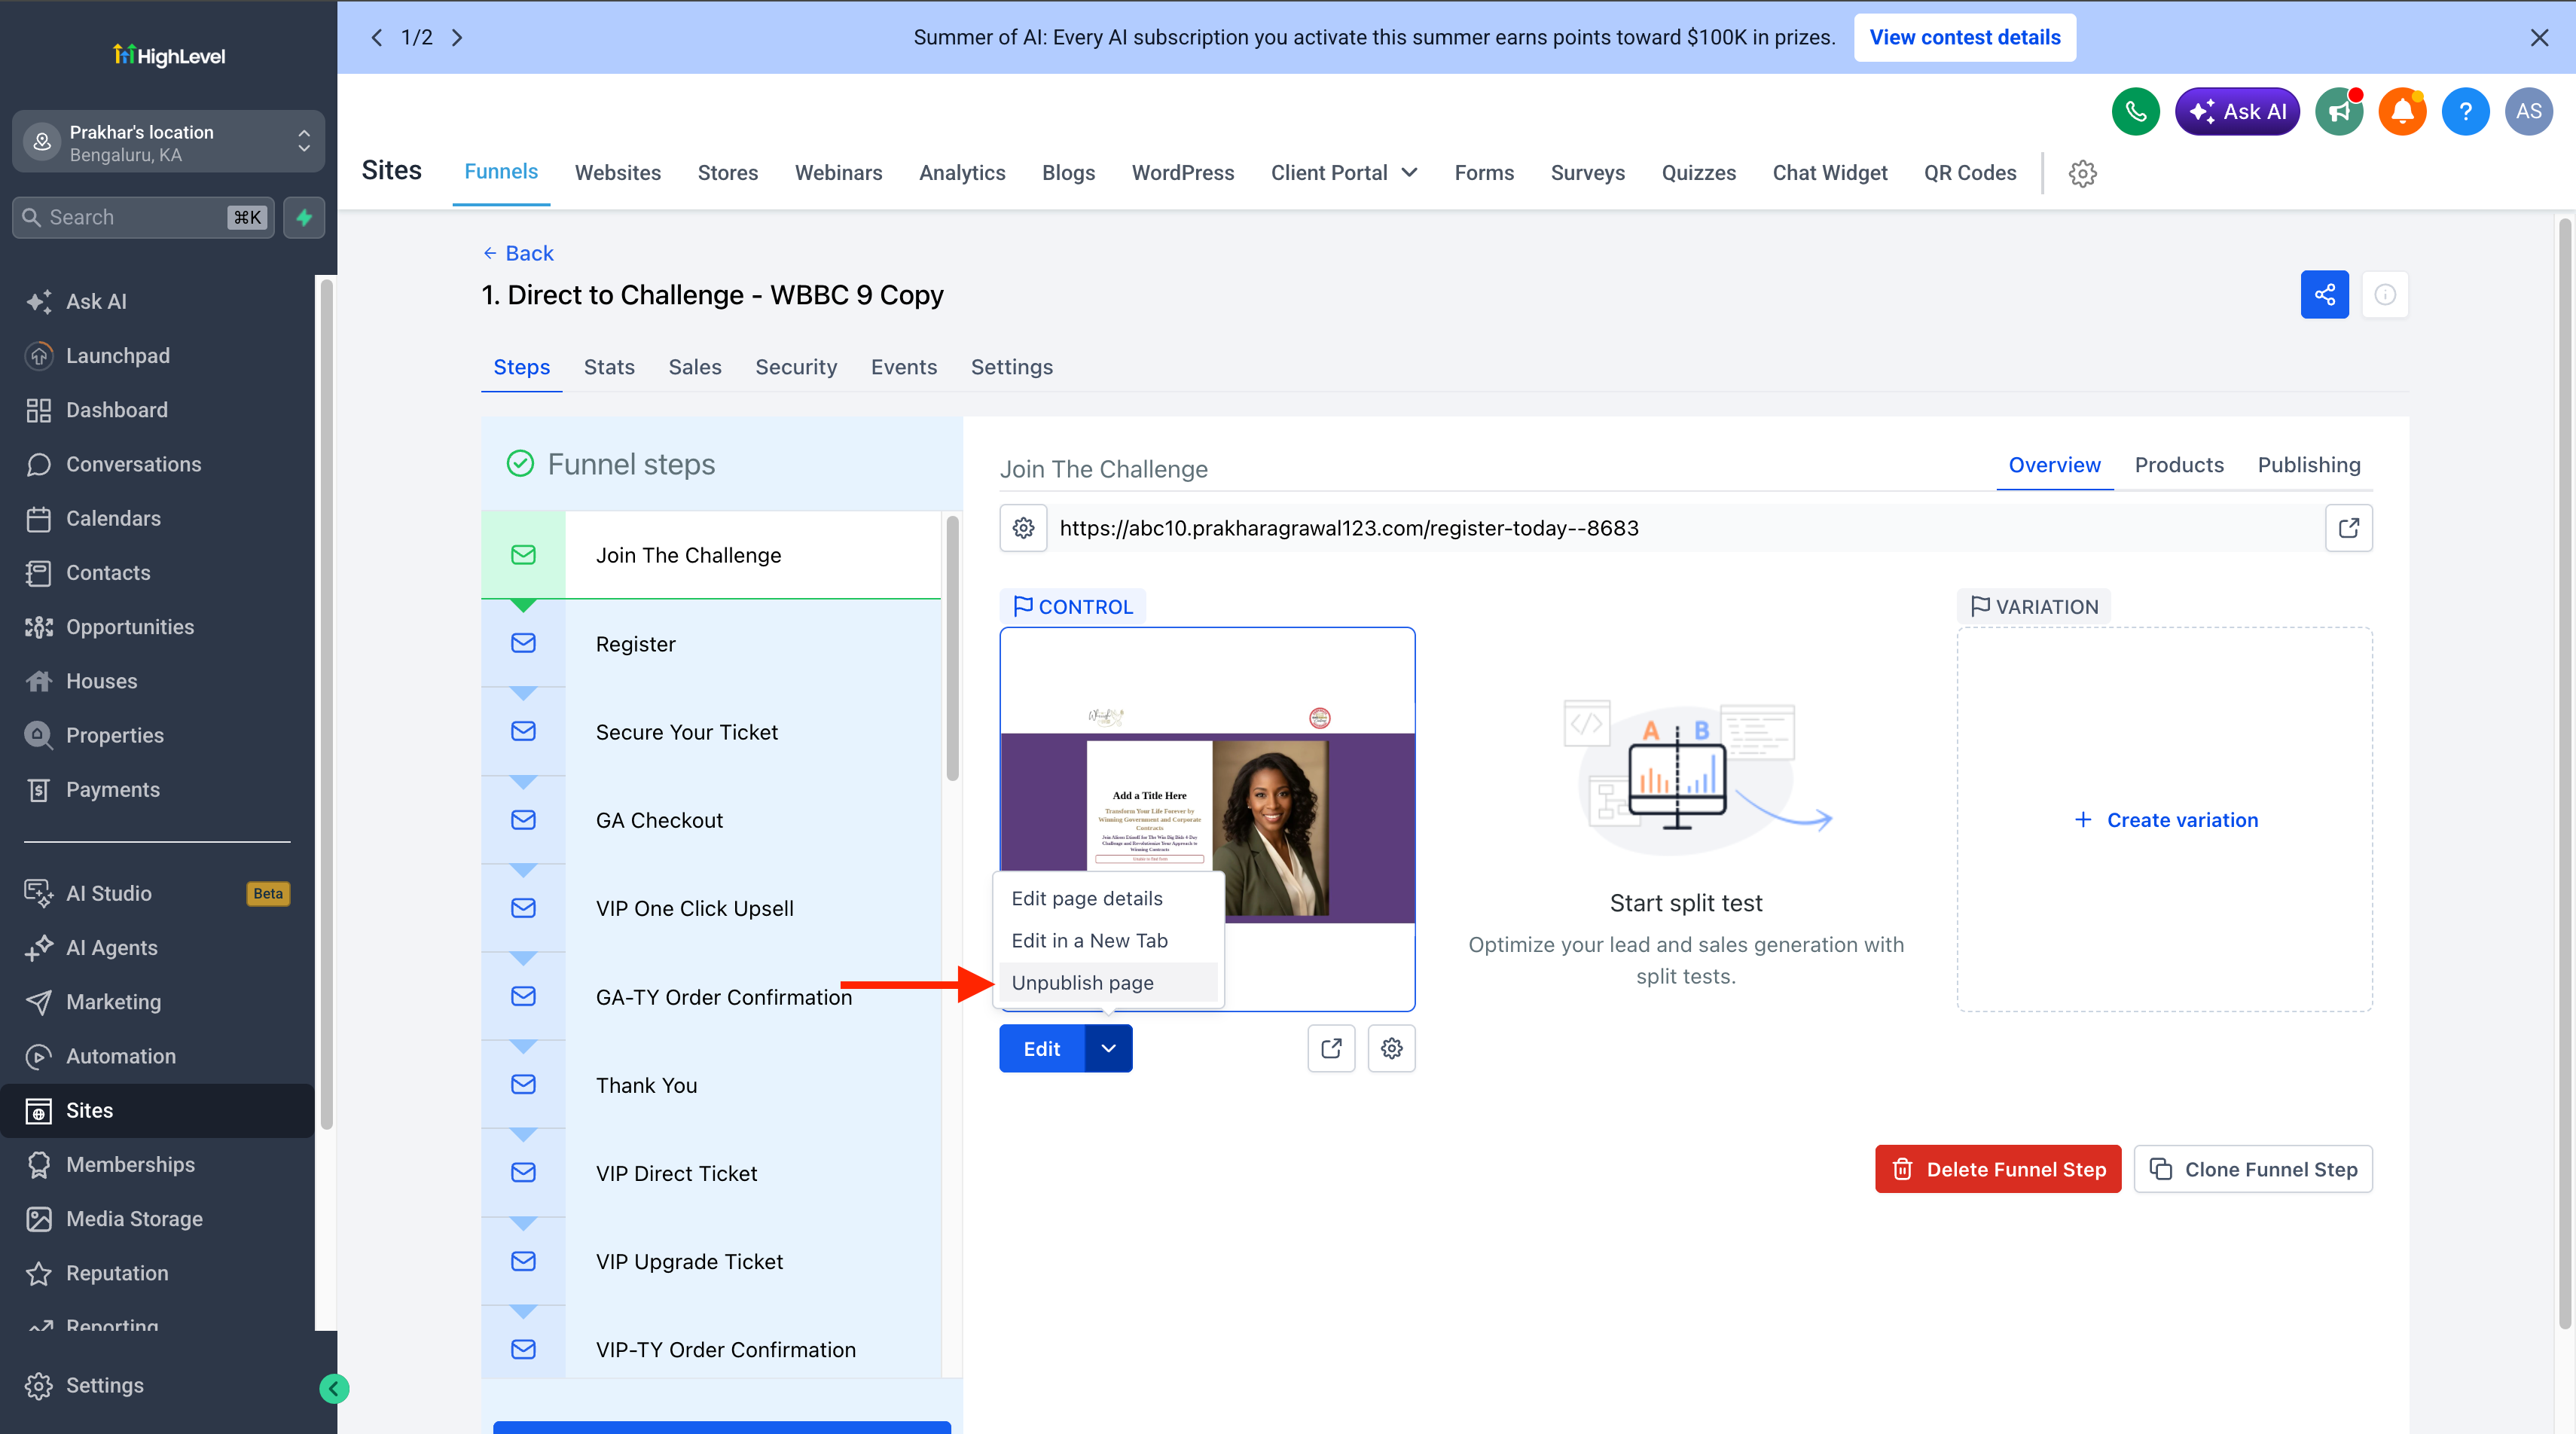
  2. Select the page you want to take offline and open its Options menu.

Screenshot 2026-08-06 at 1
  1. Choose Unpublish. A confirmation dialog appears, with an info banner explaining exactly what un-publishing this page will (and won't) affect.

Screenshot 2026-08-06 at 1
  1. Pick the redirect behavior:Standard 404, redirect to an existing page in the funnel/website, or redirect to a custom external URL.

Screenshot 2026-08-06 at 1
  1. Confirm. The page goes offline immediately - visitors hitting its URL see your chosen 404/redirect, while all other published pages are unaffected.

Screenshot 2026-08-06 at 1
  1. Check status at a glance. The page now shows an unpublished tag inside the page list, and the builder header shows the status without leaving the canvas.

Screenshot 2026-08-06 at 2
image (15)
  1. Need to change where traffic goes later? Open the page's Options menu and choose Edit Redirect Link-update the destination without republishing.

  2. Re-publish anytime the same way - select the page, choose Publish, and confirm - to bring it back online instantly.

Screenshot 2026-08-06 at 1
  1. No domain yet? The publish flow prompts you to select, purchase, or connect a domain and takes your page live in one step.

  2. Manage everything from the builder too: Open the pages side panel and each page's menu gives you Edit, Preview, Clone, Publish/Un-publish, Edit Redirect Link, and Delete - the same steps apply in Websites.

Earlier updates