August 25th, 2026
Improved
Calendar
🚀 What’s New?
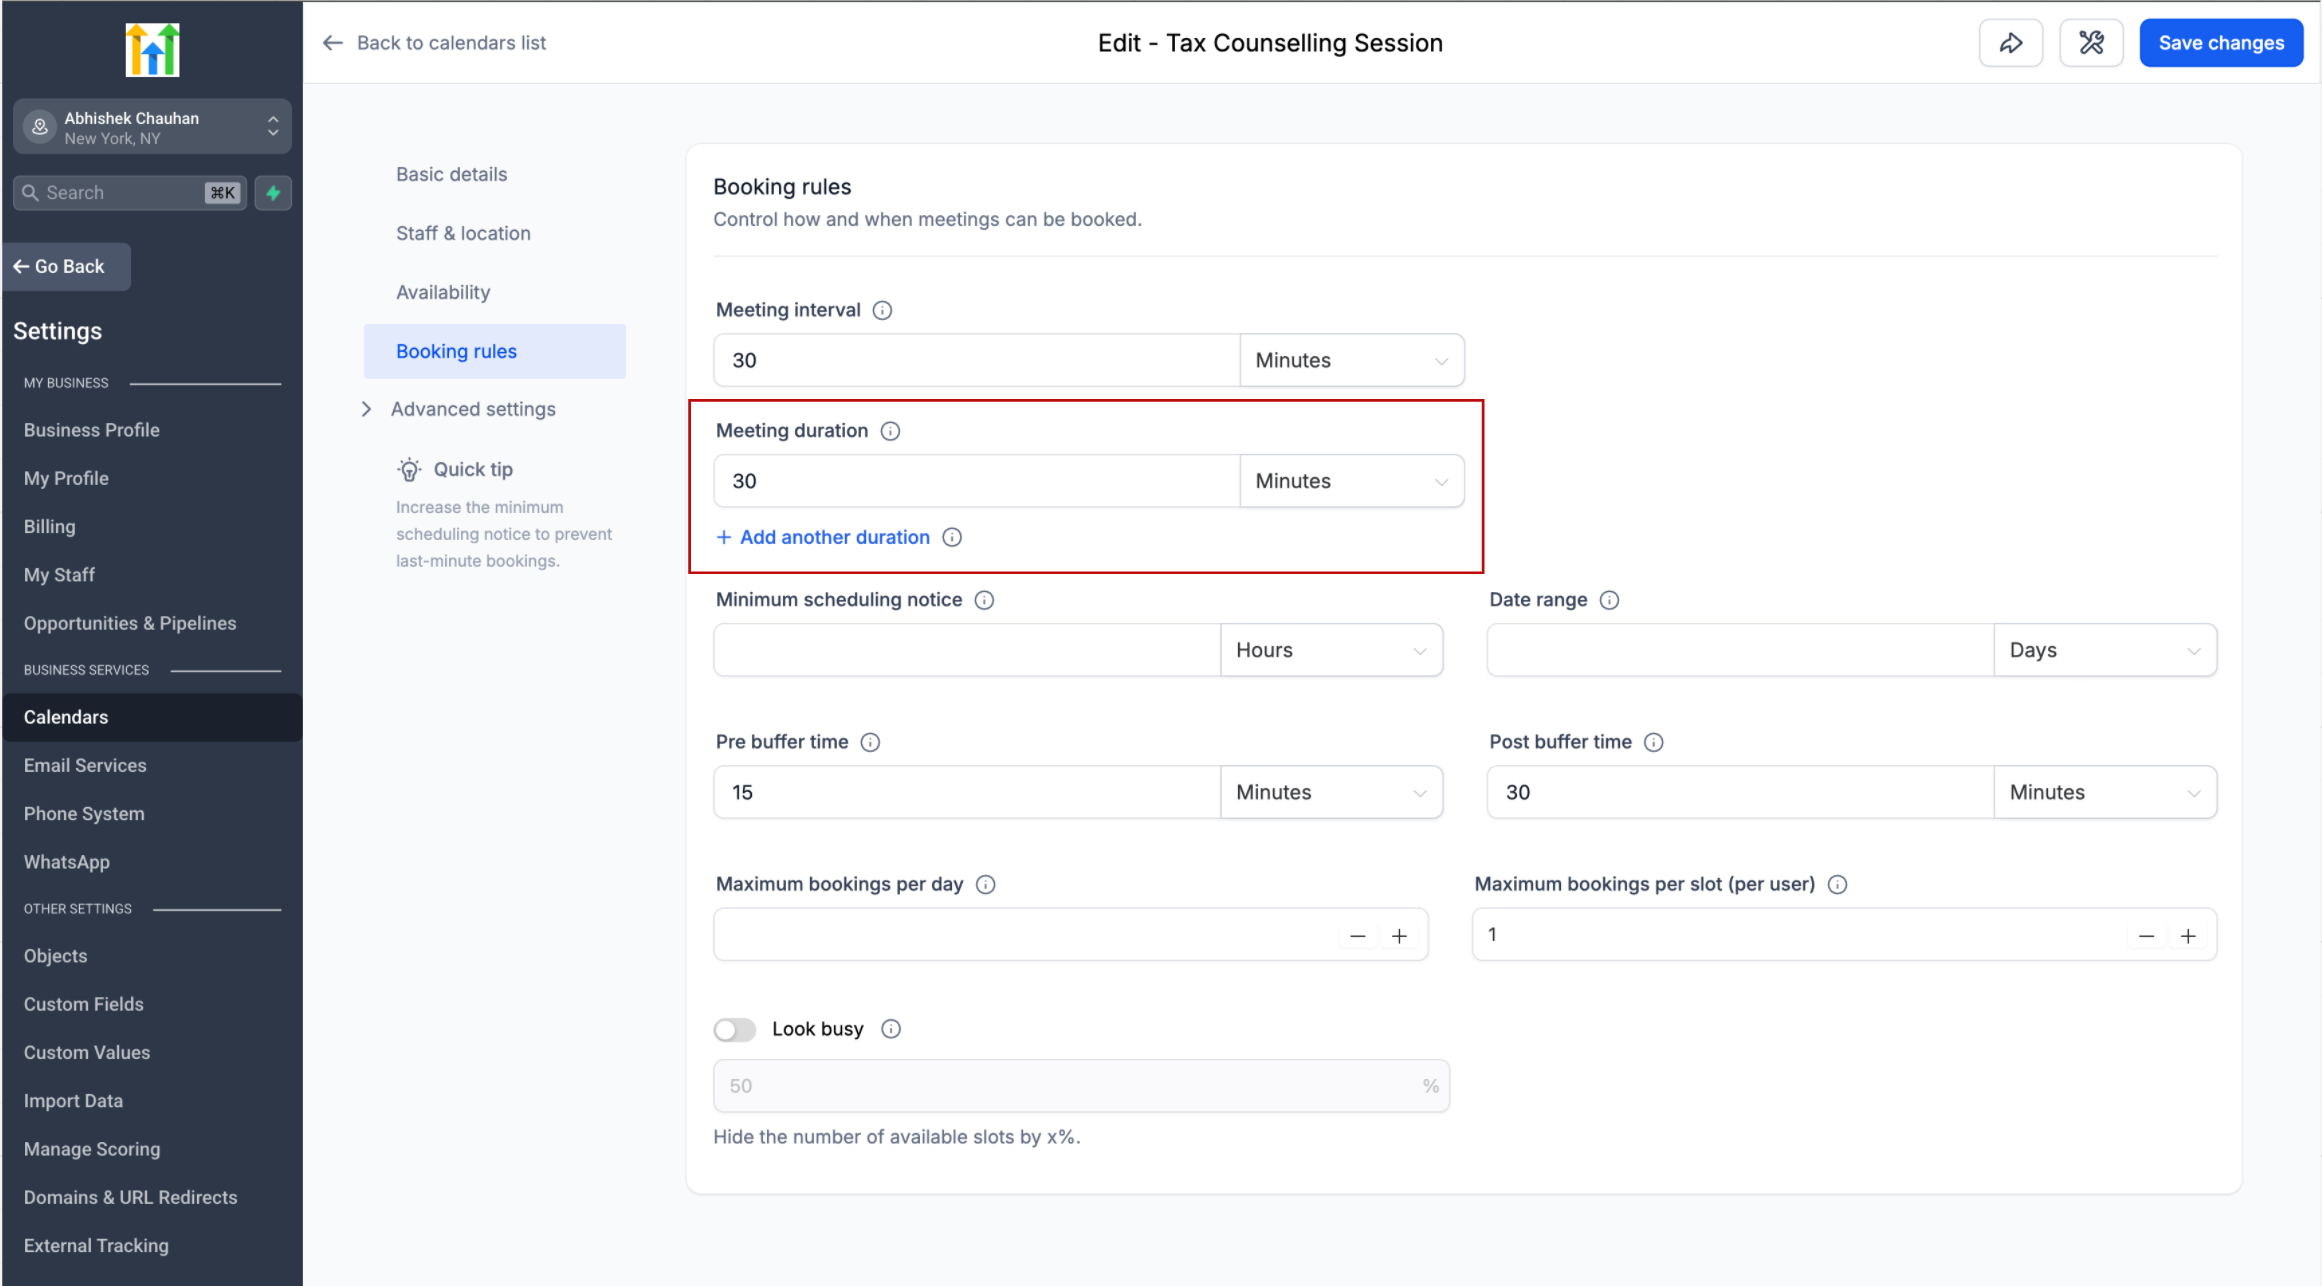
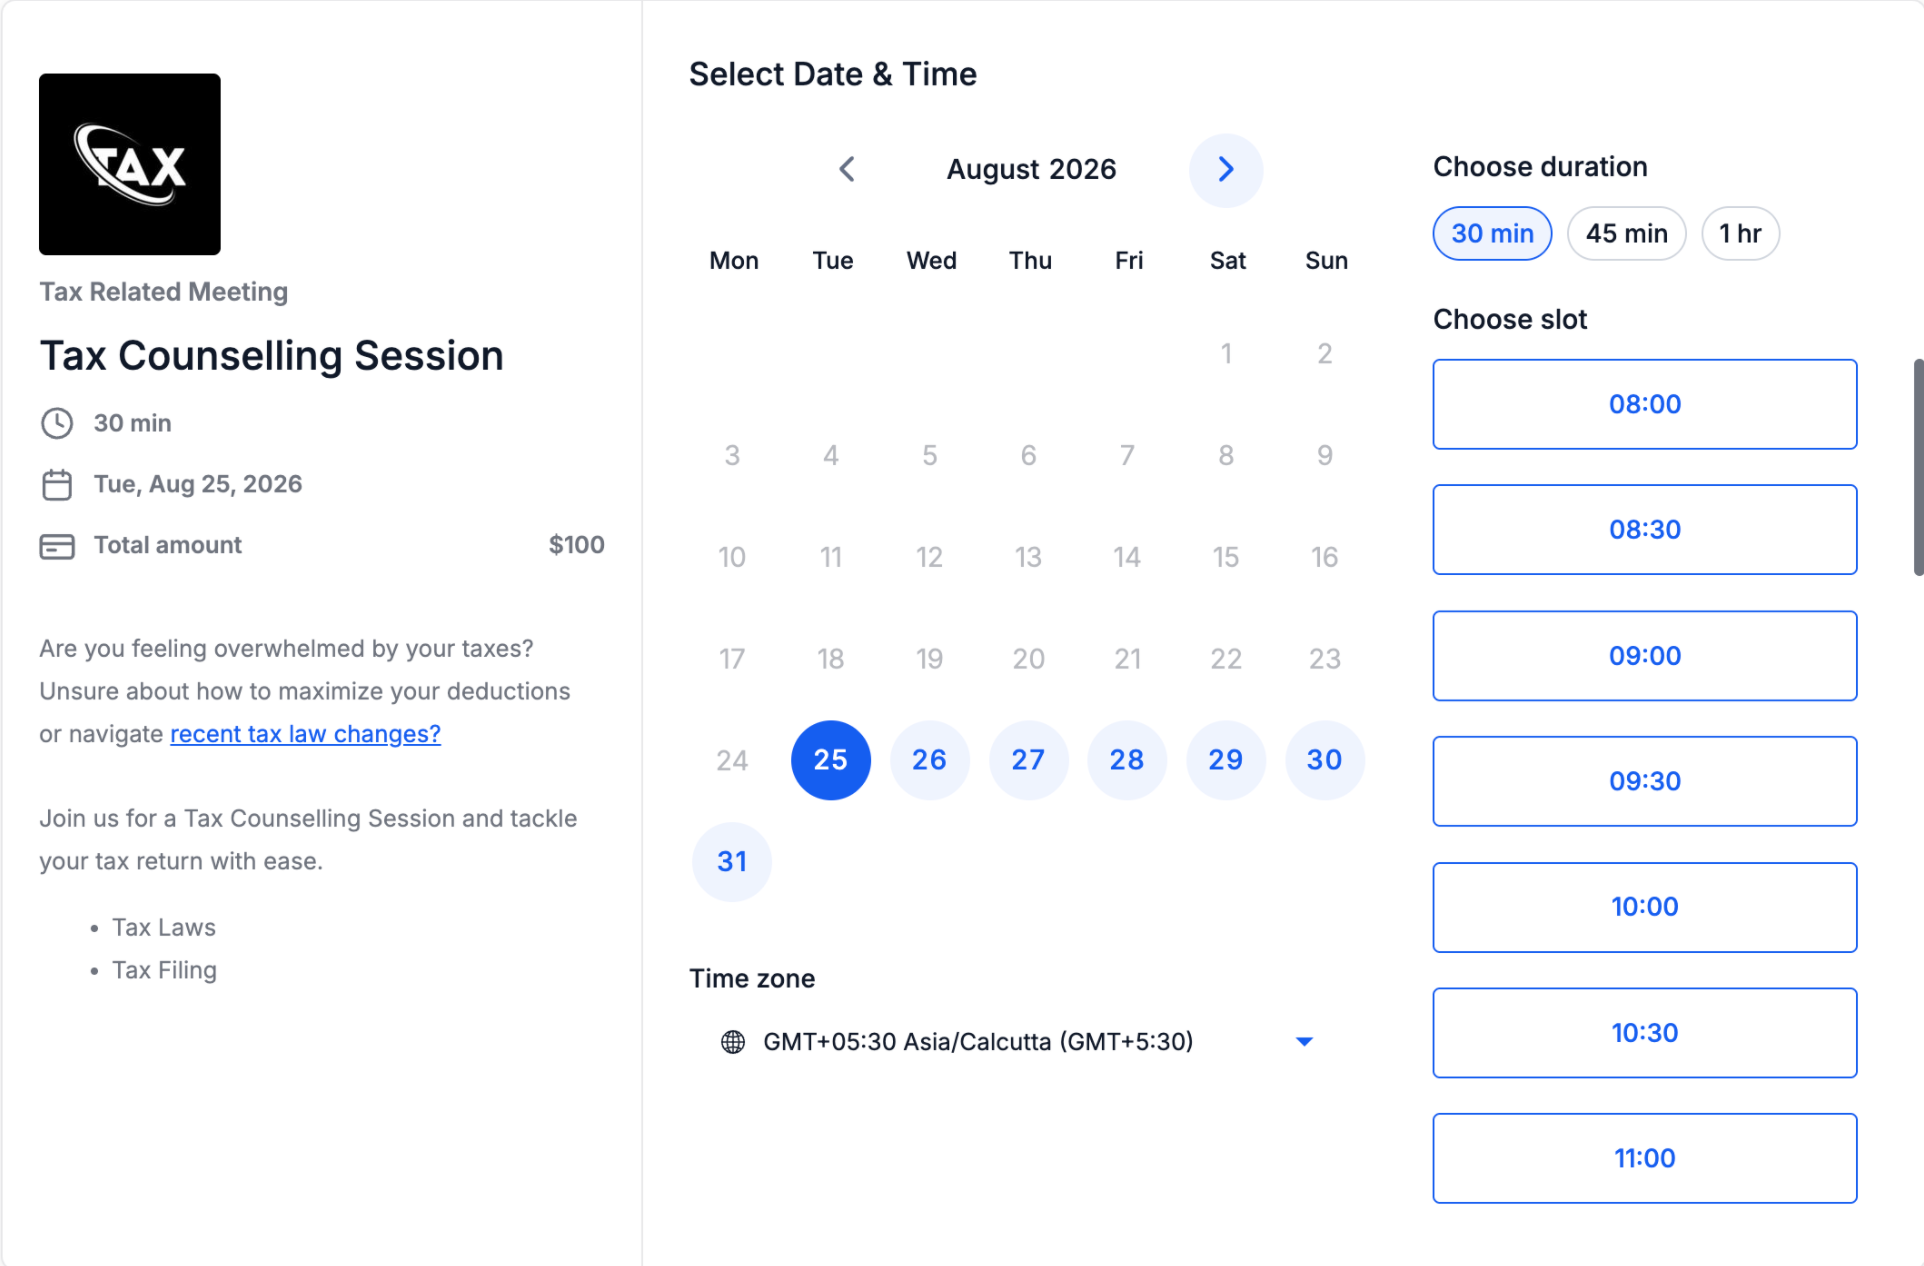
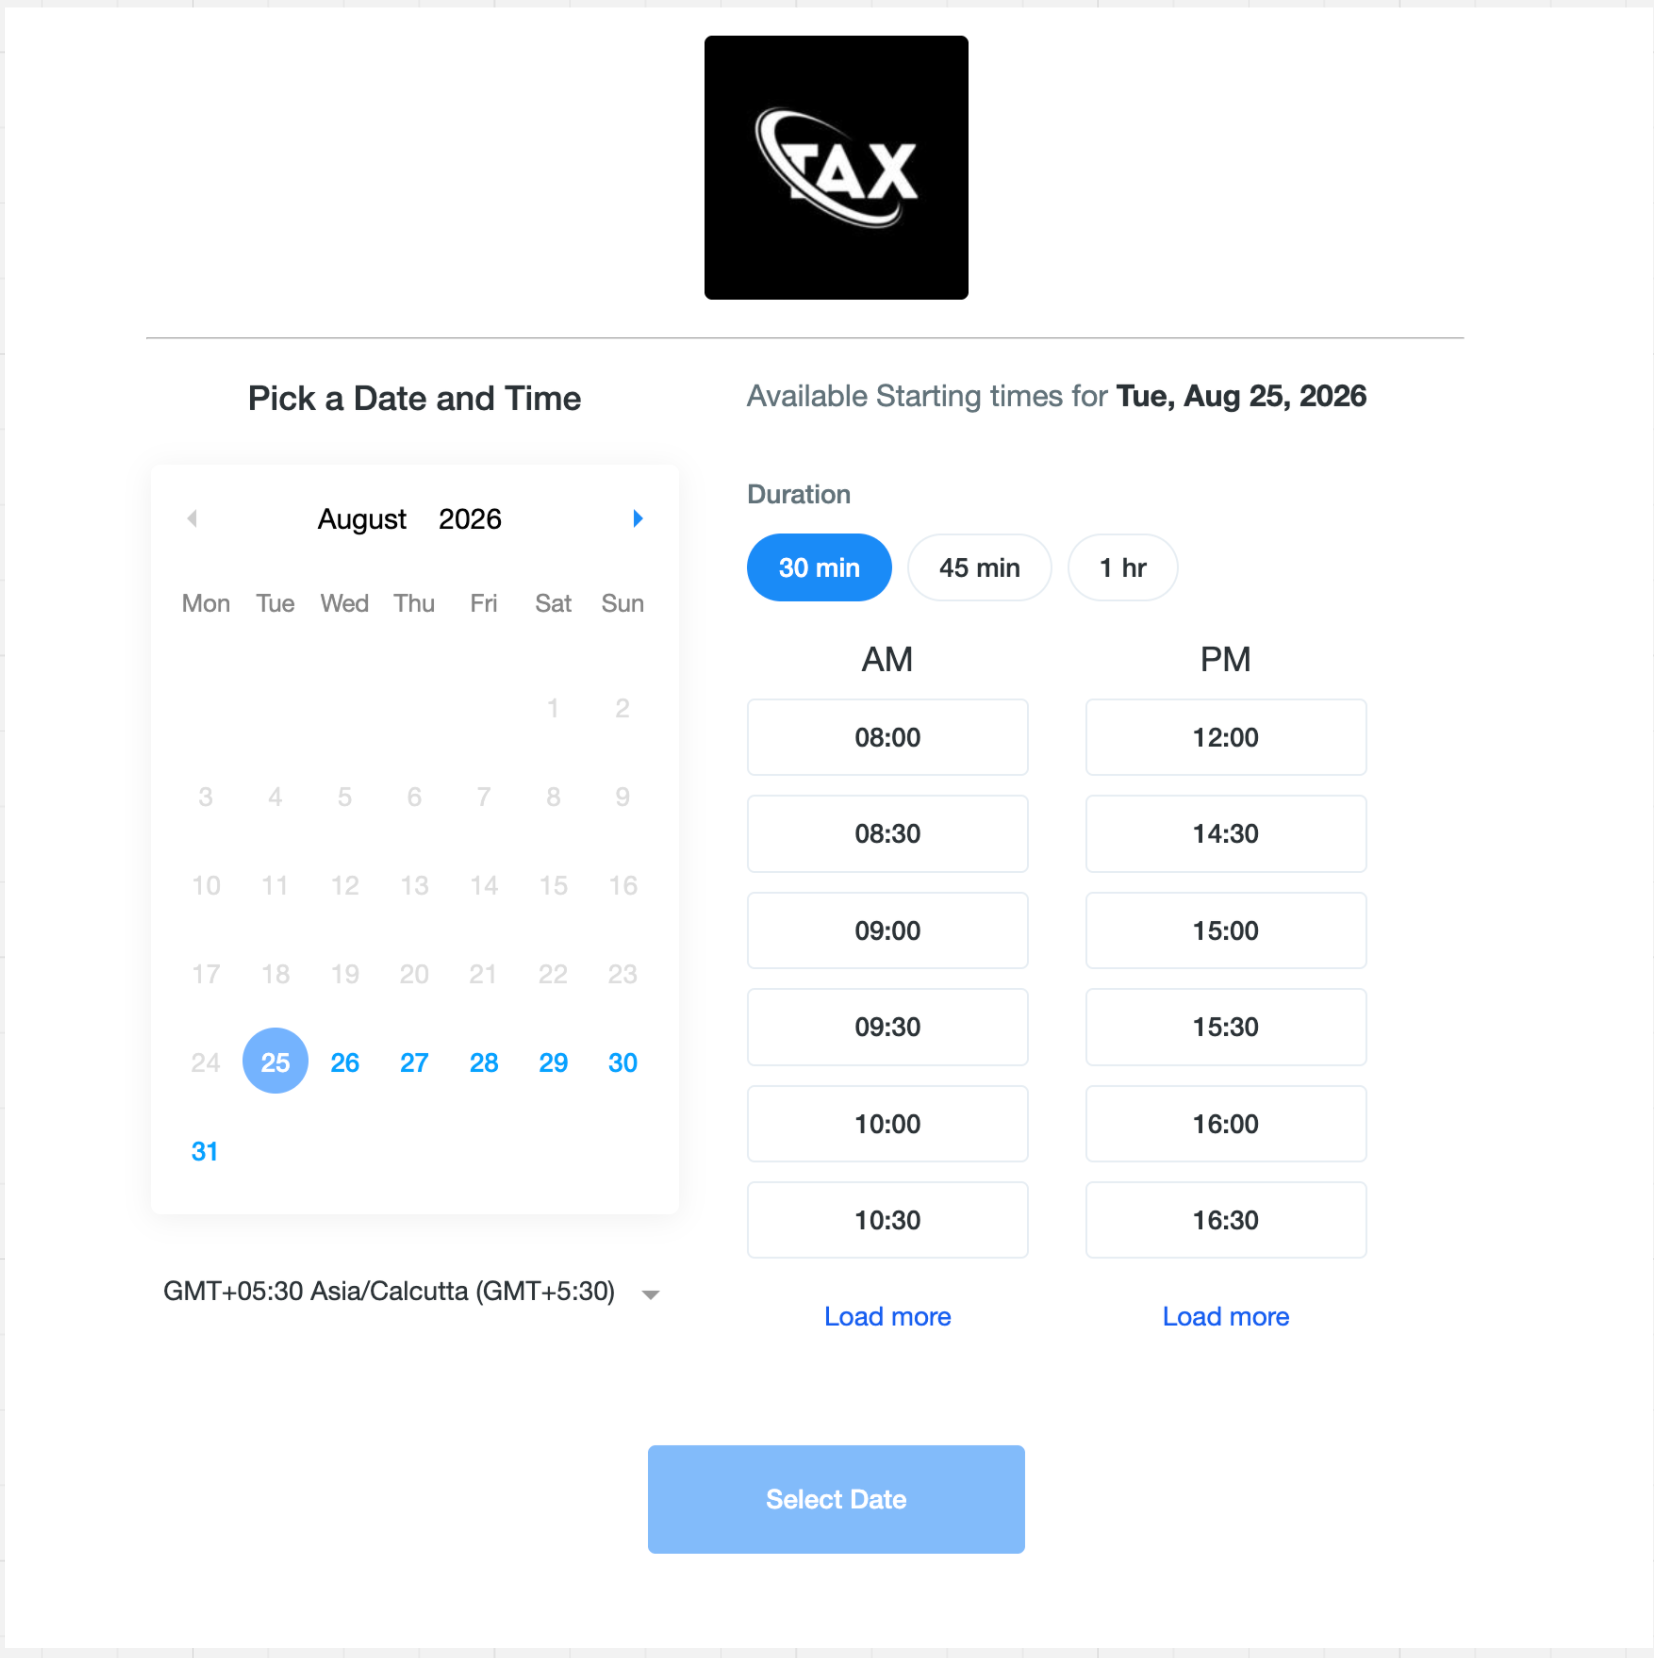
You can now offer multiple meeting durations within a single calendar, giving bookers the flexibility to choose the meeting length that works best for them.
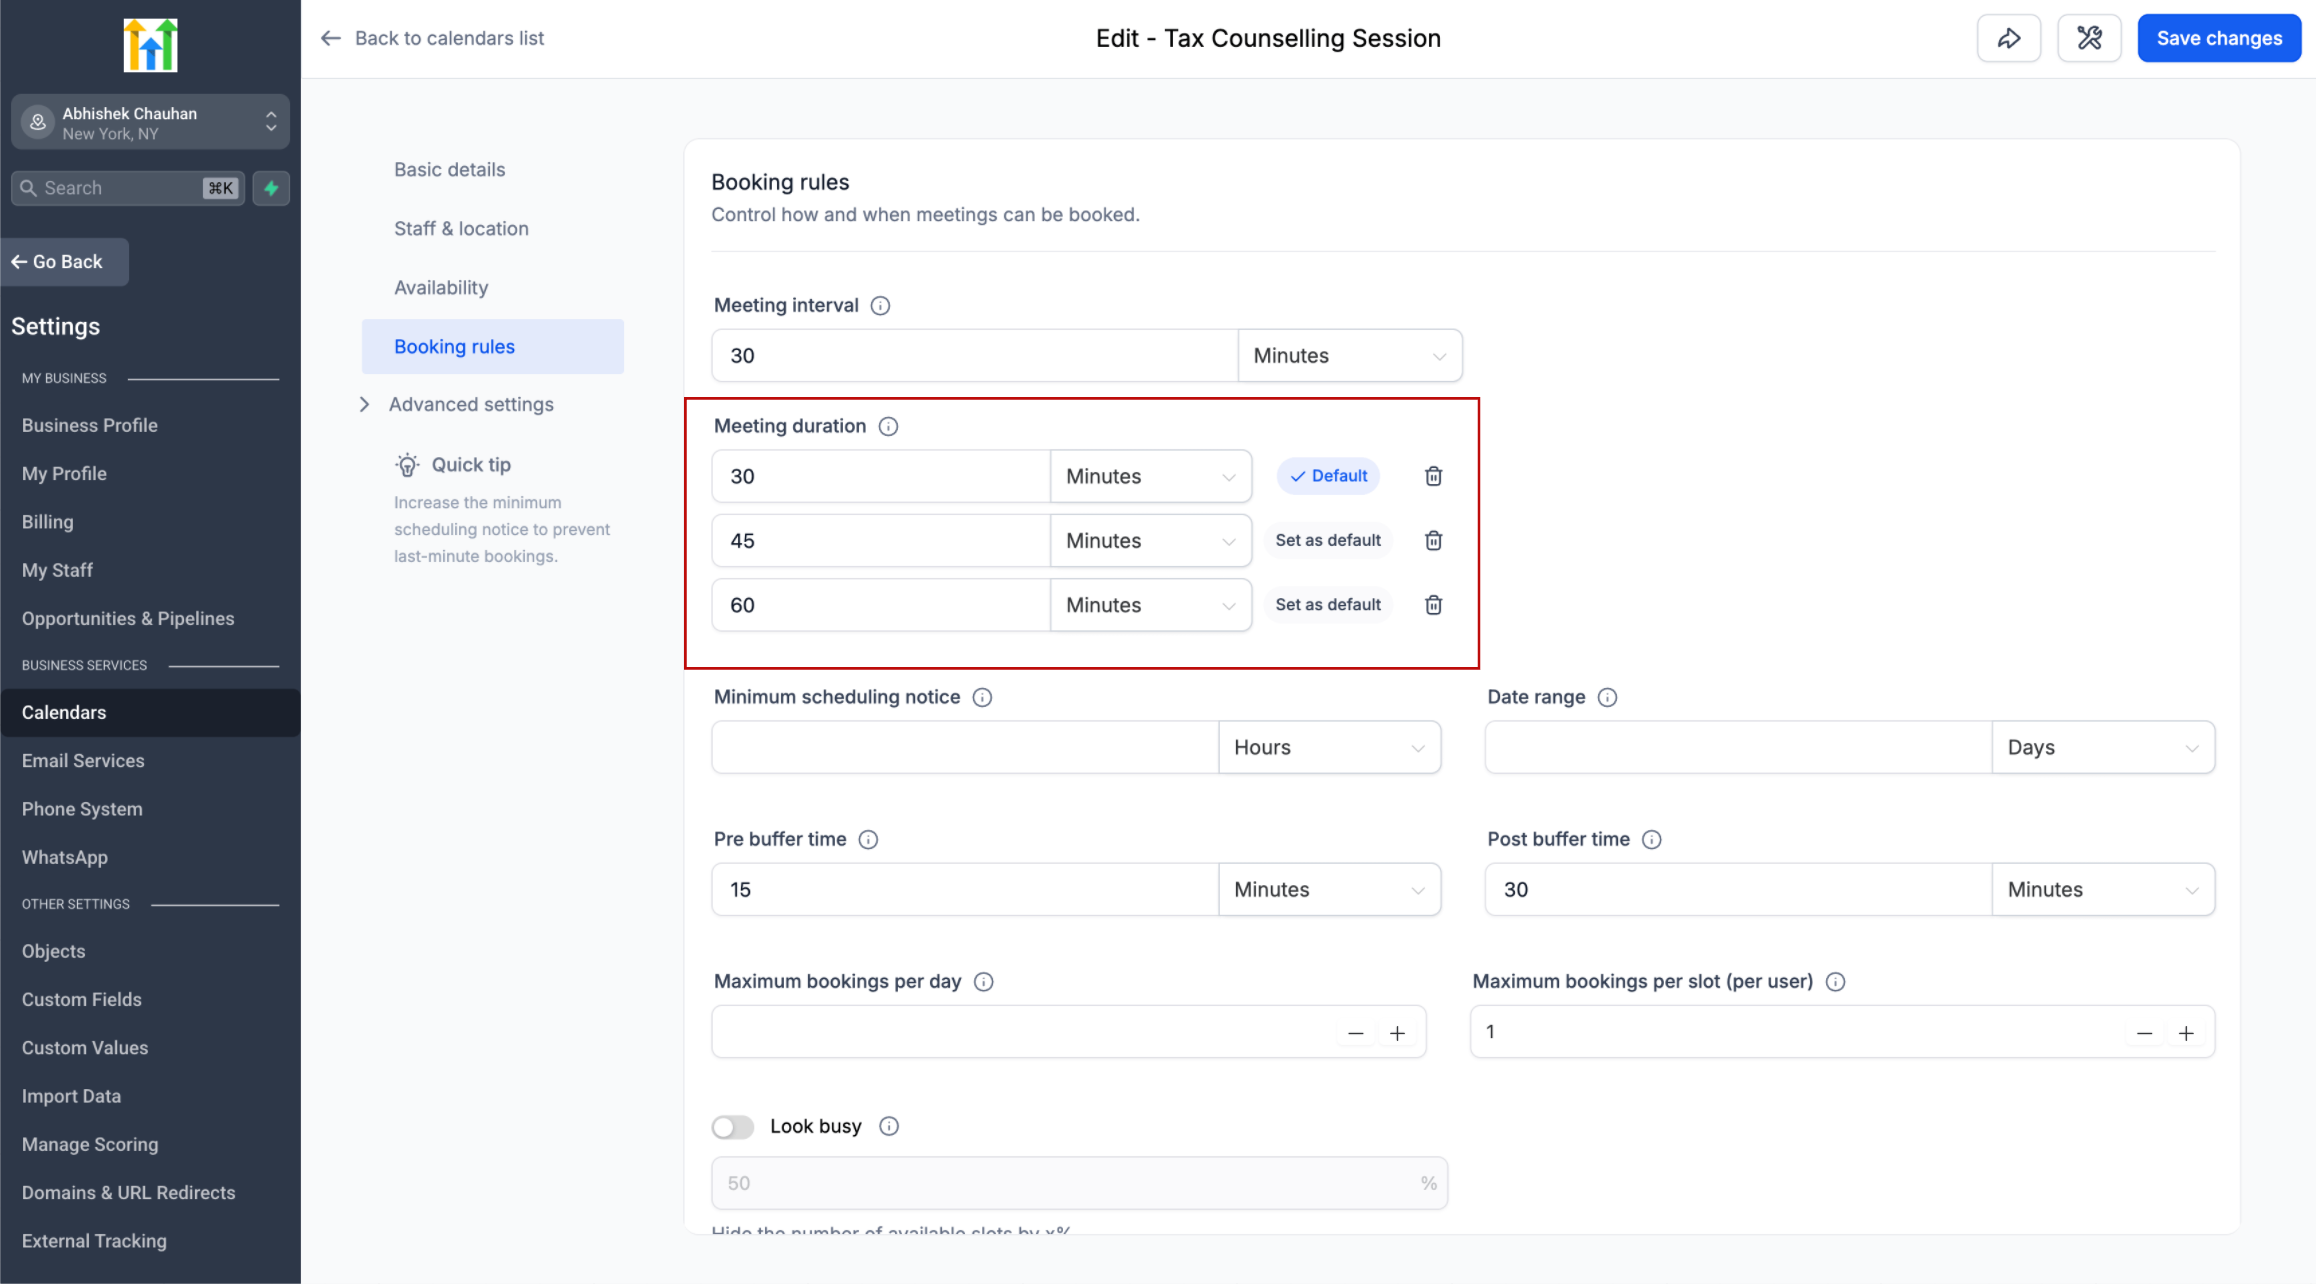
Instead of creating separate calendars for 15-minute, 30-minute, or 60-minute meetings, you can configure up to 3 duration options on the same calendar.
⚙️ How Does It Work?
From your calendar settings, you can:
Add up to 3 duration options
Choose which duration should be selected by default
Add or remove duration options at any time
When multiple durations are configured, bookers will see them as easy-to-select options on the booking page. Selecting a different duration automatically refreshes availability to show slots that can accommodate the selected meeting length.
If only one duration is configured, the booking experience remains unchanged.
📅 Available Across Booking Experiences
Multiple durations are supported across:
Web and mobile booking pages
Neo and Classic booking widgets
In-app appointment booking on web
Mobile app
The selected duration is also supported when rescheduling an appointment, allowing the meeting length to be changed along with the date or time.
🔄 What Happens to Existing Appointments?
Changes to your calendar's duration options never modify or cancel existing appointments.
For example, if you remove a 30-minute duration while future 30-minute appointments are already booked, those appointments remain unchanged. Their calendar events, reminders, and notifications continue to use the originally booked duration.
New appointments can only use the duration options currently configured on the calendar.
When rescheduling, bookers will see the calendar's currently available durations. If their original duration is no longer offered, they'll be asked to select a new duration before completing the reschedule.
📌 Supported Calendars
Available for:
Personal Calendars
Round Robin Calendars
Collective Calendars
Event Calendars
This update makes it easier to offer flexible meeting lengths while keeping availability, bookings, and calendar management within a
single calendar
.
August 24th, 2026
New
Dashboards and Reporting
👀 What's New?
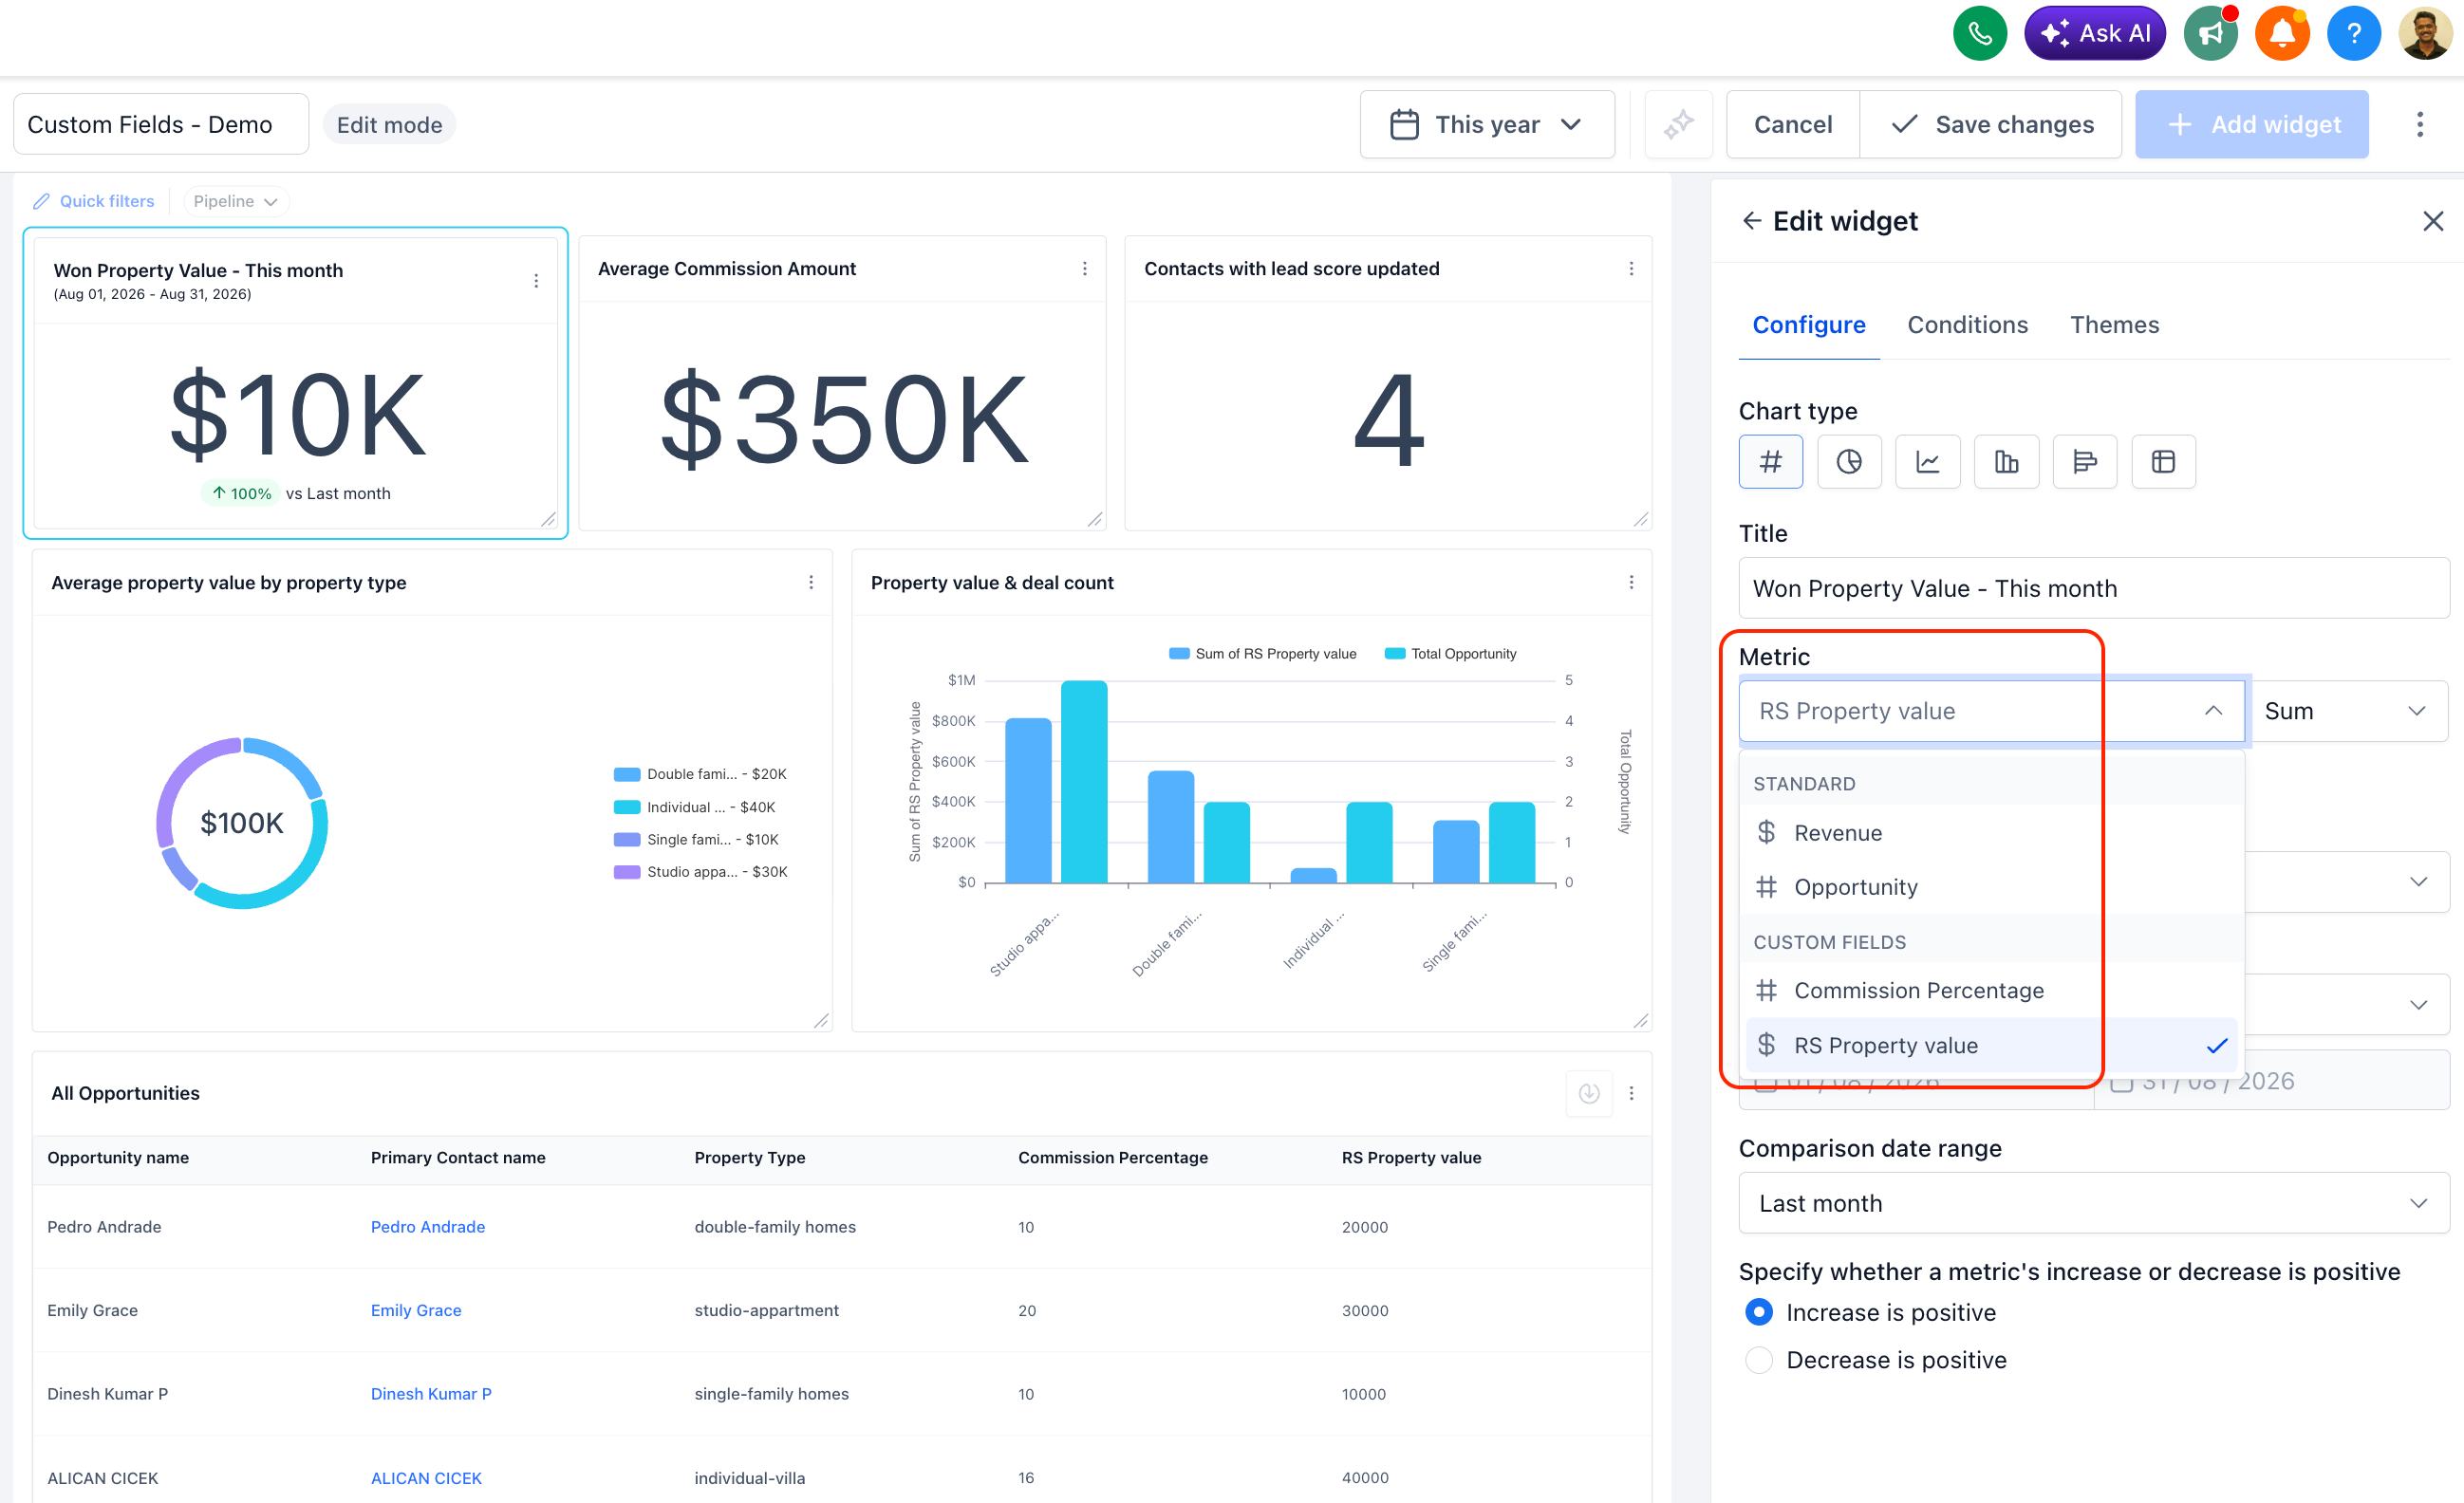
Numeric and monetary custom fields on Contacts and Opportunities can now be used as metrics — not just filters or groupings.
Aggregate them with Sum, Min, Max, or Average.
Available everywhere metrics live: Dashboard widgets, Custom Reports, and the Custom Metric module.
Any new custom field you create shows up in the metric picker automatically — no setup required.
👷 How It Works:
Open a dashboard widget, custom report, or the Custom Metric module and go to add a metric.
In the Field dropdown, select any numeric or monetary custom field (e.g., "Property Value") — it now appears alongside your standard fields.
In the Aggregation dropdown, choose Sum, Min, Max, or Average.
Your widget or report now reflects that custom field's aggregated value, live.
🌟Why It Matters:
Report on what actually matters to your business — if you've been tracking deal size, treatment cost, property value, or any other custom number, you can now build real dashboards around it instead of exporting to a spreadsheet.
No more manual math — Sum, Min, Max, and Average are calculated for you, live, instead of being tallied by hand.
Zero setup — new custom fields are metric-ready the moment you create them.
📝 Note:
Applies to numeric and monetary custom field types in Contacts and Opportunities.
August 21st, 2026
New
Courses & Communities
Badges can now be issued and used to trigger follow-up actions directly through Workflows, making it easier to automate recognition and what happens next.
🚀 What’s new:
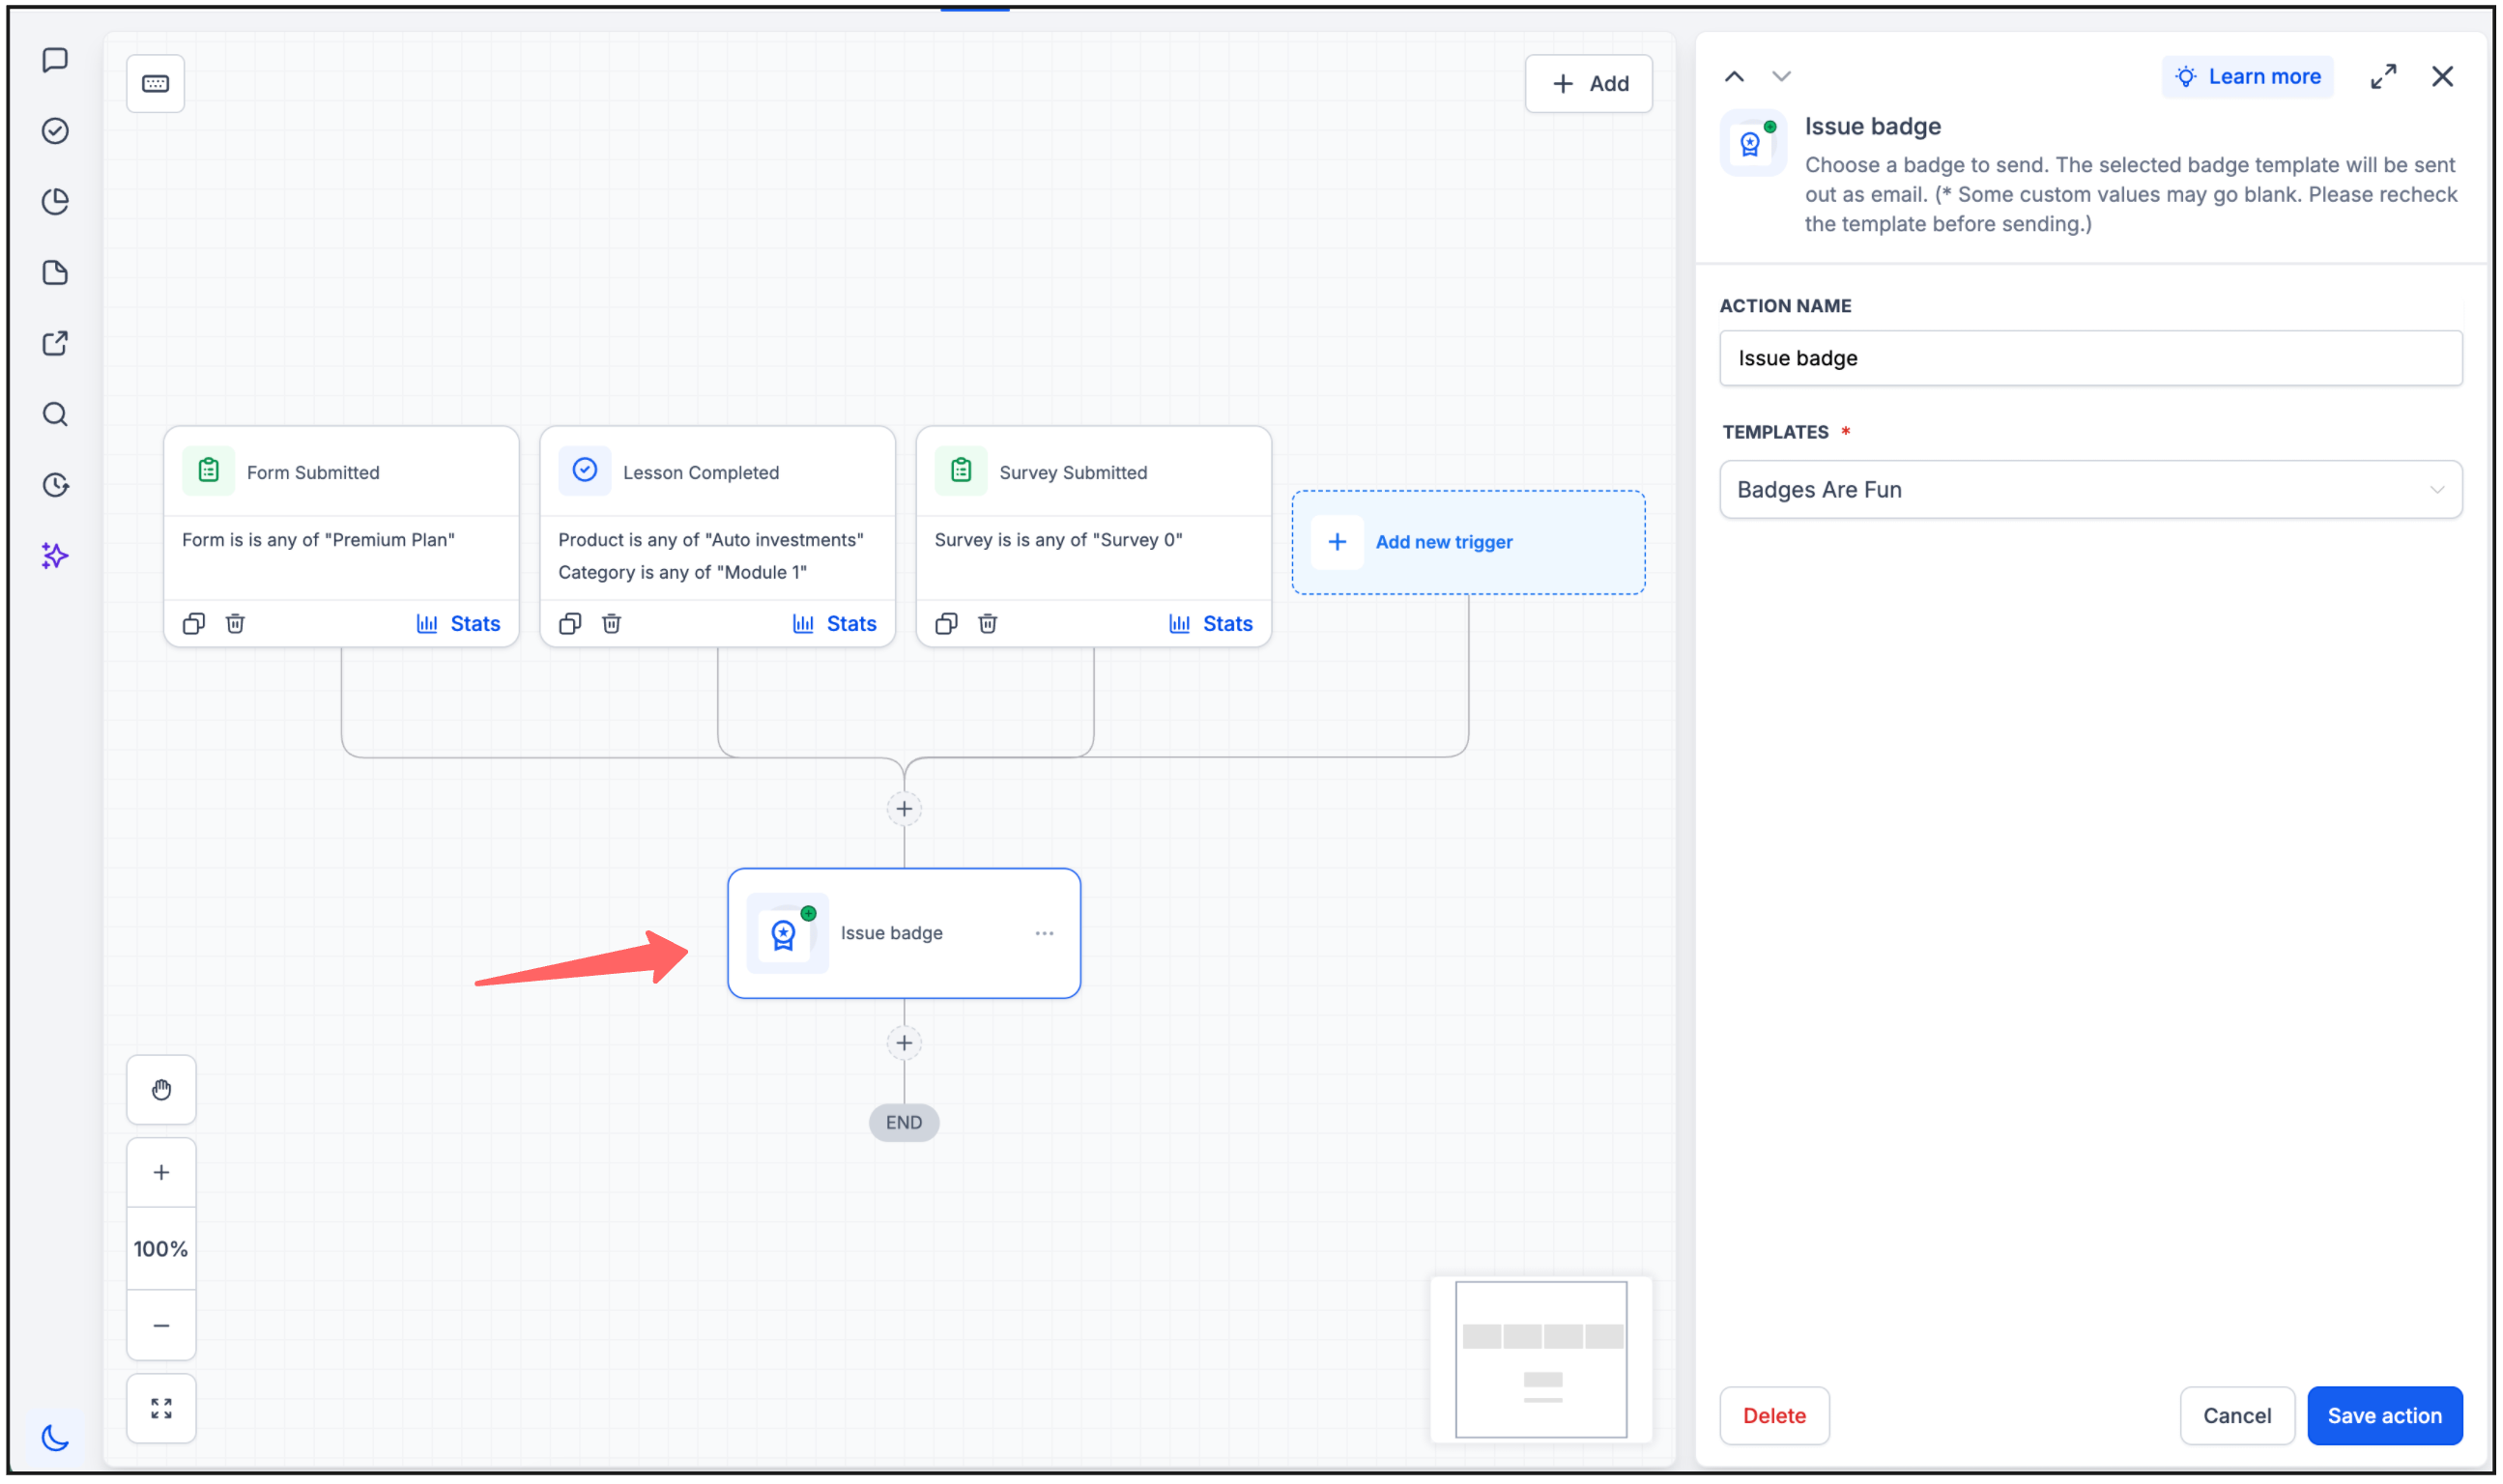
Issue Badge action: Automatically issue a selected badge when your workflow conditions are met.
Badge Issued trigger: Start a workflow when a badge is issued and automate follow-up actions such as sending a message or email, updating a contact, or starting another automation.
✅ Why it matters?
Makes badge recognition part of your existing workflows
Automates what happens after a badge is issued
Helps you build more engaging journeys around achievements and milestones
More improvements are on the way 🚀
August 20th, 2026
New
Calendar
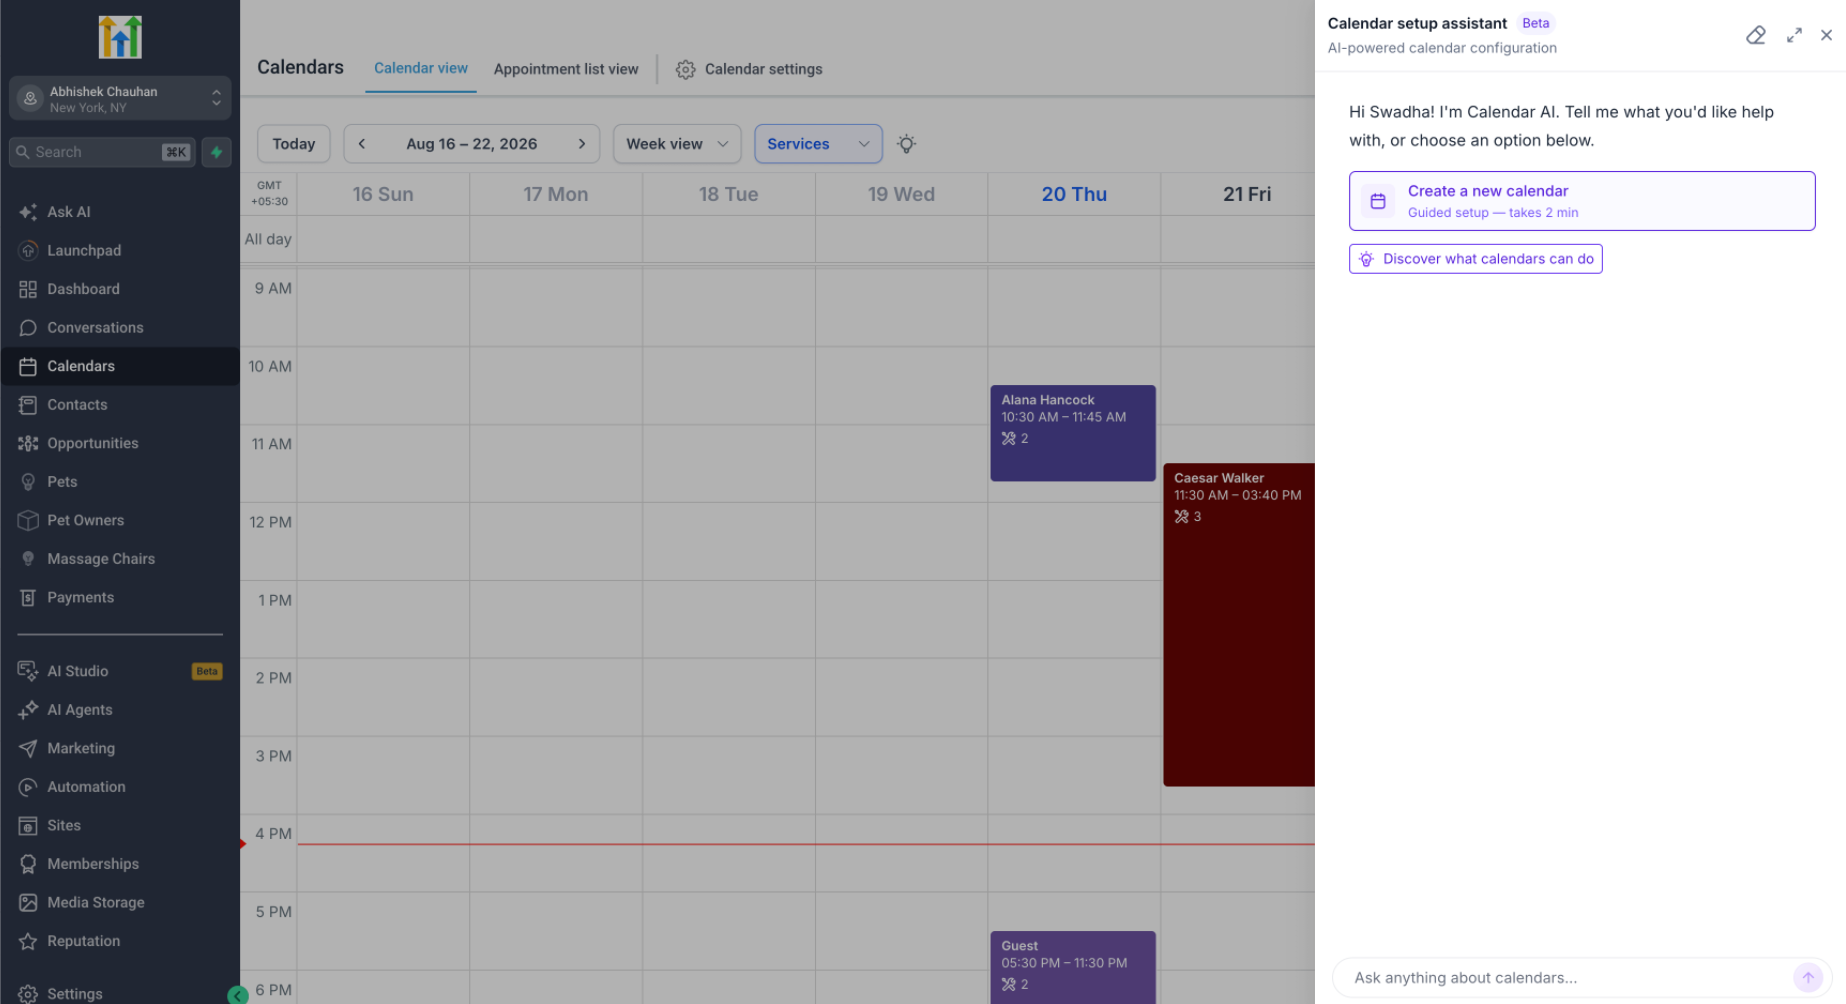
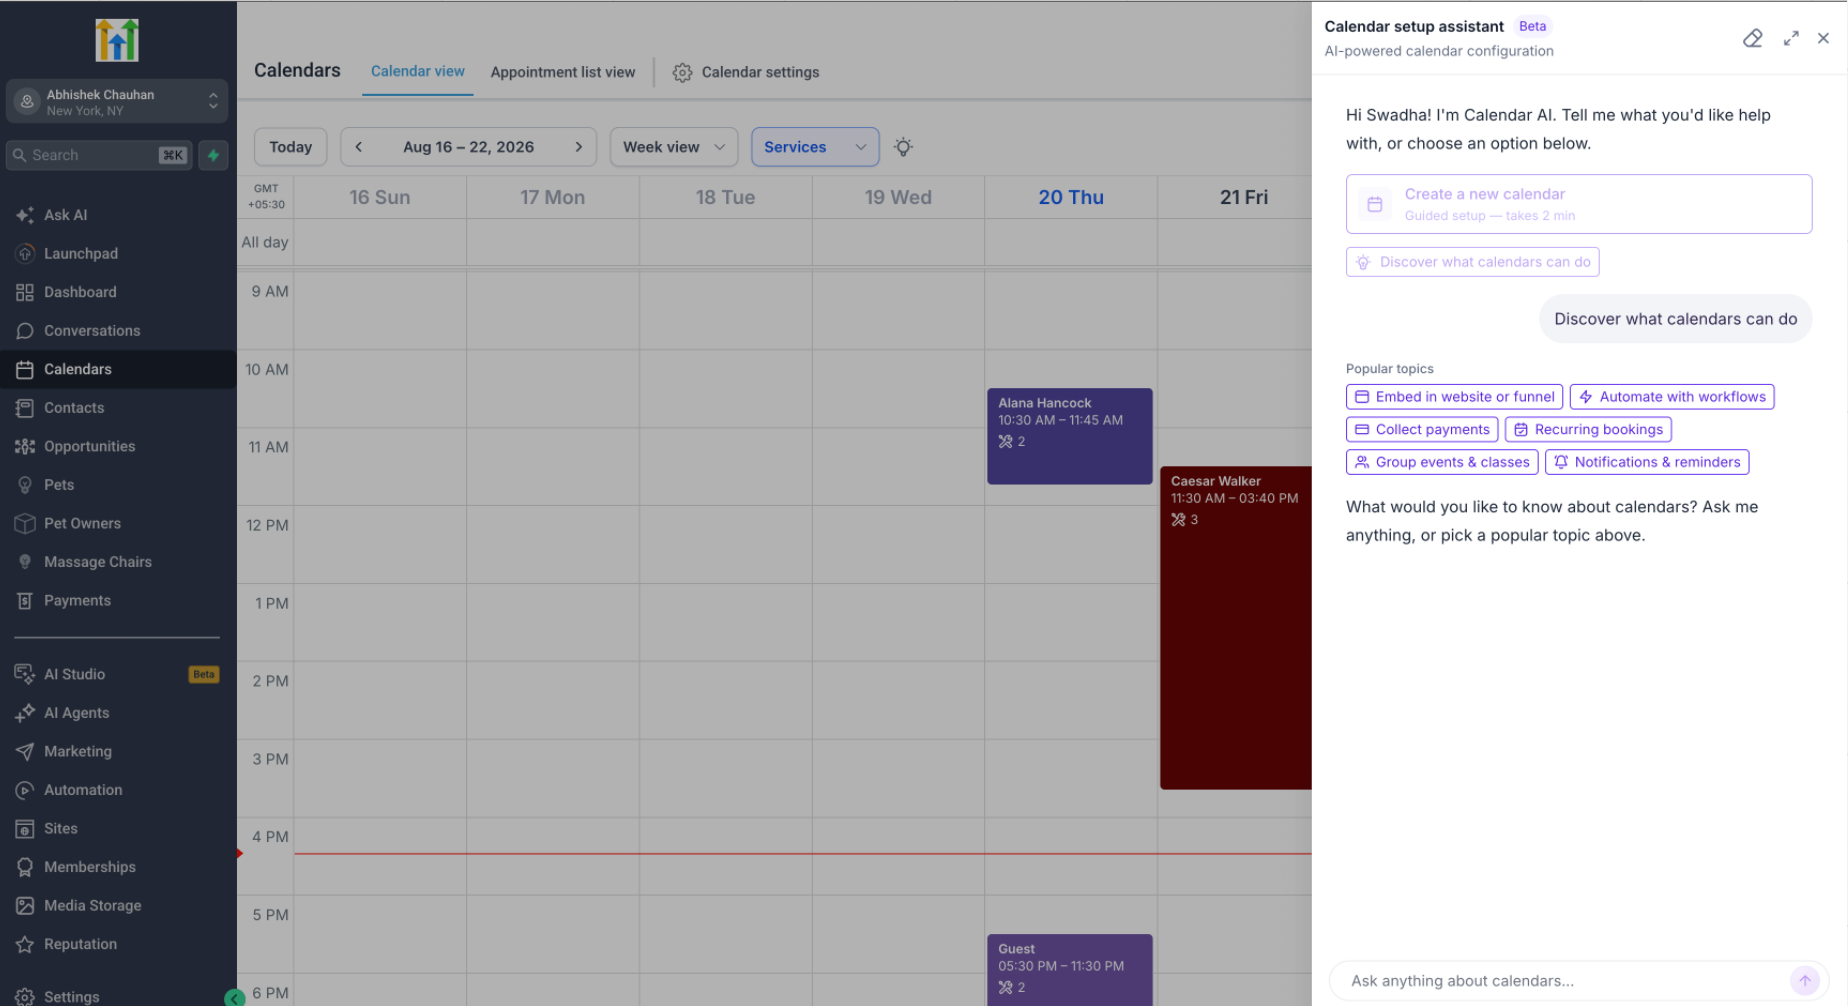
We’re rolling out Calendar AI to make it easier for new users to go from “I need a calendar” → configured calendar → first booking.
✨ What can users do with Calendar AI?
Users can simply describe what they need, and Calendar AI recommends and creates the appropriate calendar.
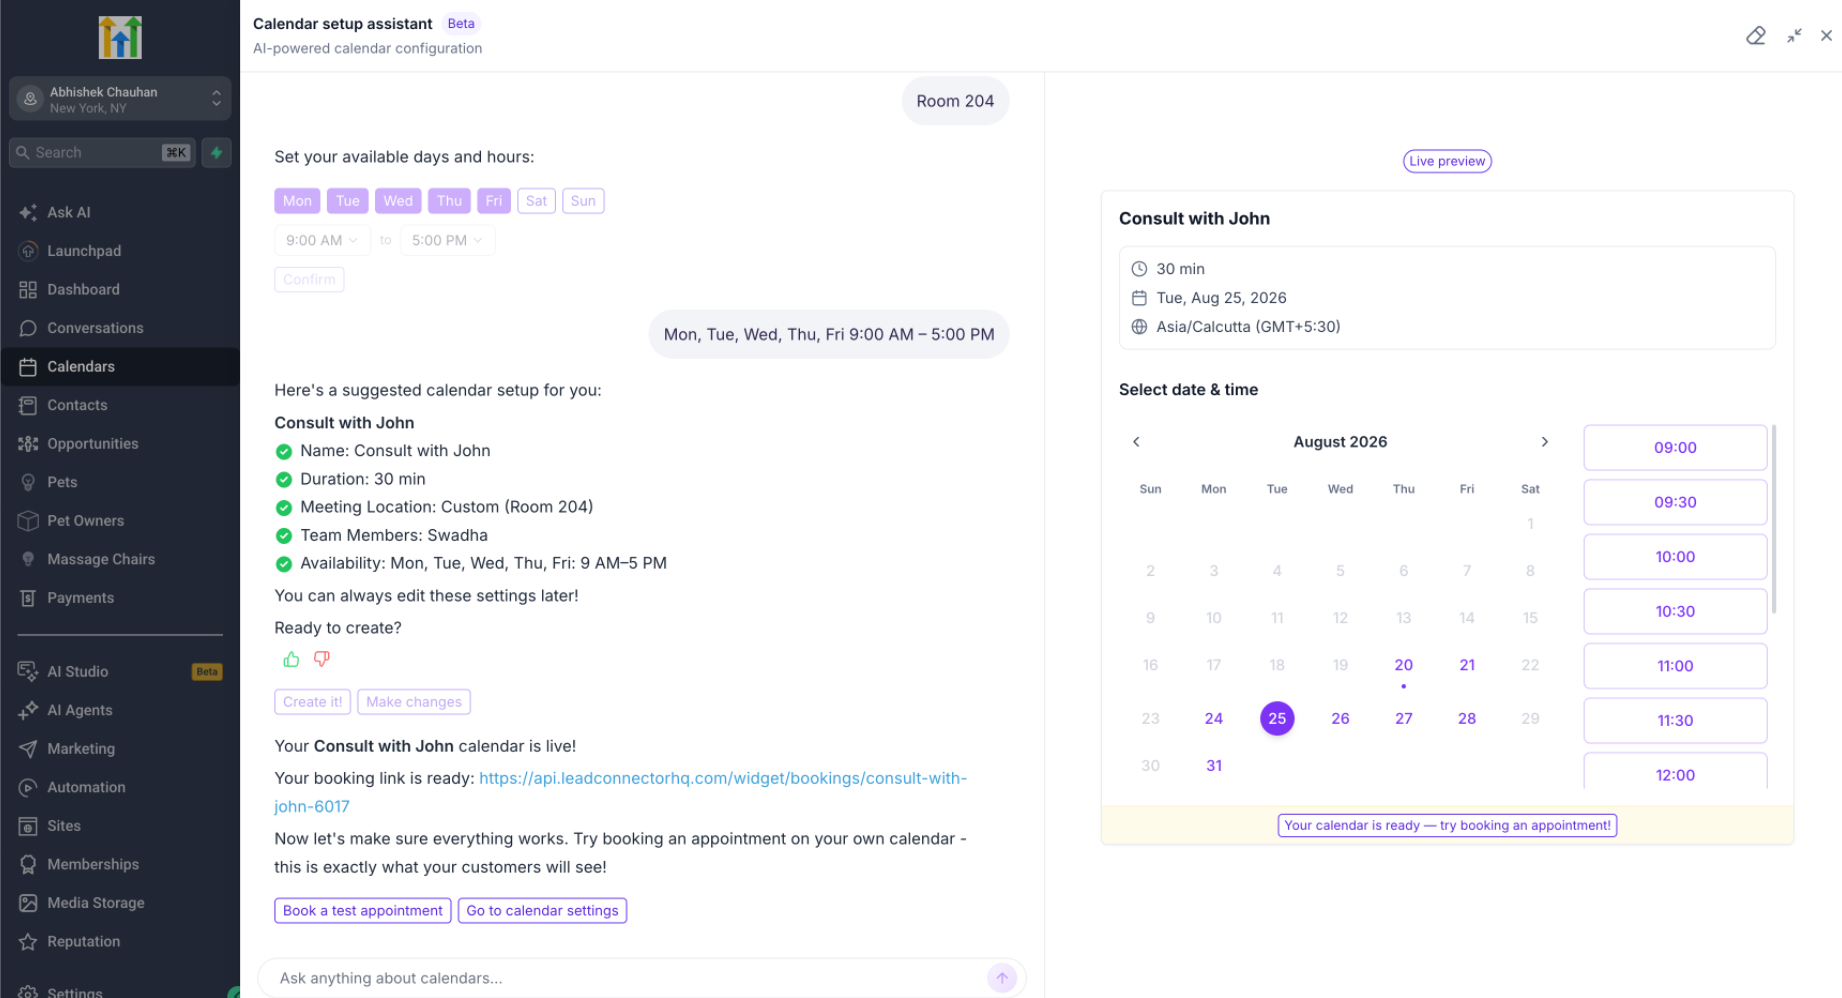
During the guided flow, users can:
Describe their use case instead of figuring out which calendar type to create
Add team members
Configure availability
Choose a meeting location
See a live preview of the booking calendar
Book a test appointment once setup is complete
Discover Calendar capabilities by asking questions or choosing from preset prompts
🔜 Next up — Calendar troubleshooting
We're extending Calendar AI to help with one of our common Calendar support questions:
>“Why isn't this specific slot showing on my booking widget?”
Calendar AI will use the customer's Calendar configuration to identify why the slot isn't available and what needs to change.
August 20th, 2026
Improved
Social Media
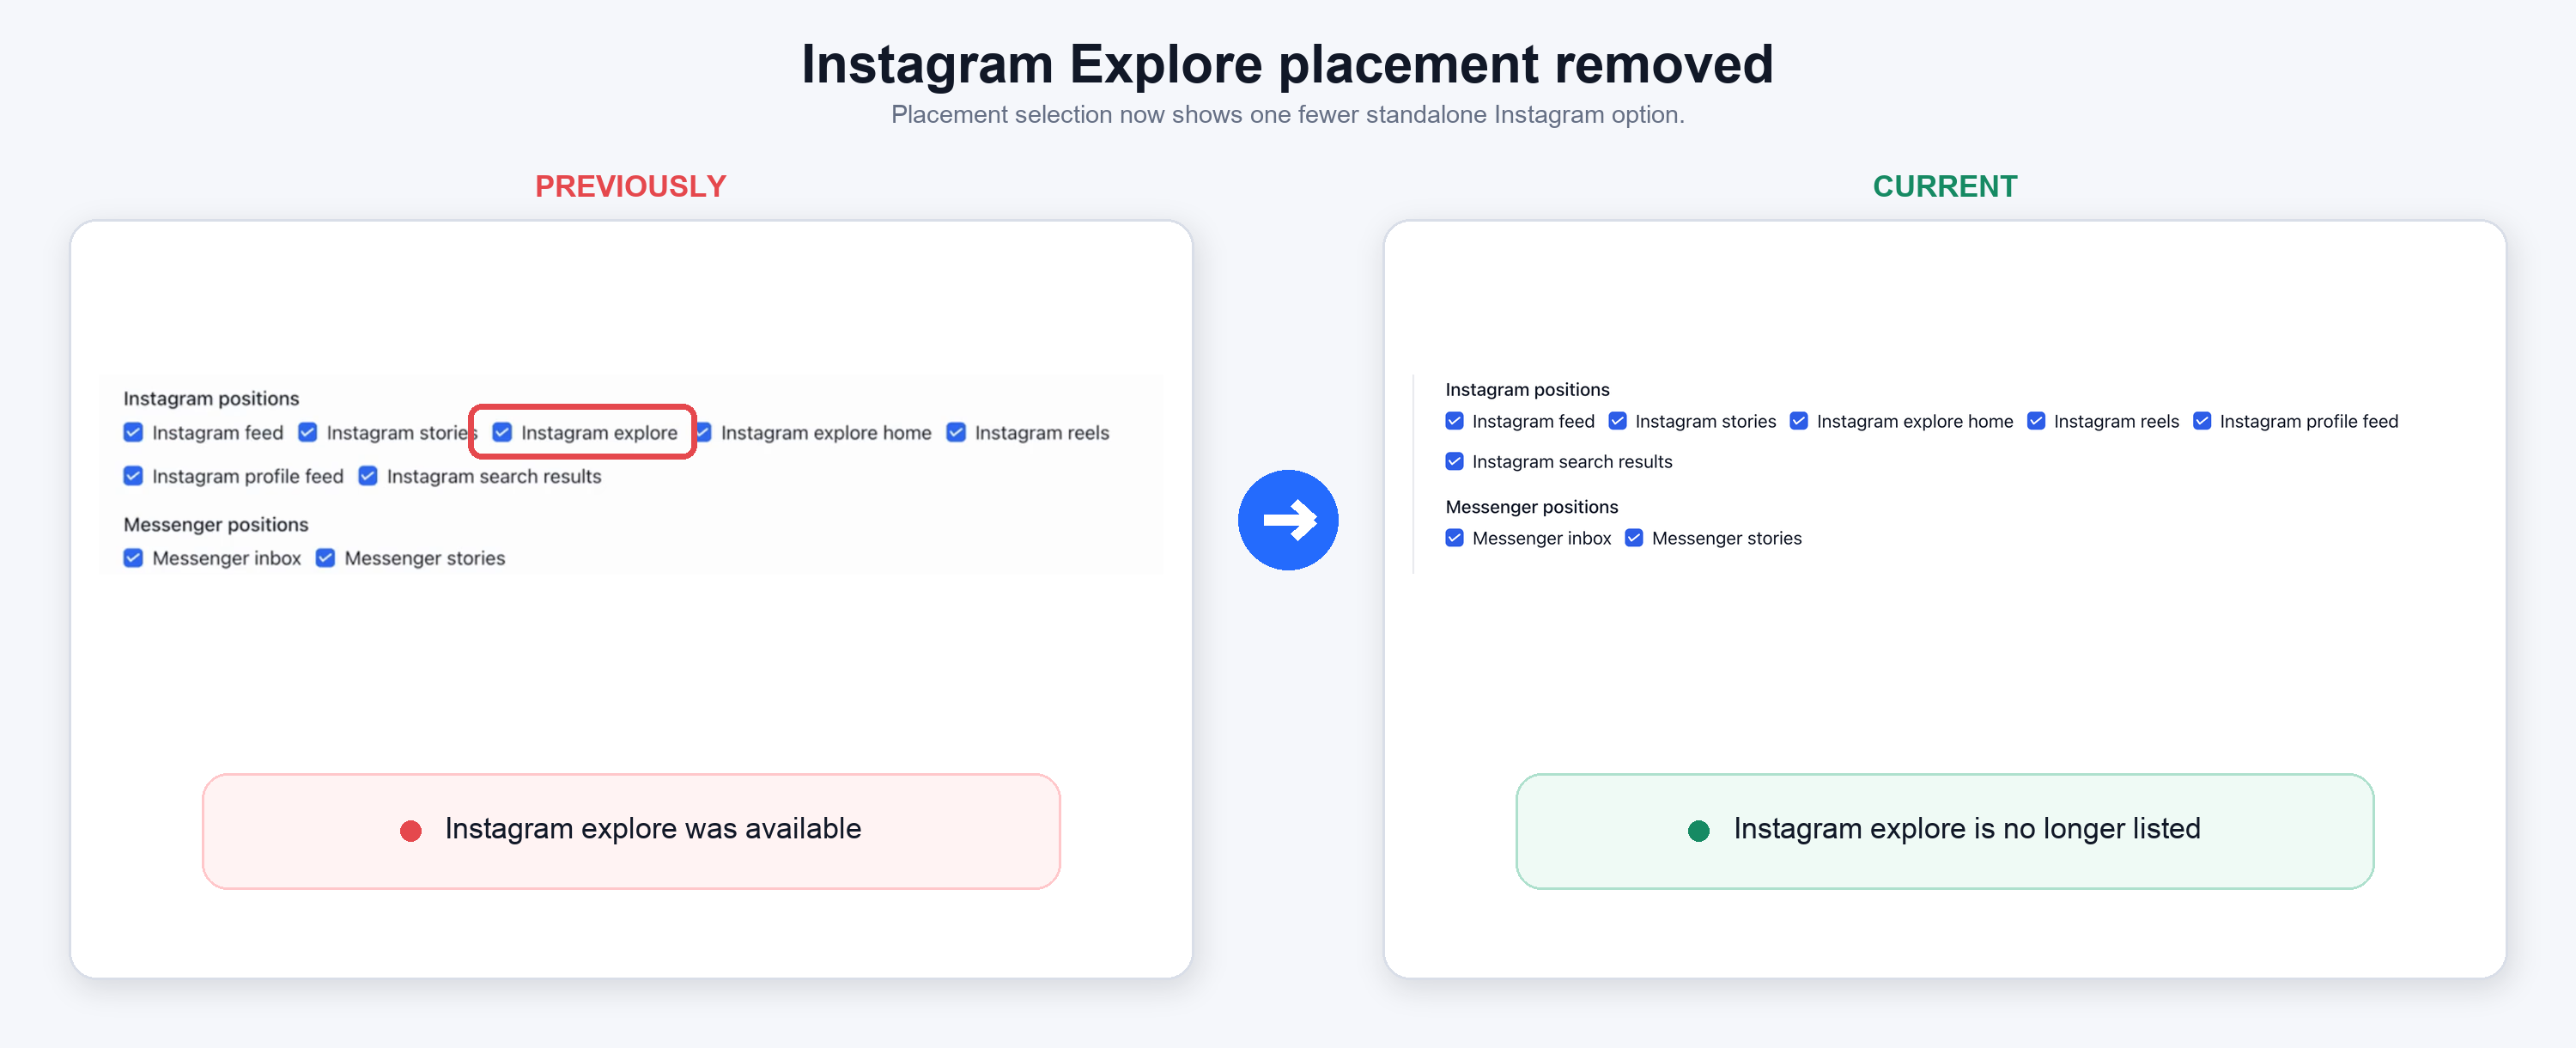
Meta has discontinued the Instagram Explore Feed placement as part of their Marketing API v26 update.
This upgrade means 'Instagram Explore' is no longer available as an ad placement in the campaign creation workflow. But, your existing campaigns stay running, and the transition happens automatically in the background with no errors or action required.
👀 What changes?
Instagram Explore Feed is no longer available as a selectable ad placement, per Meta's v26 API changes.
The upgrade ensures continuity, keeping the ad manager product compliant with Meta's v26 Marketing API requirements.
👷 How it works?
No action needed- the ad placement deprecation happens automatically and silently with no errors surfaced.
Published Meta campaigns with Explore enabled remain live and unaffected.
Draft campaigns have Explore removed automatically as soon as the ad set is saved.
Delivery shifts to other eligible placements.
⭐ Why It Matters
Ensures continuity - live campaigns are not disrupted or unpublished by this change.
No errors or failures surface
to users during the transition.
Compliance with Meta's v26 Marketing API requirements.
📝 Notes
This is a Meta-driven platform deprecation, not a Growably product decision.
Existing Template Library and campaign workflows remain otherwise unchanged.
August 19th, 2026
Fixed
Automations
Overview
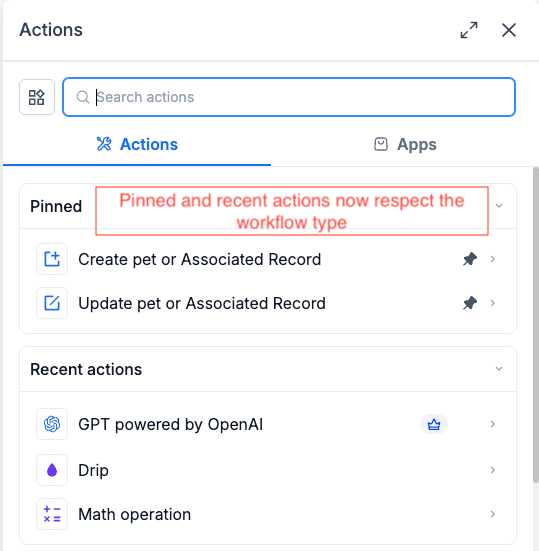
Pinned and Recent in the Actions & Triggers sidebar ignored what kind of workflow you were in. Use a Contact action once, and it started showing up in your Custom Object and Company workflows too.
What's new
Both sections now list only the actions and triggers that work in the workflow you have open.
What's changed
The sidebar checks the workflow's object type before it renders Pinned and Recent. Contact actions stay in Contact workflows. Company actions stay in Company workflows. Custom object actions stay in workflows built for that object. Everything else is hidden, so you can't pick a shortcut that breaks the moment you click it.
Additional Notes
Covers both the Pinned and Recent sections.
Your pins are intact. They're hidden only in workflows where they don't apply.
The full action and trigger list below these sections was already correct and is unchanged.
Preview
August 19th, 2026
Fixed
Automations
Overview
Dropdown fields in the Create Record and Update Record actions, including the associated record versions, stopped offering dynamic values. If you had saved something like {{contact.day_1}} in a dropdown, the field opened empty with nothing selected. There was no way to enter a new merge tag either.
What's new
Single-select dropdown fields now have the Standard and Dynamic toggle, the same one you already use in Update Contact Field.
What's changed
Standard mode gives you the searchable picklist, image options included. Dynamic mode gives you a text input with the custom value picker, so you can drop in a merge tag from a trigger, a formatter, or an inbound webhook. Saved values that don't match a picklist option now open in Dynamic mode on their own, so existing configs render the way you set them up. Switching between the two modes clears the field, which stops a leftover value from the other mode saving without you noticing.
Additional Notes
Covers Create Record, Update Record, and both associated record actions, in contact-based and custom object workflows.
Multi-select fields were never affected. Nothing changed for them.
Update Contact Field already had this toggle and is unchanged.
Flipping the mode wipes the current value on purpose. Re-enter it after you switch.
August 19th, 2026
Improved
Automations
Overview
The Email Events trigger fires on opens and clicks, but the event never carried anything that identified which email produced it. If you pushed those events to an external system with the Send Webhook action, there was no Message ID variable to pick.
What's new
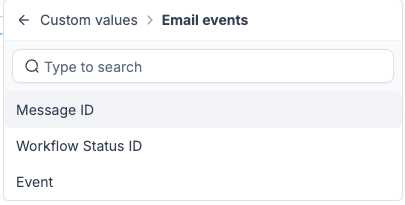
Email Events now carries a unique Message ID, and you can select it as a custom value inside the Send Webhook body.
How it works
Open the Send Webhook action in a workflow that starts with Email Events, then pick Message ID from the custom value picker when you build the payload. Every open and click on the same email sends the same ID. A different email sends a different one. The ID rides along with the event itself, so an open that arrives late still points back to the email that generated it.
Why this matters
Teams feeding email engagement into an external dashboard had no reliable way to dedupe. Email Opened fires on every open, including repeat opens of the same message, and resolving the email through the API by "most recently sent" got the wrong answer whenever a contact opened something older.
Simple example
A marketing agency sends two campaign emails in the same week and pipes open and click events into its own reporting dashboard. With Message ID in the webhook body, each open lands against the specific email it came from, and the same contact opening one email four times collapses into a single engagement record instead of four.
Additional Notes
Applies to both Email Opened and Email Clicked on the Email Events trigger.
The ID is stable per message. Repeat opens send the same value every time.
Preview
August 19th, 2026
Improved
Automations
What’s new?
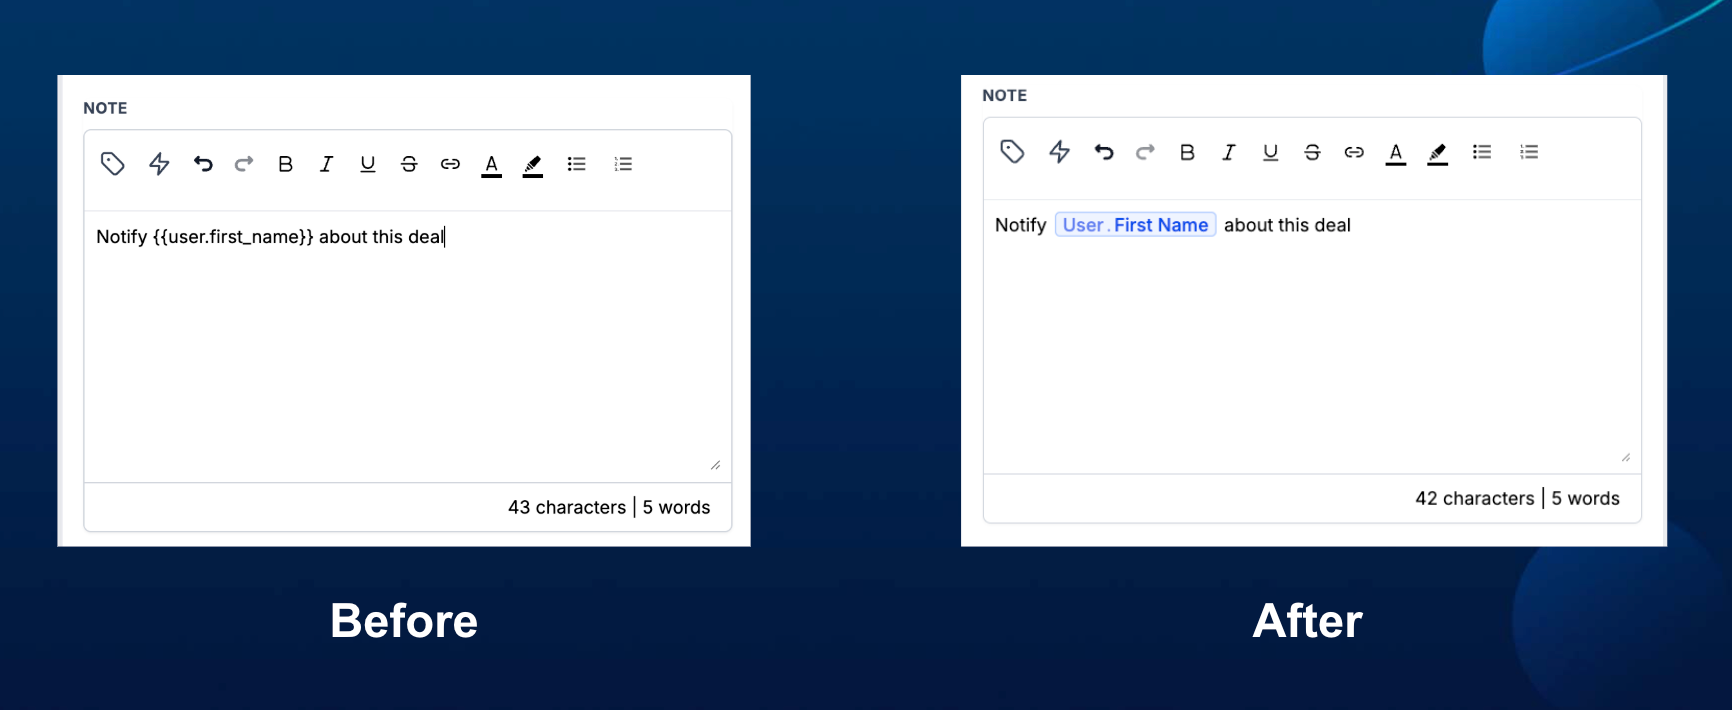
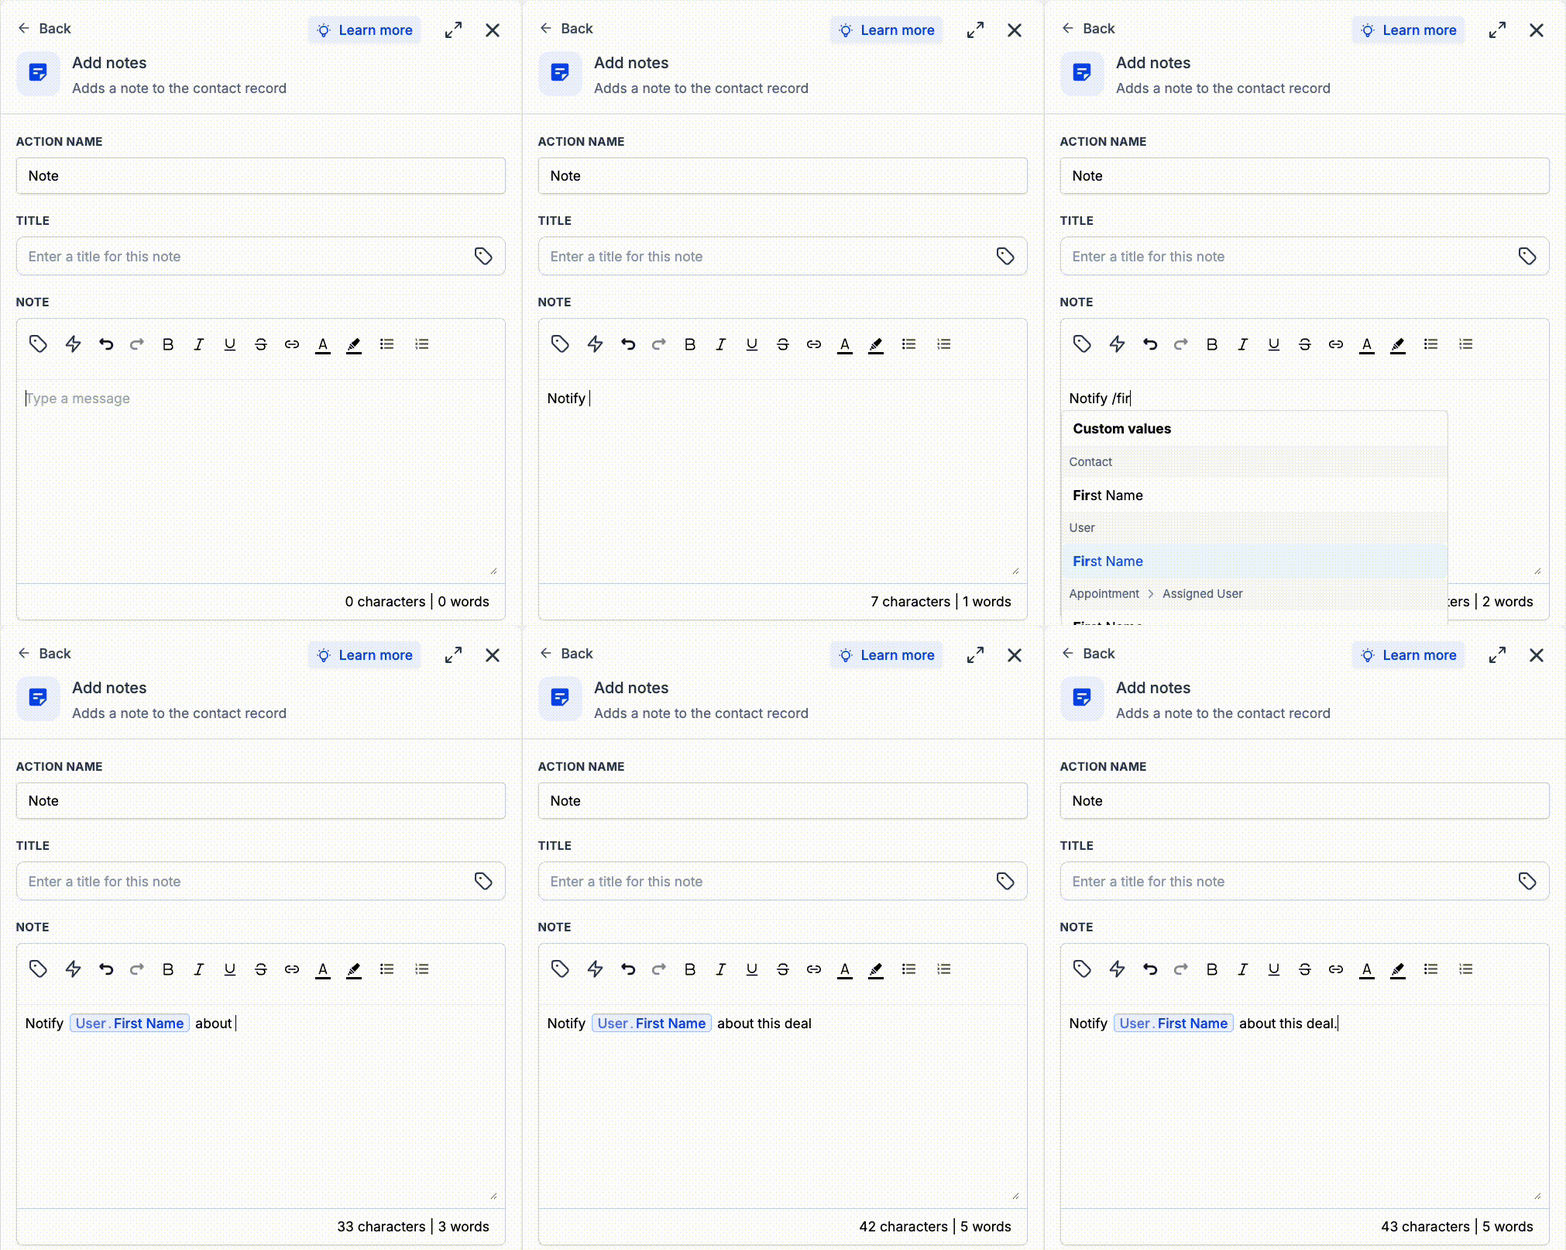
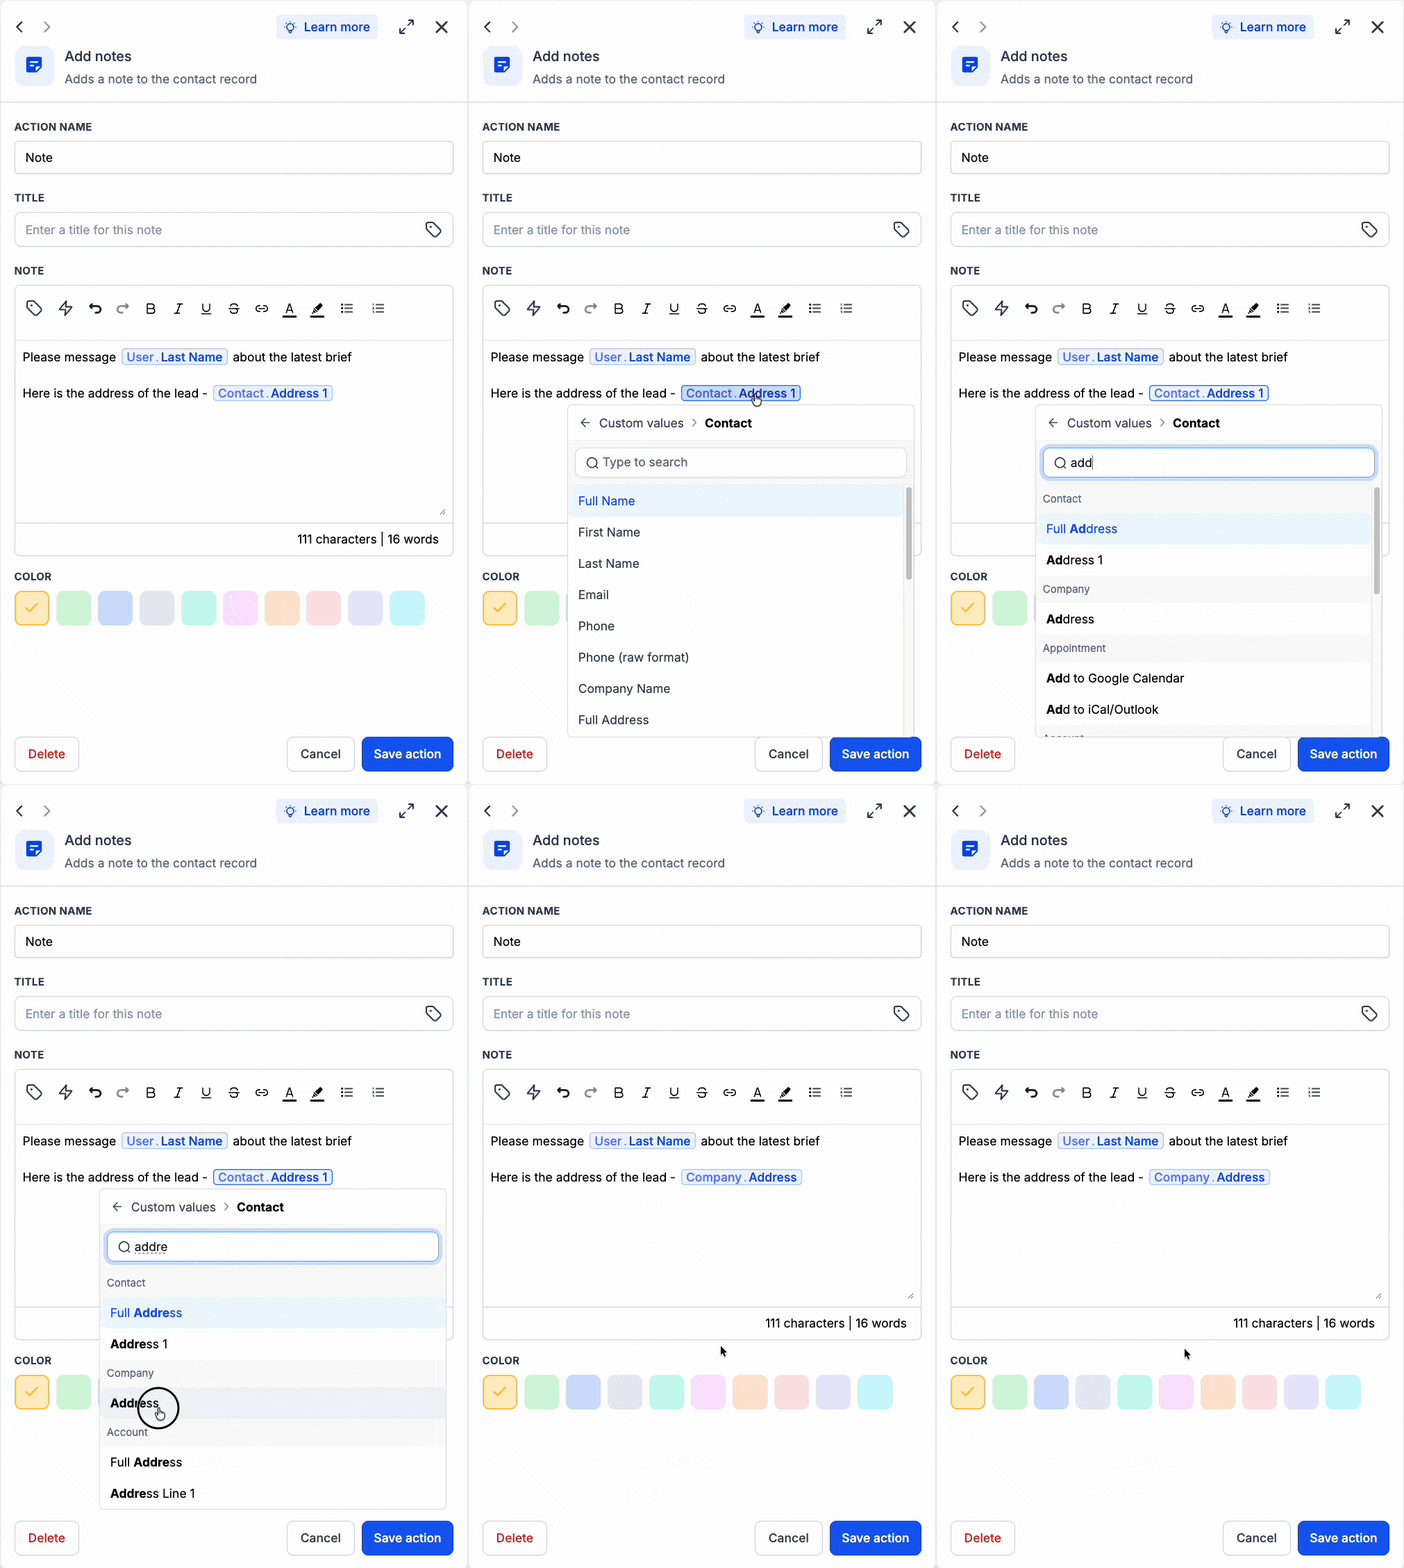
Dynamic values inside workflow text fields now appear as chips, making dynamic values easier to distinguish from static text. You can also type '/' to quickly search for and insert a custom value directly in the text box.
How it works
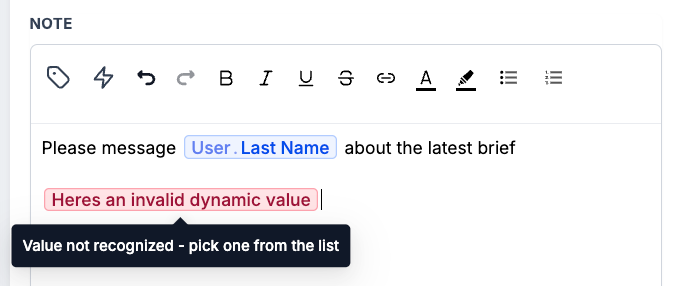
This is a UI-only change. Existing custom values are not impacted, and there is no change to how custom values are rendered or resolved when a workflow runs. Valid custom values appear as chips, while stale or unrecognized values are highlighted in red so you can quickly spot and fix them.
How to use it
Type '/' inside a workflow text field to search for and insert a custom value.
Click an existing custom value chip to replace it with another value in the same place.
If a value appears in red, replace it with a valid custom value from the list.
Why we built it
Custom values can be difficult to spot or validate when mixed with static text. The new interface makes dynamic content easier to identify, speeds up editing, and clearly flags values that are no longer valid.
Simple example
Add the User Last Name custom value from user data to a workflow message and it appears as a chip. If the text contains a stale or unrecognized value such as not a name, it appears in red so you know it needs to be replaced.
Additional Notes
Existing custom values are not changed or affected.
There is no change to custom value rendering or workflow behavior.
Chips are only a visual representation inside workflow text fields.
Type '/' to quickly search for and add a custom value.
Click an existing chip to replace it with another custom value in the same position.
Stale or invalid values are highlighted in red and must be replaced with a recognized value.
Preview
August 19th, 2026
New
Automations
What’s new?
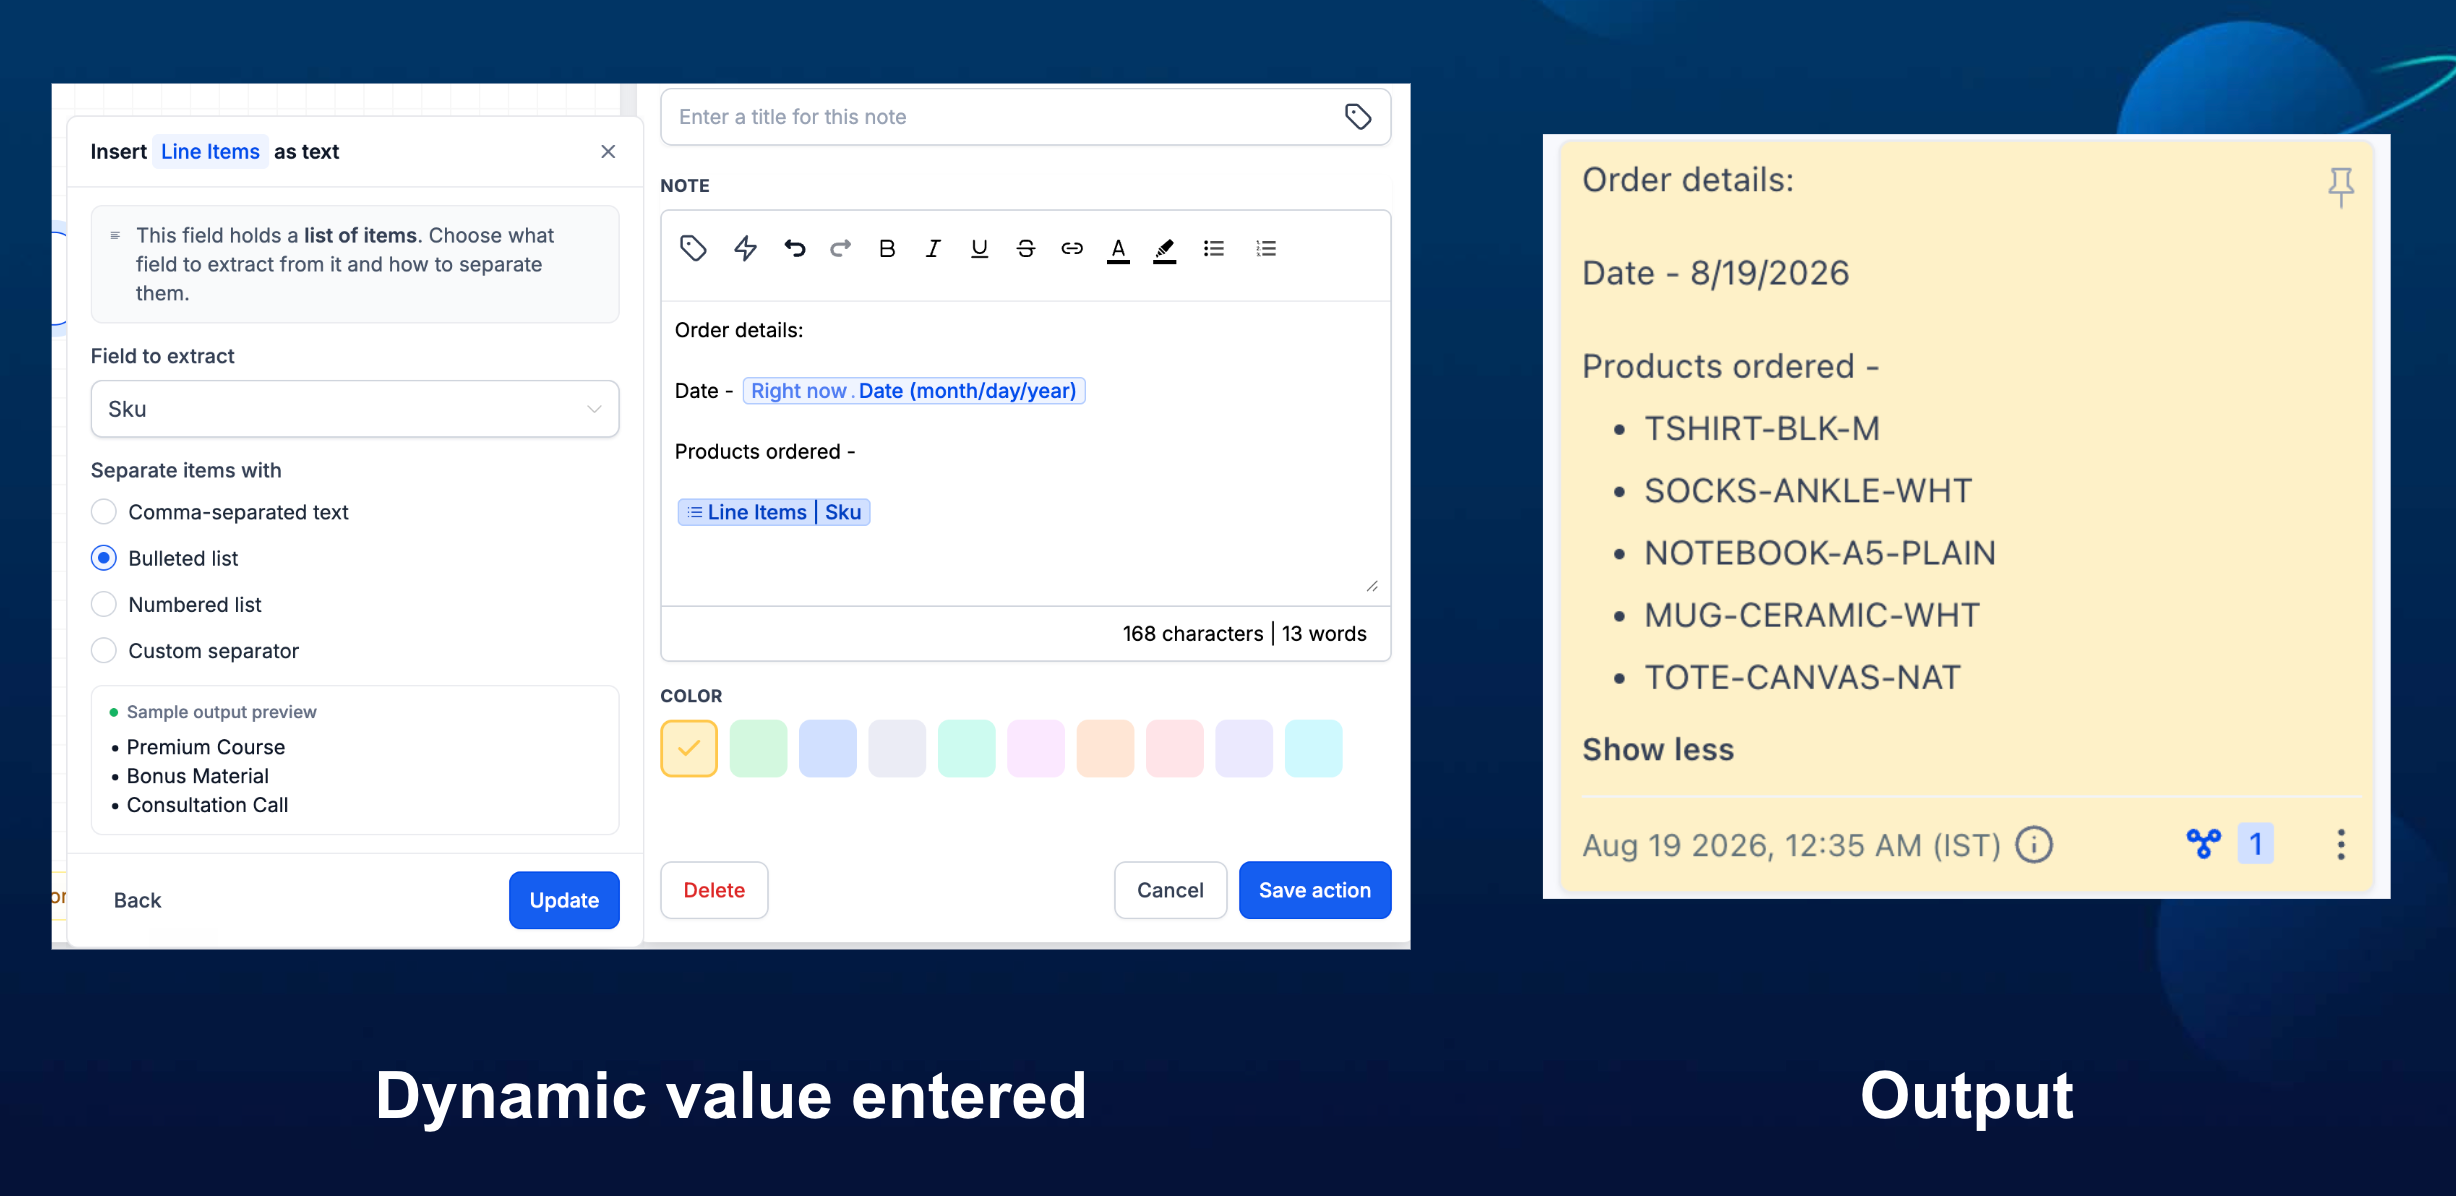
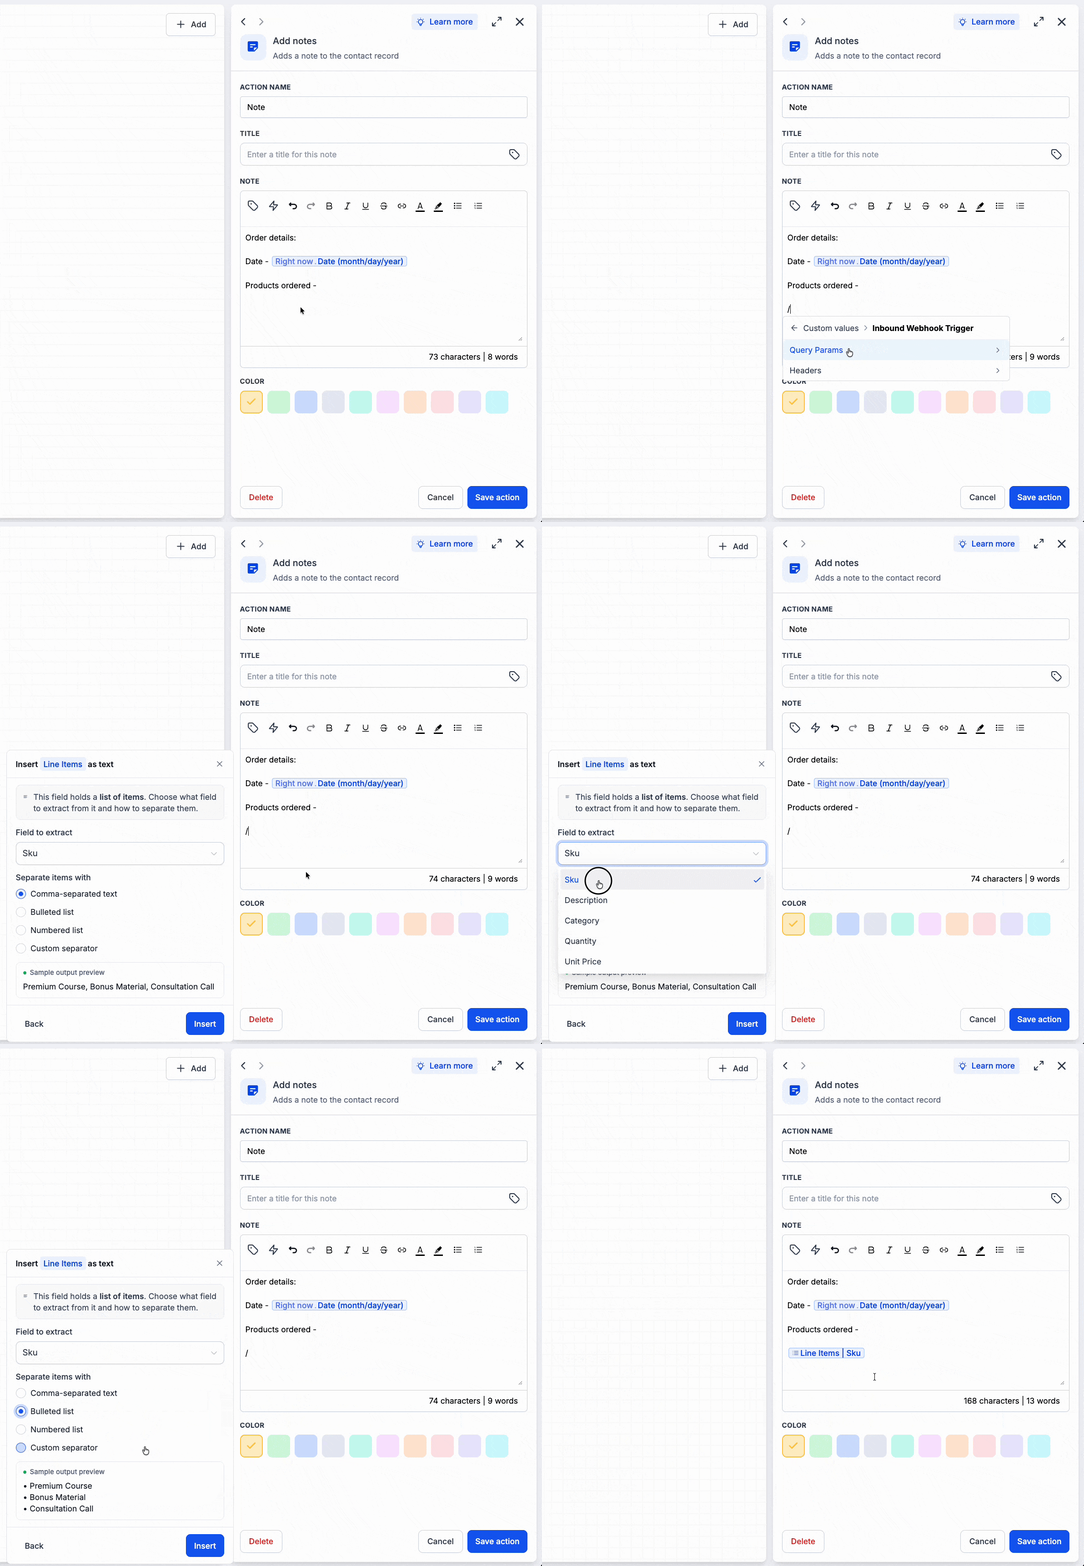
The custom value picker now recognizes list-type values, such as order line items, Inbound Webhook lists or any collections of values. Instead of inserting the raw list, it opens a small inline form where you can choose which field to extract and how the list should appear with your preferred format.
How it works
When you select a list, the picker stays inside the current text field and lets you choose a field plus a format: comma-separated, bulleted, numbered, or joined with a custom separator. That builder saves those formatting rules with the custom value and renders the latest list each time the workflow runs.
How to use it
Open the custom value picker and select a list-type value.
Choose the field to extract, the list format, and optional empty-list fallback.
Preview the result, then click Insert to add it at the cursor.
Why we built it
Previously, array and list values could not be rendered directly in text fields, which made this data difficult to use in emails, notes, and other workflow content. With this update, users can now insert list data into the text editor and choose how it should be displayed, including comma-separated, bulleted, numbered, or custom-separated formats.
Simple example
An Inbound Webhook sends a line_items list containing a sku field. Select line_items, extract sku, and choose Numbered list to insert each product SKU on its own numbered line.
Additional Notes
Text, number, date, and other single-value variables keep the existing instant-insert behavior.
List formatting appears only when the workflow detects a list-type output in the execution context.
The preview shows how the selected field and format will appear before you insert it.
Preview -